C++ is one of the most popular high-level languages that facilitates us with various functions and operations. It also provides multiple header files in which the functions are declared. These functions are very simple and efficient, making our work more convenient. There is also a function in C++ programming that helps get the character from the user or we can say it takes input from the user during the time of execution. This function is known as the “getchar()” function. By utilizing this function, we can easily get the characters from the user in our C++ code. Now, we will explore this function.
Example 1:
As we provide the header files in C++ programming, we make use of these header files in our code. To start our code, we put the header files that we require in doing this code. The “cstdio” and “iostream” are included here which are necessary for this code.
After this, we add the “namespace std” and the “main()” function. This “main()” function is also called as the driver code. Then, we have a “var” that is declared here; its data type is “char”. Then, we render a message that tells the user to enter the character. When we execute this code, the user will enter a character which takes the input only when we utilize the “getchar()” function. So, to get the character here, we initialize “var” with the “getchar()” method. It gets the user’s input and save it in “var”. After this, we move towards printing the character that we get from the user with the aid of the following “cout” statement:
Code 1:
#include <iostream>
using namespace std;
int main()
{
char var;
cout << "Please enter the character here: ";
var = getchar();
cout << "The character which is entered is " << var;
return 0;
}
Output:
Here, it shows the message for entering the character. We enter “a” and then hit “Enter”. Now, it shows the entered character on the next line:

Example 2:
We provide the header files that are needed to run this code. The header files that are included here are “cstdio” and “iostream” which are required for this code. Subsequently, the “namespace std” and “main()” functions are added. Next, “ch_1” of the “char” data type is declared here.
Next, we display a message to the user which instructs them to input the character. The user enters a character when this code is executed, and it only accepts an input when the “getchar()” method is used. Thus, we initialize “ch_1” using the “getchar()” method to obtain the character. The user’s input is gathered and stored in the “ch_1” variable. After that, we use the following “cout” statement to output the character that we received from the user.
Code 2:
#include <cstdio>
using namespace std;
int main() {
char ch_1;
cout << "Please enter the first character : " ;
ch_1 = getchar();
cout << "The first character is : " << ch_1;
return 0;
}
Output:
Here, the message that requests the character to be entered is displayed. We type “z” and press “Enter”. The typed character is now shown on the following line:

Example 3:
Here, we use a “do-while” loop that takes multiple characters from the user and print all characters. After including the header file and “namespace”, we invoke the “main()” function. Then, we initialize “ch” of the “int” data type and “i” of the same “int” data type. After this, the character’s array is initialized with the size of “50” and the “char” data type. Below this, we enter the message that we wish to display for the user which we mentioned to “Enter the character and press “Enter” to terminate the loop.
Now, we place “do-while” ahead; we first add “do” in which we place the “getchar()” method and save the characters in the “ch” variable that we get from the user with the aid of this function. Then, we store this “ch” into the “ch_str[i]” array of characters. After this, we increment the value of “i”. Below this, we add “while” in which we insert a condition that says that “ch != ‘\n’” which means that this loop works until the “Enter” key is pressed.
When the user hits “Enter”, the loop will terminate and show all the characters that a user entered. For this, we print the character array in which we stored all the characters.
Code 3:
#include <cstdio>
using namespace std;
int main()
{
int ch =0;
int i=0;
char ch_str[50];
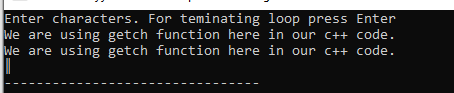
cout << "Enter characters. For terminating loop press Enter" << endl;
do
{
ch = getchar();
ch_str[i] = ch;
i++;
} while(ch!='\n');
cout << ch_str;
return 0;
}
Output:
It shows the message first. Then, we enter the characters that are stored in the character array. When we hit “Enter”, it stops getting an input from us and displays all the characters that we entered.
Example 4:
We declare “myCharacter” and “newIndex” of the “int” data type and an array of size of “100” with the name “myCharacterArray” of the “char” data type. The message that we want to show the user is typed in the following with the instructions to “Enter the characters”. The loop stops upon pressing “Enter”. Now that we have “do-while” in place, we add “do” first where we place the “getchar()” method and use this function to save the characters that we received from the user in the “myCharacter” variable.
Next, we increment the value of “newIndex” after storing this “myCharacter” in the “myCharacterArray[newIndex]” character array. The word “while” is added in the following, and a condition that states “myCharacter!= ‘\n'” indicates that the loop continues to run until the “Enter” key is pressed. The loop ends when the user presses “Enter”.
Code 4:
#include <cstdio>
using namespace std;
int main() {
int myCharacter;
int newIndex = 0;
char myCharacterArray[100];
cout << "Enter the characters. The loop stops on pressing Enter " << endl;
do {
myCharacter = getchar();
myCharacterArray[newIndex] = myCharacter;
++newIndex;
} while (myCharacter != '\n');
cout << endl << "Entered characters are : " << myCharacterArray << endl;
return 0;
}
Output:
In this output, after displaying the message, we can enter the characters that will be saved in the character array. When we press the “Enter” key, the system stops accepting an input from us and shows every character that we type in the next line.

Example 5:
Here, we print the “ASCII” values of the character that we get from the user by utilizing the “getchar()” method. We first declare an integer variable named “charASCIIvalue” and then print the “Input character”. Below this, we place a “do” and utilize the getchar()” method which gets the characters from the user and stores them in the “charASCIIvalue” variable whose data type is an integer. So, it stores the “ASCII” values of all characters that are entered here.
After this, we simply perform a casting to print the character as well as the ASCII values of all those characters. Below it, we place “while()” in which the condition says that the loop works until the “ASCII” value is “10” which is the ASCII value of “Enter”. So, when the user presses “ENTER”, the loop stops.
Code 5:
#include <cstdio>
using namespace std;
int main() {
int charASCIIvalue;
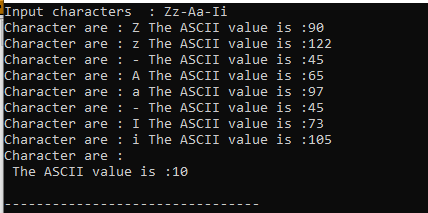
cout << "Input characters: ";
do {
charASCIIvalue = getchar();
cout << "Character are :" << char(charASCIIvalue) << " The ASCII value is :" << charASCIIvalue << endl;
} while (charASCIIvalue != 10);
return 0;
}
Output:
The inputs are the characters that we type here. When we hit “Enter”, it shows the characters as well as the ASCII values of all these characters. We can enter these characters here because we utilized the “getchar()” method in our previous code.
Conclusion
The concept of using the “getchar()” function to get the input character from the user in our C++ code is thoroughly explored here in which we learned how to get a single character and print it as well as how to get multiple characters and store them in the character’s array and then print them. We also took the character input with the help of the “getchar()” method and then displayed their ASCII values.