Example 1:
Let’s begin our first C++ code here. Whenever we need to type the C++ code, we must add the header files to it. The first header file that we include is the “<iostream>”, the input\output stream. The next header file is the “<cstring>” that is included here since the instructions to work with various types of strings in C++ can be found in this header file. After this, we have the “<string>” header file which specifies numerous functions, one macro, and one variable type that can work with a character string or array.
Now, we have the “namespace std”. Below this, we have the “main()” from where our actual code starts. Now, we move ahead and create the “str_1” string and place “string” before this since it is the data type of “str_1”. We initialize this string variable with “Here is my string”. Then, we create a character array with the “ch” name and use the “length()” function here. Its size is one greater than the “str_1” size since we have to utilize the “.c_str()” function in which one additional pointer is stored at the end.
Below this, we place the “strcpy()” function which aids in copying the “str_1” values into the “char_1” which we previously created. The “.c_str” method is inserted in it so that it may transform the string into an array of characters. After this, we simply utilize the “cout” statement which is for printing. Then, we print both the “str_1” and “char_1” here.
Code 1:
#include<cstring>
#include<string>
using namespace std;
int main() {
string str_1 = "Here is my string ";
char * char_1 = new char[str_1.length() + 1];
strcpy(char_1, str_1.c_str());
cout << "The value of the original string : " << str_1 << endl;
cout << "The value of the string in an array : " << char_1 <<endl;
return 0;
}
Output:
This output shows that the string that we created in our code is copied to the character array and displayed here.
Example 2:
In this case, the input/output stream or “<iostream>” is the first header file that we add. The following header file is called “<cstring>” and it is put here because it contains instructions on how to work with different kinds of strings in C++. The “<string>” header file follows which contains several functions, a single macro, and a single variable type that can be used to manipulate a character string or array.
Below this is the “namespace std”. Then, there is the “main()” which is the beginning point of our code since it is the driver’s code. We create a “new_str” string in this “main()” function and pass the string here. Then, using the “length()” method, we construct a character array called “new_ch”. Its size is one more than the “new_str” size because we also need to use the “.c_str()” function. Then, we mention the “strcpy()” function which helps with copying the “str_1” values into the “char_1” that we constructed previously.
In this, we use the “.c_str” method so it converts the string into the character’s array. After this, we have a “char *” which is the character pointer here with the “new_p” name and utilize the “strtok()” method here. When transforming a string through a delimiter, the strtok() method is utilized. The strtok() function divides str[] using the supplied delimiters. The “string. h” contains this “strtok()” method. After this, we add “delete[]” which aids in deleting the storage allotted for array objects that are formed with new[]. Then, we add “return 0”.
Code 2:
#include <cstring>
#include <string>
using namespace std;
int main ()
{
string new_str ("We divide the complete sentence into words here ");
char * new_ch = new char [new_str.length()+1];
strcpy (new_ch, new_str.c_str());
char * new_p = strtoks (new_ch," ");
while (new_p!=0)
{
cout << new_p << endl;
new_p = strtok(NULL," ");
}
delete[] new_ch;
return 0;
}
Output:
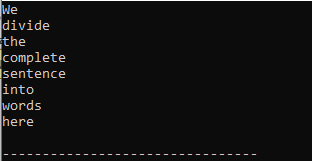
This result demonstrates how the string that we generated in our code was transferred to the character array and displayed each word on a single line.
Example 3:
In this code, we add one more header file which is “bits/stdc++.h” along with the “iostream” and “string” header files since “bits/stdc++.h” contains all the standard libraries of C++ programming. After this, the “namespace std” is added and then the “main()” function. The “firstString” is the string variable here and we initialize it with “String in C++”. After this, we have an “if” condition in which it verifies whether the string’s size matches the character pointer’s size provided by “.c_str”. If the condition is satisfied, the “cout” line after this is implemented. Otherwise, the line after “else” is implemented. Below this, we also print the string which we previously declared.
Code 3:
#include <bits/stdc++.h>
#include <string>
using namespace std;
int main()
{
string firstString = "String in C++";
if (firstString.size() == strlen(firstString.c_str())) {
cout << "The size of the string is equal to the string length " << endl;
}
else {
cout << "The size of the string is equal to the string length " << endl;
}
printf("%s \n ", firstString.c_str());
}
Output:
Here, the first statement is printed which means that the string’s size matches the character pointer’s size, and the string is also printed.
Example 4:
We place the header files here and then the “namespace std”. After this, we add the “main()”. Below this, we declare the “myString” string with “Programming”. We utilize the “for” loop here which prints the characters in our string. We utilize the “.c_str()” method inside the “cout” statement which transforms the string into the character array and print all the characters.
Code 4:
#include <string>
using namespace std;
int main()
{
string myString = "Programming";
for (int a = 0; a < myString.length(); a++) {
cout << "The " << a + 1 << " character of our string " << myString
<< " is " << myString.c_str()[a] << endl;
}
}
Output:
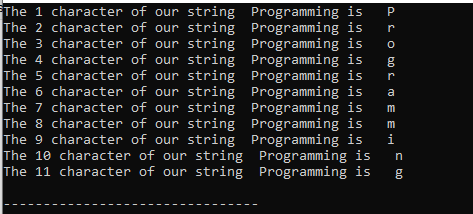
We might notice in this output that a string is copied and converted into a character array and each character of that string is displayed on the new line.
Example 5:
Now, we move towards the last example of this article in which we add two header files: the “namespace std” and the “main()” function. The variable that is used to declare the string here is “newString_1”; we type it as a string here. After this, we declare another string variable with the name “newCharStr” where we utilize the “.c_str()” method with the “newString_1” variable which transforms the string into a character array and then save it in “newCharStr” variable.
After this, we have the “for” loop inside in which we add the “cout” which aids in printing the character of the strings in new lines. Then, we add another “cout” which is used to print the whole string which we convert into the character array.
Code 5:
#include <string>
using namespace std;
int main()
{
string newString_1 = "Programming is FUN!";
string myCharStr = newString_1 .c_str();
for(int a =0; a< myCharStr.length(); a++)
{
cout<<" My string character is "<<newString_1[a] << endl;
}
cout<<" My complete string is " <<myCharStr << endl;
return 0;
}
Output:
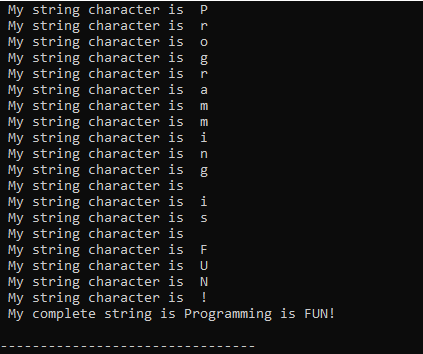
This result demonstrates how a string can be transformed into a character array. Then, each character from the string is shown on a separate line. Also, it prints the complete string that we stored as the array of characters.
Conclusion
The “.c_str()” function is described here in deep detail. Here, we studied how to utilize this “.c_str()” function in our C++ programming and how it transforms a string into a character’s array. We explored five examples in which we utilized this “.c_str()” function and showed the result that we get after using this function in our codes.


