On the other hand, in vectors, when an element is added or removed, a vector’s capacity to resize itself is activated and the container takes care of its storage automatically. So, an array of vectors is defined as a two-dimensional array with a fixed row’s numbers and a varying length vector in every row. Iterators can retrieve and traverse the vectors that are stored at each array index. Now, let’s implement this concept in our C++ code and check the working of the array of vectors.
Example 1:
Here is the practical demonstration of C++ code in which we create an “Array of vectors”. To start our C++ code, we just need to insert the header files required during code execution. The first header file that we insert here is the “<iostream>”. We must type the “#include” keyword with the header files. We have two header files in this code. The first header file is required to input or output the data. The second header file that we include here is the “<vector>” header file. This offers the functions that we can utilize to perform the operations on our vectors.
After this, the “std” namespace is added and we have a driver code. The “main()” function is our driver code since our code starts from here. This “main()” function contains a “no” variable and the data type of this variable is “int”. “No” is initialized with “4”. Below this, we declare an array of vectors with the “vec” name with the “int” of the “no” and initialize this “no” on the previous line. So, this “no” means “4” and it is the size of an array of vectors.
After this, we utilize the “push_back()” method which aids in inserting the values in the array of vectors. We type “vec[0].push_back(20)” which means that it inserts “20” at index “0”. It inserts “20, 21, 22, 23, 24, and 25” at index “0” of the vector. After this, we insert the values at index “1” or we can say that we insert the values on the second row. In the same way, we insert all the values that we want to insert in the array of vectors here.
After this, we printe a line using the “cout” statement. Then, we print every value that we previously inserted in our array of vectors, so we use two loops here. The inner loop iterates for the number of values in each vector, while the outside loop counts the number of rows to execute “no” times. After this, we utilize the “cout” again to print our results.
Code 1:
#include<vector>
using namespace std;
int main() {
int no =4;
vector<int> vec[no];
vec[0].push_back(20);
vec[0].push_back(21);
vec[0].push_back(22);
vec[0].push_back(23);
vec[0].push_back(23);
vec[0].push_back(25);
vec[1].push_back(30);
vec[1].push_back(31);
vec[1].push_back(32);
vec[1].push_back(33);
vec[1].push_back(34);
vec[2].push_back(40);
vec[2].push_back(41);
vec[2].push_back(42);
vec[2].push_back(43);
vec[3].push_back(50);
vec[3].push_back(51);
vec[3].push_back(52);
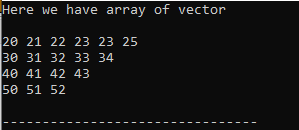
cout<< "Here we have array of vector " << endl << endl;
for(int a=0;a<no;a++){
for(int b=0;b<vec[a].size();b++){
cout<<vec[a][b]<<" ";
}
cout<< endl;
}
return 0;
}
Output:
In this output, all the values are displayed as we inserted in our previous code. We might notice that the length of each vector’s row varies. It is adjusted according to the values that are added in the code.
Example 2:
In this code, we declare the array of vectors before the “main()” which means that we declare it globally after including the header files. The array of vector is named “my_vec” with the size of “6” of the “int” data type. Then, we create a function with the name “elementInArrayOfVectors” and create this function to insert the values in our array of vectors using two loops. We insert the values at every “n_1” row by utilizing the “push_back()” method.
After this function, we create another function that aids in printing the values that are added in the previous function. This function is named “printValues”. Now, in this function, we add a loop for traversing “vec” to display the values that we stored in it. After this loop, we have another loop to display the value at each column.
Here, we utilize two functions: “begin()” and “end()”. The “begin()” function is utilized to start the iterator, and the “end()” function aids in ending the iterator. After this, we use “cout” and place “*it” there. This “it” is utilized to get the values at which the iterator points. Now, we have another function named “vectorsArray” to illustrate an array of vectors. In this function, we call both functions that we previously created. After this, we place the driver code and call the “vectorsArray” inside this “main()” function.
Code 2:
#include <vector>
using namespace std;
vector<int> my_vec[6];
void elementInArrayOfVectors()
{
for (int n_1 = 0; n_1 <= 6; n_1++) {
for (int n_2 = n_1 + 1; n_2 <= 6; n_2++) {
my_vec[n_1].push_back(n_2);
}
}
}
void printValues()
{
for (int n_1 = 0; n_1 <= 6; n_1++) {
cout << "Values present on index "
<< n_1 << ": ";
for (auto it = my_vec[n_1].begin();
it != my_vec[n_1].end(); it++) {
cout << *it << ' ';
}
cout << endl;
}
}
void vectorsArray()
{
elementInArrayOfVectors();
printValues();
}
int main()
{
vectorsArray();
return 0;
}
Output:
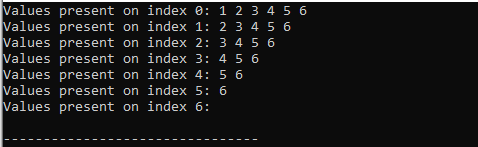
In this output, it is possible to observe the variations in the row length of each vector. It is modified following the values that we added to our code. All of the values that we inserted into the code are shown in this outcome.
Example 3:
In this code, we take the size of the array of vectors and the values from the user. In the “main()” function, we declare an integer variable which is “number” and then printe a message to the user that says to enter the number of vectors. After this, we place a “cin” statement that gets the number from the user and store it in the “number” variable. Now, we declare an array of vectors and adjust its size according to the number that the user inputs.
After this, we place a loop that displays the message to the user to “Enter the number of values in a vector”. When the user enters the value, it is stored in the “number_2” variable which we declared here. Then, we have another loop that takes the values that are inputted by the user and inserts them in an array of vectors by utilizing the “push_back()”. After this, we print the values by utilizing the “size()” method first. Then, we print the values by utilizing the iterator method.
Code 3:
#include <vector>
using namespace std;
int main()
{
int number;
cout<<"Please enter how many vectors you want to add in the array: ";
cin>>number;
vector<int> vtr [number];
for (int i=0; i<number; i++){
cout<<"Please Enter number of values in vector "<<i+1<<" : ";
int number_2;
cin>>number_2;
cout<<"Now Enter Values into vector "<<i+1<<" : ";
for (int j=0; j<number_2; j++){
int tmpry;
cin>>tmpry;
vtr[i].push_back(tmpry);
}
}
cout<<"Here we are utilizing the size() method "<<endl;
cout<<"Valuess are : "<<endl;
for(int i=0; i<number; i++){
cout<<"Vector "<<i+1<<" : ";
int size = vtr[i].size();
for(int j=0; j<size; j++)
cout<<vtr[i][j]<<" ";
cout<<endl;
}
cout<<"Now we are utilizing the insertion method "<<endl;
for(int i=0; i<number; i++){
cout<<"Vector "<<i+1<<" : ";
for(auto it = vtr[i].begin();it != vtr[i].end(); it++)
cout << *it << ' ';
cout<<endl;
}
return 0;
}
Output:
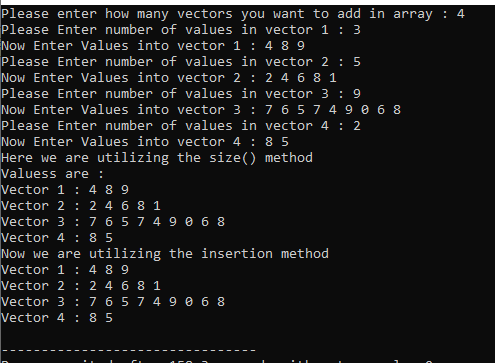
When we compile and run this code, it shows the given message on the terminal and we have to enter the number of vectors here.

After inputting the number of vectors, we have to hit “Enter” and the message appears there. We have to input the number of values that we want to enter in our vector 1.

When we enter that number, it displays a message to enter the values into the vector. Since we entered “3”, it means that we want to enter “3” values in our vector 1. So, here in this line, we must enter “3” values of our choice and hit “Enter”.

After inserting the values and pressing “Enter”, the same step is repeated until the number of the array of vectors is completed.

Now, the final output is here. After inserting the values, we get the following code result:
Conclusion
This tutorial is all about the array of vectors in C++ programming. We explored that in an array of vectors, the row size may change according to the values that we entered in it, but the number of rows remains unchanged in an array of vectors. We provided multiple examples where we input the data in our code and got the input from the user in an array of vectors. We implemented two methods, “size()” and “insertion”, to print the values of an array of vectors.