PowerShell comprises a set of cmdlets, functions, modules, aliases, and variables to serve multiple purposes. If we talk about the Exchange PowerShell module (EXO V2), it helps the user to connect to Exchange Online from Windows PowerShell.
This post will present a brief guide on how to connect to exchange online using PowerShell. So let’s begin!
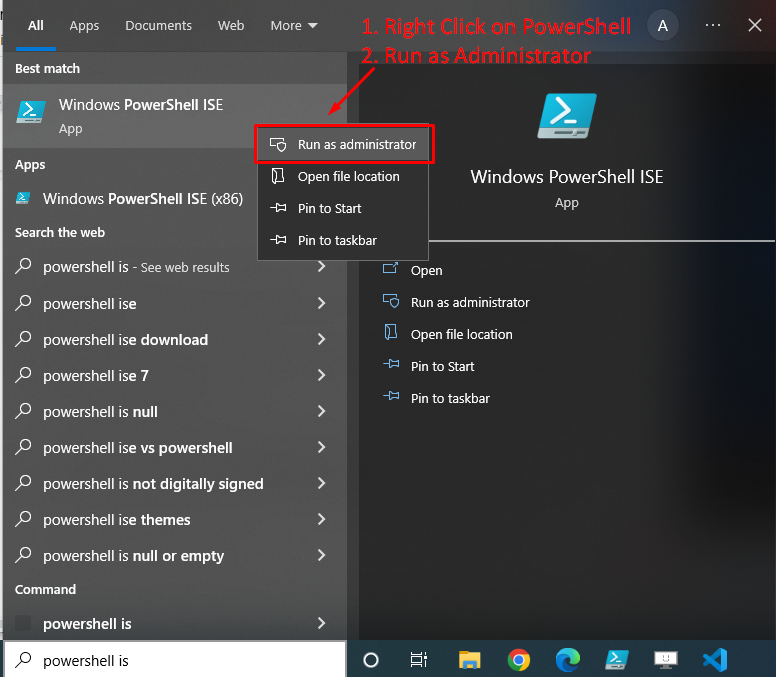
Run Powershell as Admin
Firstly, you have to run PowerShell as an administrator as shown in the below snippet:
How to Install Exchange module
Next, you have to install the exchange online module, to do that type the below-given command:
When you run the above-mentioned command following window will appear:
Press the “Yes” button to install and import the NuGet provider.
How to Check Execution Policy
Before proceeding further, first, check the execution policy using the below-given command:
If you get the output something like this:
Then you have to change the execution policy from restricted to “RemoteSigned”. To do that, type the below-given command:
Now, you can proceed further.
How to Import Management module
You can connect to the exchange without importing the management module however, Microsoft recommends importing it. Now, to import the management module run the following command:
The above command will import the module, and after that, you have to connect with the exchange online.
How to connect to exchange online using PowerShell
Exchange Online can be connected from the browsers or from the smartphones. Microsoft recommends using version 2 (EXO V2) because version 1 has become outdated. Type the below-given command to bind to the exchange online:
Here, the user principal name also known by the initialism UPN represents the user name of the person who is going to connect to the exchange online.
How to get user principal name (UPN)
There are two methods to find the UPN i.e. you can go to the office 365 portal or you can go to the Azure portal.
Method 1: Use the Office 365 portal
Sign in to the Office 365 portal as a global admin > Go to the user’s management page > Find and then select the user > Note the user name, which is the UPN
Method 2: Use the Azure portal
Sign in to the Azure portal as a global admin > Select the Active Directory extension, and then select your directory > Go to the user’s management page > Find and then select the user > Note the user name, which is the UPN.
Once you get the UPN, follow the below syntax to connect to the exchange online PowerShell:
How to test the connection
Run the below-given command to test your connection:
If you are connected to the exchange online then it will show you the complete information about your connection else it will show you an error:
If you get the output something like this, it means you have successfully connected to the exchange online PowerShell.
Conclusion
Run PowerShell as admin > Install Exchange module > Import Management module > Run “Connect-ExchangeOnline -UserPrincipalName | type UPN here” command in PowerShell to connect to exchange online PowerShell. Run the “Get-EXOMailbox” command to test the connection. This write-up demonstrated a complete guide on how to connect/bind to the exchange online with PowerShell.


