What will we cover?
In this tutorial, we will learn:
- How does Netplan work?
- Netplan commands
- How to use Netplan for configuring: a) Single Static IP b) Multiple Static IP c) Multiple Static IP with Multiple Gateways.
Prerequisites
1. Ubuntu 20.04 system.
2. ‘Sudo’ access and knowledge of Ubuntu networking.
How does Netplan work?
Netplan fetches the network configuration information from a .yaml file (YAML format) . This file can reside inside the following netplan directories:
1. /etc/netplan/
2. /lib/netplan/
3. /run/netplan/
At the initial boot phase, Netplan creates backend config files inside the ‘/run’ directory and transfers control of devices to one of the supported network services/daemon: NetworkManger or Systemd-networkd.
Netplan Commands
Three commands are used in conjunction with Netplan:
netplan generate: This will generate a configuration for renderers or backends using the /etc/netplan.
netplan apply: It is used to apply all the configurations for the renderers.
netplan try: Apply a configuration, then wait for the user to confirm.
Getting started with Netplan
A basic Netplan configuration can be written as::
# we have used NetworkManager as a renderer in this e.g.
network:
version: 2
renderer: NetworkManager
Netplan reads the above configuration when a system boots and generates a file as ‘/run/NetworkManager/conf.d/10-globally-managed-devices.conf’. The system will be informed that all the network configuration and device management tasks will be handled by NetworkManger. There are currently two backends: NetworkManager and systemd-networkd. Only one can be supported at a time. The default renderer is ‘systemd-networkd’.
Configuring a Static IP address using Netplan
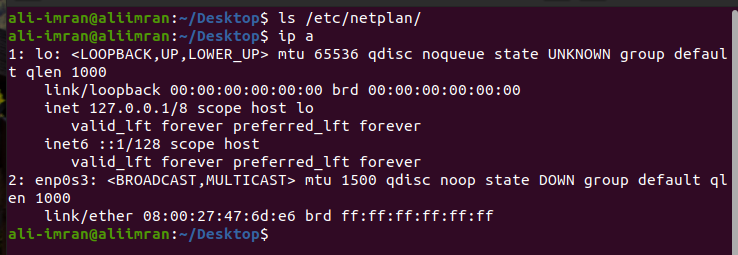
The configuration file for Netplan(.yaml) is stored in the directory ‘/etc/netplan’. In our case, there is no config file in this directory, and no IP is assigned to the interface ‘enp0s3’:
Let’s get started now to assign a static IP on this interface. Before we dive into this tutorial, you must read the below important note:
IMPORTANT NOTE: You should first check if the below configurations works by running the command:
In this way, we can roll back our changes in the config file after a specific timeout. The following screen will appear to confirm if you want to keep changes or revert back to the configuration.
1. Setting a Single Static IP
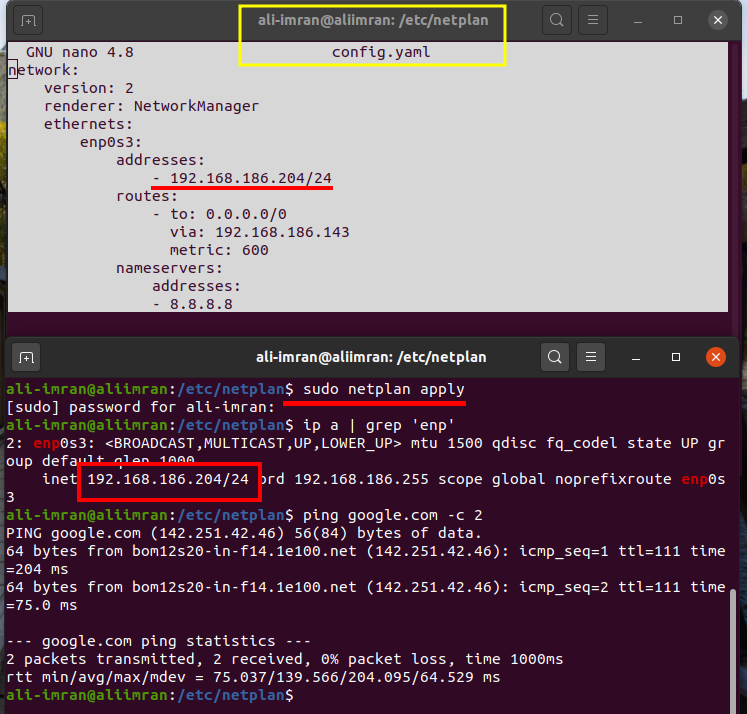
For setting a single static IP for a system using Netplan, create a new configuration file as ‘/etc/netplan/config.yaml’. Let us modify the interface enp0s3 with the following details:
Gateway: default
subnet prefix: /24
Now create or open the configuration file in the directory ‘/etc/netplan/’ with the command:
Now put the following contents in this .yaml file:
version: 2
renderer: NetworkManager
ethernets:
enp0s3:
addresses:
- 192.168.186.204/24
routes:
- to: 0.0.0.0/0
via: 192.168.186.143
metric: 600
nameservers:
addresses:
- 8.8.8.8
To apply the above configuration, use the command:
Now check the IP with the ‘ip’ command:
2. Setting Multiple Static IP addresses
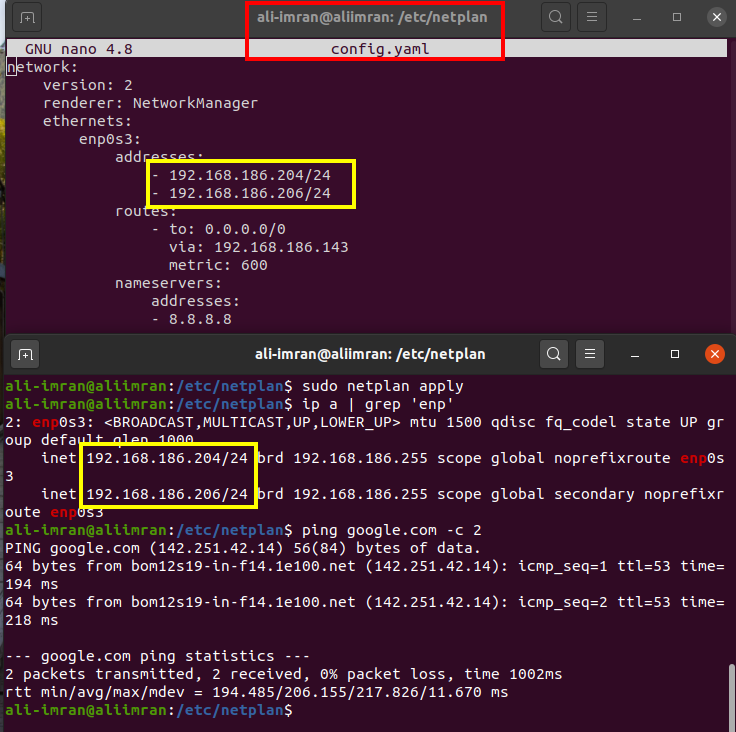
In case we need to set multiple static IP on the above interface ‘enp0s3’, just add another address to the addresses key as shown below:
version: 2
renderer: NetworkManager
ethernets:
enp0s3:
addresses:
- 192.168.186.204/24
- 192.168.186.206/24
routes:
- to: 0.0.0.0/0
via: 192.168.186.143
metric: 600
nameservers:
addresses:
- 8.8.8.8
To apply the above configuration, use the command:
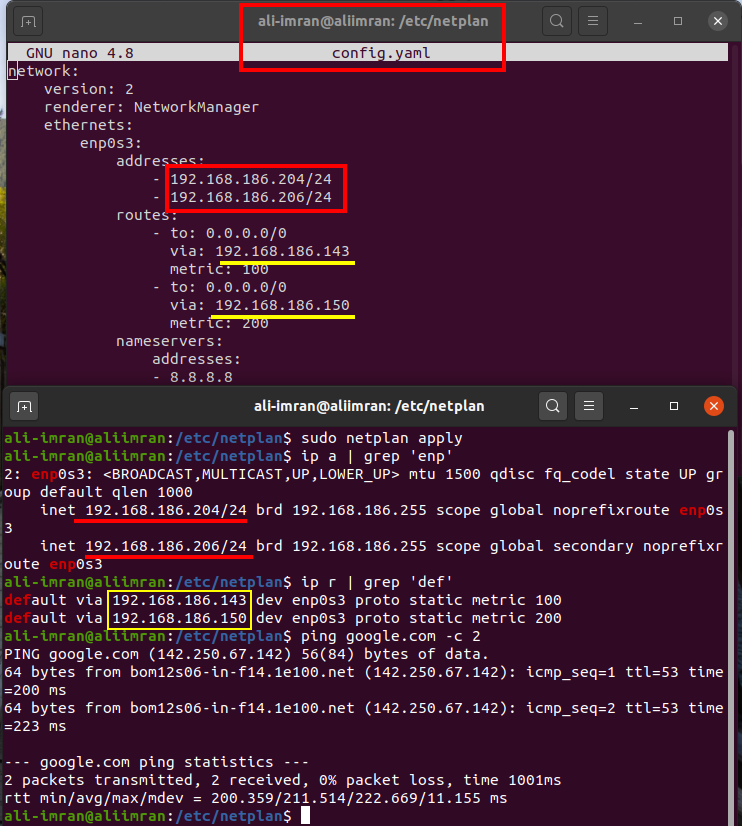
3. Setting Multiple Static IP addresses with Multiple Gateways
version: 2
renderer: NetworkManager
ethernets:
enp0s3:
addresses:
- 192.168.186.204/24
- 192.168.186.206/24
routes:
- to: 0.0.0.0/0
via: 192.168.186.143
metric: 600
- to: 0.0.0.0/0
via: 192.168.186.150
metric: 100
nameservers:
addresses:
- 8.8.8.8
To apply the above configuration, use the command:
In all the above configurations, we have used NetworkManager as renderer; you can switch to networkd by changing the renderer from NetworkManager to networkd. A sample version of config.yaml, in this case, will be as:
version: 2
renderer: networkd
Note: Since we have to configure Netplan using YAML, indentation (number of spaces) should be used properly. Otherwise, YAML will cause indentation errors like the one below:
Wrapping Up
In this guide, we have learned to set static IP using Netplan. Netplan config file is very space-sensitive as it uses the YAML format. Managing networking with Netplan is quite straightforward. You will not find it tough to master once you get used to it.


