- Create a launch template
- Create an auto-scaling group from the launch template
- Test auto-scaling group
- Delete auto-scaling group
Create a launch template
Launch template is a kind of structure of the EC2 instances that includes all the instances’ details and parameters. All the instances in the auto-scaling group are launched using either the launch template or the launch configuration. Launch templates are newer to AWS than launch configuration and have more options to customize the EC2 instance configuration. That is why, in this blog, the launch template will be used to create an auto-scaling group.
In order to create a launch template, first, log into the management console and select the region where all the infrastructure will be deployed. From the top right corner of the management console, click on the region button and select the appropriate region. For this blog, we will deploy our infrastructure in the us-east-1 (N. Virginia) region.

Now search for the EC2 service from the management console.

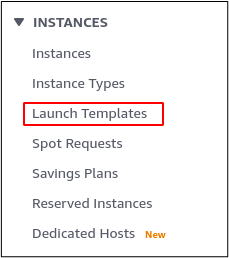
From the left side panel, go to the Launch Templates under the Instances section.

Click on the Create launch template button to create a new launch template, and it will open a form asking for different parameters for the launch template.

Enter the Launch template name under the Launch template name and description section.

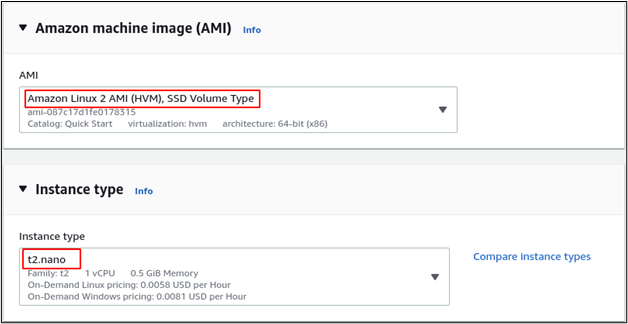
Select the AMI under the Amazon machine image and the Instance type under the Instance type section.
Select the specific Key pair you want to use while logging into your server over SSH. If you do not have any key, create one by clicking on the Create new key pair.

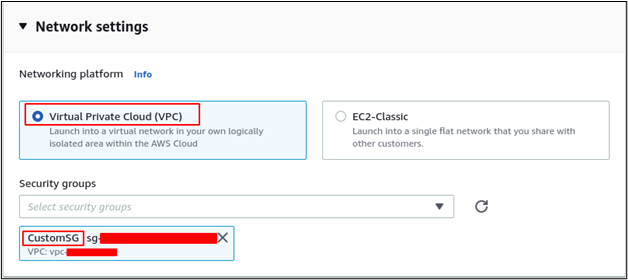
Under the Network settings, select the Networking platform and security groups.
Leave the rest of the parameters default and click on the create launch template button to create the launch template.
Create an auto-scaling group from the launch template
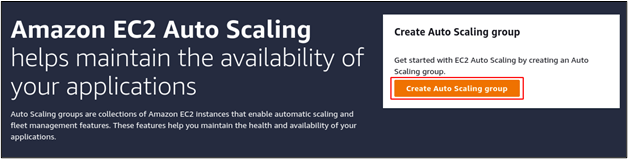
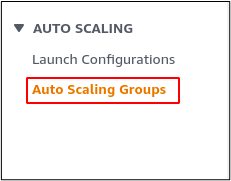
After creating the launch template, now create the auto-scaling group from the launch template. From the left side panel, click on the Auto Scaling Groups under the Auto Scaling section.

Click on the Create Auto Scaling group to create a new auto-scaling group.
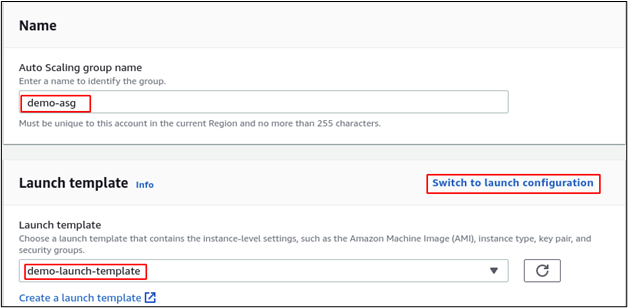
Enter the name of the auto-scaling group and select the launch template created in the previous step. You can also switch to launch configuration instead of launch template by clicking on the Switch to launch configuration, but we will stick to the launch template for this blog.
Click on the Next button after entering the above details, and it will ask for the instant purchase option and network details. Select the Adhere to launch template as an instant purchase option.

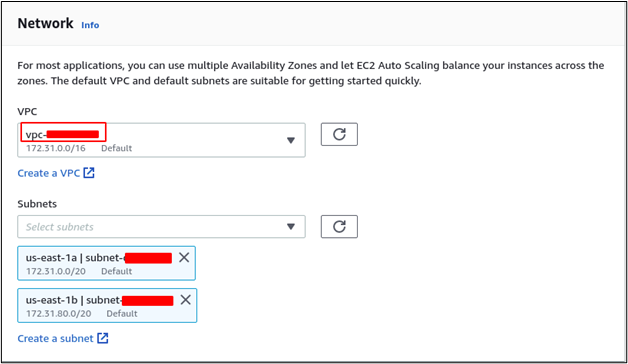
For the network, select the VPC and subnets you want to deploy instances in. For this blog, we will use default VPC and two subnets. You can select as many subnets as you want.
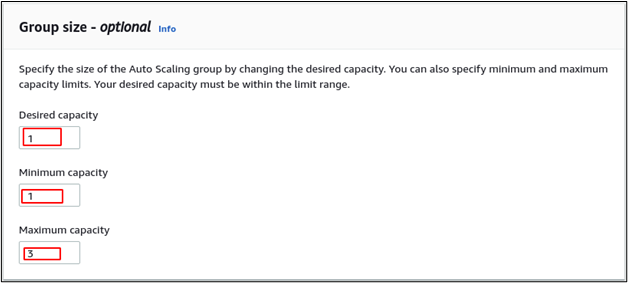
After entering the network details, click on the Next button, and it will ask for the advanced options. Click on the Next button without entering or selecting any parameter, and it will ask for group size and scaling policy. Auto scaling group size defines the maximum and the minimum number of instances to be launched in an auto-scaling group and can also be used to maintain a constant number of instances on AWS. Enter the same number for Desired capacity, Minimum capacity, and Maximum capacity to maintain a constant number of instances in the auto-scaling group.
For this demo, enter the 1 instance as Desired capacity and Minimum capacity and 3 instances as Maximum capacity.
A scaling policy is a set of configurations that decides when to launch or terminate the instances in the auto-scaling group. Scaling policy tracks a target defined using the Metric type and Target value while configuring the scaling policy. Following are the metric types provided by AWS.
- Average CPU utilization
- Average network in (bytes)
- Average network out (bytes)
- Application load balancer request count per target
Auto scaling group monitors the selected metric type of all the instances, and whenever the average target value of the selected metric type goes above the threshold, the auto-scaling group launches more instances to handle the load.
For this demo, select Target tracking scaling policy, enter the Scaling policy name, select Average CPU utilization as Metric type, and 10 as Target value.
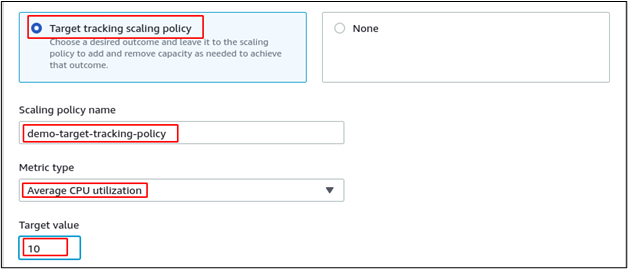
The above configuration will maintain a minimum of 1 instance running. Whenever the instance dies, the auto-scaling group will automatically launch a new instance. Also, when the load on the instance reaches more than 10%, the auto-scaling group will automatically launch a new instance. The auto-scaling group will not launch more than 3 instances at a time even if the load is more than 10% on all the instances as we have specified a maximum number of 3 instances.
Now click on the Skip to review button to skip the remaining steps and click on the Create auto scaling group button at the end of the page after reviewing the configuration to create the auto scaling group.
Test auto scaling group
After creating the auto scaling group, it will launch one EC2 instance as we have specified the desired capacity to be one EC2 instance. The auto scaling group can be tested by either terminating the instance or increasing the CPU utilization of the instance.
First, we will test the auto scaling group by terminating the EC2 instance. From the left side, the panel selects the Instances under the INSTANCES section.

Select the instance launched by the auto scaling group and click on the Instance state button on the top right corner. It will open a list, click on the Terminate instance to terminate the instance manually.

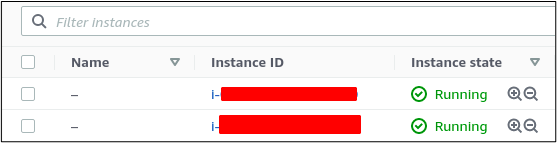
After 3 minutes of terminating the instance, the auto-scaling group will launch a new instance.

Another way to test the auto scaling group is to increase the load on the EC2 instance, as we have configured the CPU utilization as a metric of the scaling policy. Whenever the load on the CPU goes above 10%, the auto-scaling group will launch another EC2 instance. For this purpose, SSH into the EC2 instance and run an infinite loop.
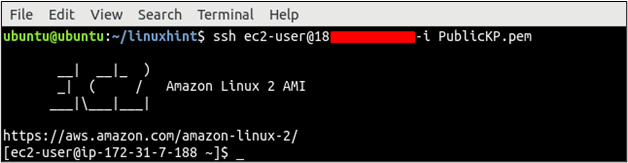
On the terminal, run the following command.
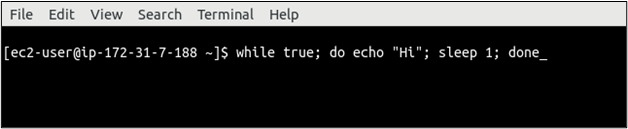
It will run an infinite loop, and the CPU utilization will reach a maximum that will trigger the auto-scaling group to launch another instance. Go to the instances section to see the instances.
Delete auto scaling group
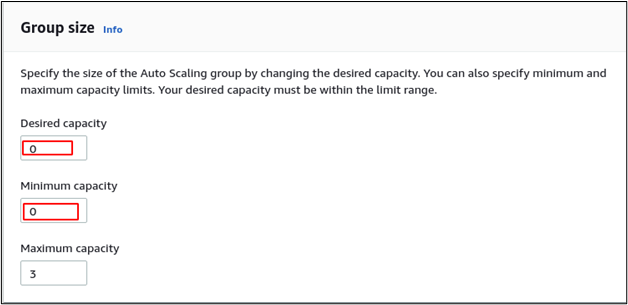
This section will discuss how we can delete the auto scaling group on AWS, as whenever an instance is deleted, the auto scaling group will create another instance to maintain a specific number of instances. In order to delete the auto-scaling group, first edit the desired capacity and a minimum number of instances to 0. Select the Auto Scaling Groups from the EC2 console.
Select the auto scaling group and click on the Edit button.
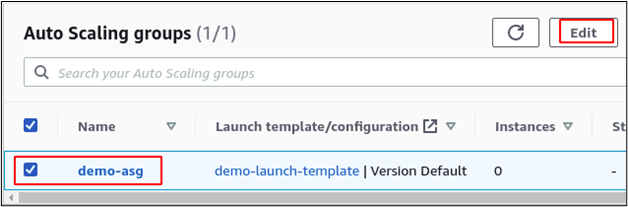
Set the desired capacity and the minimum capacity to 0 and click on the Update button at the end of the page.
It will automatically terminate all the instances launched by the auto scaling group to maintain the size of the group. Go to the instances section to see all the instances available.

Both the instances are terminated, and now the auto-scaling group can be deleted. From the auto scaling group section, select the auto scaling group and click on the Delete button.
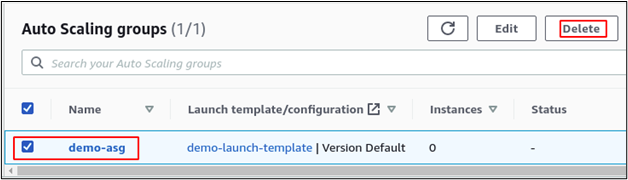
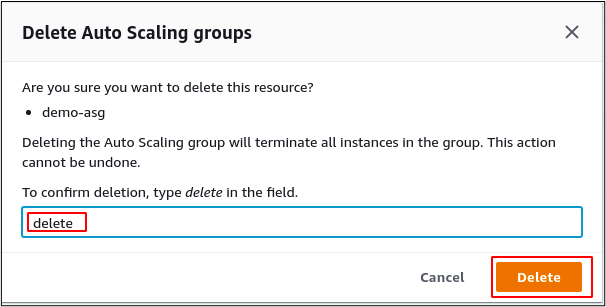
Now it will ask for your confirmation to delete the auto scaling group. Enter delete in the input bar and click on the Delete button to delete the auto scaling group.
After deleting the auto scaling group, go to the launch template section to delete the launch template.
Select the launch template and click on the Actions button. It will display a list of different options. Select the Delete template option from the list.

Now it will ask for confirmation before deleting the launch template. Enter delete in the input bar and click on the Delete button to delete the launch template.

Conclusion
Auto scaling group is the feature provided by AWS to create a highly available and scalable infrastructure on AWS cloud. Auto scaling group uses launch template or launch configuration to launch instances to scale the infrastructure on AWS. Launch template includes all the configurations required to launch new instances in the group. Auto scaling group provides different types of target tracking policies used to launch and terminate instances in the group. This guide provides a step-by-step procedure to create, manage and delete an auto-scaling group on AWS.