Moreover, Linux being open-source has allowed there to be much fewer vulnerabilities, bugs and threats to look out for. However, what if we could even improve it more? We’ll be looking at some of these steps today that will surely let you have a smoother and faster Ubuntu system.
[adthrive-in-post-video-player video-id=”cPkEJfiU” upload-date=”2020-04-30T17:40:39.000Z” name=”Cleaning and Speeding Up Linux” description=”Cleaning and Speeding Up Linux” player-type=”collapse” override-embed=”true”]
Step 1: Keeping your Ubuntu updated
One of the most important things to a speed up is to have the latest Ubuntu version installed. This is because Canonical, the developers of Ubuntu, continually release new updates for Ubuntu which are designed to fix common bugs as well as improve the overall system performance and efficiency. With the latest update, Ubuntu will have most of the issues in the old version sorted out and will be able to run much more smoothly. To have the latest Ubuntu updates, first open the terminal through either Ubuntu Dash or Ctrl+Alt+T shortcut and enter the following command:
Moreover, to check for any major upgrades available, run the following command:
It is always important to back up your files before proceeding with this task.
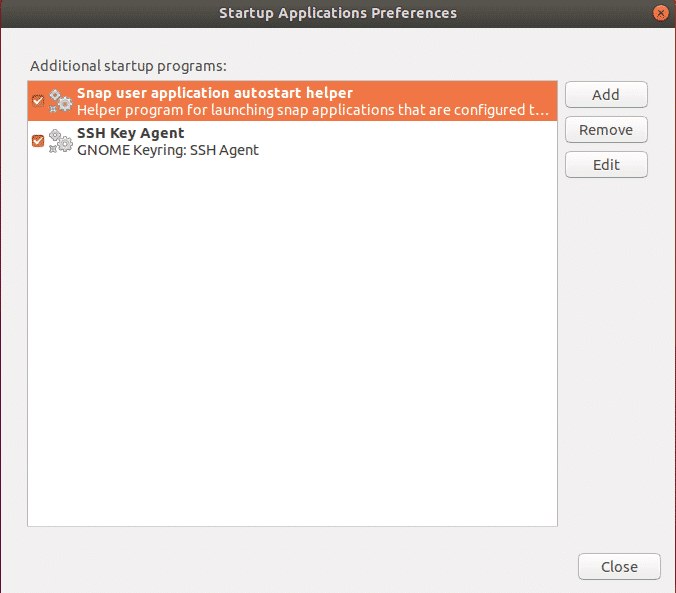
Step 2: Managing Startup Applications
Linux uses your system memory as sparingly as possible. However, over time, as you install more and more applications, your system can slow down due to a huge number of these applications starting and taking huge resources as soon as your system boots up. In Ubuntu, handling these startup applications is very easy.
Go to the Ubuntu Dash and search for Startup Applications. Over here you’ll have the options to Add, Remove and Edit as you like. Click on any option that seems unnecessary to load every time you boot up. If you’re unsure, you can simply remove the check mark next to the option instead of removing it. Please see the image below for a better understanding:
Step 3: Setting the best Mirrors for Software Updates
To get faster updates from Ubuntu Center, it is always required to use the best server. Since Ubuntu software repositories are mirrored across the world, the best server is usually the one closest to your location. To select this option, go to Ubuntu Dash and search for Software and Update. Next click on the Ubuntu Software tab, then click on the drop down option on Download from and choose Other.
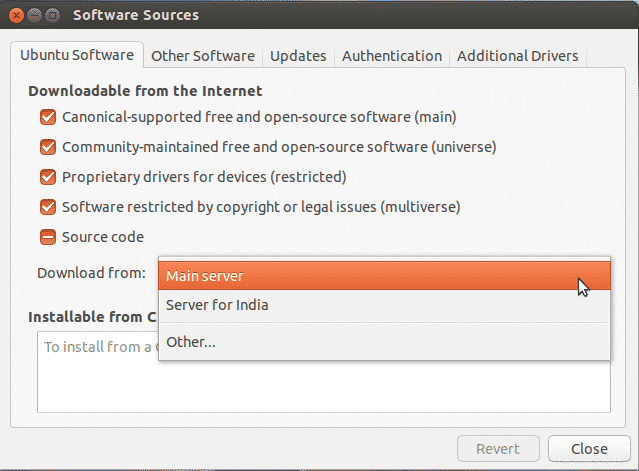
Now click on Select the Best Server.
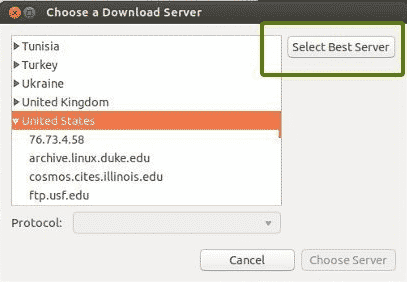
Now this will start a test to find out which is the server closest to you so that it updates the files much faster.
Step 4: Enabling Proprietary Drivers
One of the best things about Ubuntu is that it itself identifies and installs the drivers that are needed on your system. It is to be noted that there are two types of drivers available: open source ones and the proprietary ones. By default, Ubuntu installs the open source drivers and in some cases, that causes problems. This is where Ubuntu excels as it is aware of these issues and allows you to install additional proprietary drivers. To set this up, go to Ubuntu Dash and search for Software and Update. Next click on the Additional Drivers tab and from here, you will be able to see all the devices for which drivers can be installed.
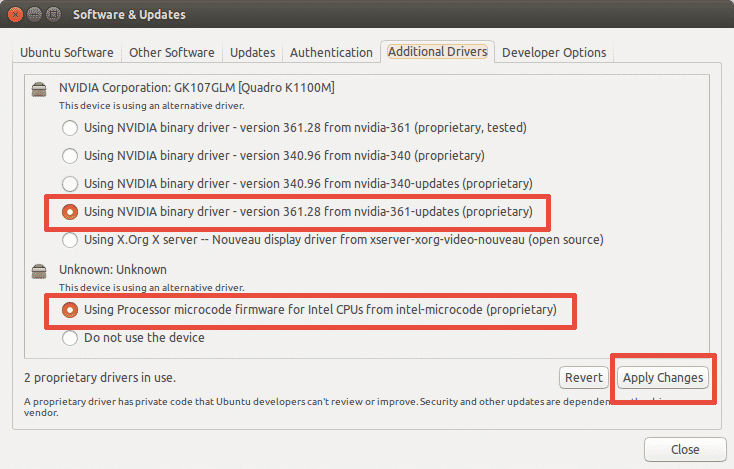
As shown in the image above, you will also get the option to either use the driver or to not use the device at all. To install the drivers, select it and click on Apply Changes. After the installation is complete, you will get a restart option. Click on it to restart your system and finish driver installation. The driver will be in use after the reboot.
Step 5: Install Preload
Preload is a tool that runs in the background and keeps track of the user’s most frequently used applications. And using this data, it tries to predict what applications the user might run next and ensures that they’re the first to load on login, which reduces your start-up time significantly. To install preload, simply run the following command in the terminal:
Once installation is complete, simply reboot your system and it will automatically start running in the background and improve your startup speed.
Step 6: Using Apt-fast Instead of Apt-get
Apt-get is one of the most important Ubuntu commands. It is basically a command line tool for installing or updating any packages in your system. Apt-fast is something of a packet that attaches itself to apt-get and accelerates the upgrade of the system and downloading of packages from the network. For installation of apt-fast, we run the following commands:
$ sudo apt-get update
$ sudo apt-get install apt-fast
Step 7: Reducing Overheating of the System
One of the major problems that systems have to face is the overheating problem. When your system gets hot, it runs slower and gives a poor performance. A very effective tool in the Ubuntu repository for this problem is TLP which helps in cooling down your system and making it run faster and smoother. In order to install TLP, run the following commands in your terminal:
$ sudo apt-get update
$ sudo apt-get install tlp tlp-rdw
When the installation is done, run the following command to start it.
TLP will start running in the background afterwards.
Step 8: Cleaning Up Apt-Cache
Ubuntu uses Apt for installing, managing & removing software’s on the system which results in cache of previously downloaded and installed packages being stored, even after their uninstallation. This package cache can quickly become large and eat up your space. To clean the apt cache, simply run the following command:
Step 9: Removing Unnecessary Packages
When you install software on Ubuntu, it also automatically installs libraries and packages that may need to satisfy the dependencies of the installed package. However, if that package is uninstalled, these dependencies still exist on your system and aren’t needed anymore. To remove them, simply run the command:
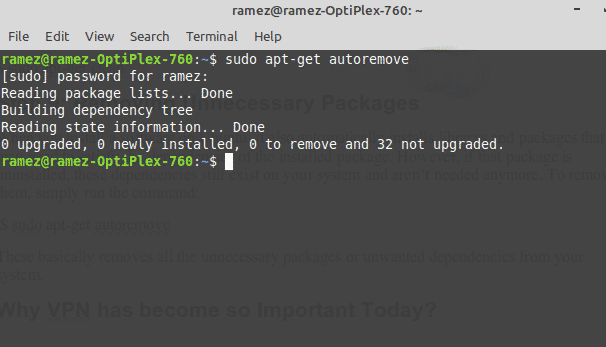
This basically removes all the unnecessary packages or unwanted dependencies from your system.
Step 10: Cleaning up the Thumbnail Cache
Ubuntu automatically creates a thumbnail and stores these in a hidden directory at ~/.cache/thumbnails. With time, these thumbnails increase dramatically and so will the thumbnail cache. You can check the size of the thumbnail cache with the command below:
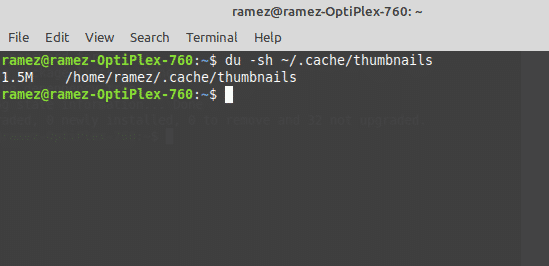
As seen by the image above, my system has a thumbnail cache about 2 Mb in size. To remove these, simply enter the command:
A Faster, Efficient Ubuntu
Linux has slowly garnered a name for it being a fast and efficient operating system. But it’s not flawless. Even it can slow down or become sluggish over time. Using any of the steps that we’ve covered, either applied in isolation or all of them combined, can surely help to speed up your system and save resources for the tasks that matter most to you.