The chkconfig tool is used in RedHat-based systems (like CentOS) prior to RHEL version 7 to control what services are started by SysV startup scripts and at which runlevels.
It can be used to manage the /etc/rc.d/init.d directory hierarchy. It saves the system administrators from the task of manually updating the several symbolic links which are found in /etc/rc.d.
What Will We Talk About?
In this article, we will explore the chkconfig command in Linux and see some examples that demonstrate its usage. Let’s get started now.
What Will We Need?
For this tutorial, we assume that the reader is familiar with the runlevel concept in Linux. Also, we must have superuser privileges to run the certain commands.
Services Management in Red Hat Linux
Starting with RHEL 7, RHEL has moved from service and chkconfig to the new systemctl command.
With the releases earlier than RHEL 7, the service command was used to start or stop the services after RHEL was all set and operating. A service’s automatic start and stop runlevels were determined using the chkconfig command.
The service and chkconfig commands can still be used to start and stop the services. However, they are not fully compatible with the systemctl command which was introduced in RHEL 7.
Before systemd, the services were kept as scripts in the /etc/init.d directory and then attached to the right runlevel directories (/etc/rc3.d, /etc/rc5.d, etc.).
The /etc/rc.d/init.d/ directory is used to house the init scripts for the older versions of Red Hat Enterprise Linux that came bundled with SysV init or Upstart. The system administrator could manage the state of the services and daemons on their system with these init scripts which were generally created in Bash. As of RHEL 7, the service units have taken over the role of init scripts.
Let’s now turn to the chkconfig utility and see some of the use cases.
Use Cases of the Chkconfig Utility
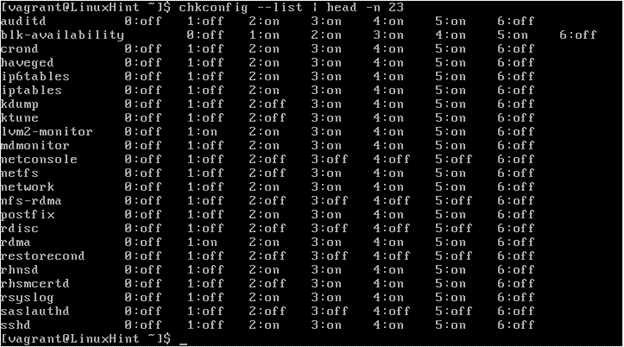
1. We can use the chkconfig command to see the System V init scripts that are present on our system and the runlevels. They start at:
From the provided screenshot, we can see a tabular output which consists of the names of services with their corresponding runlevels, followed by the state (on or off) of the service for each of the seven runlevels.
2. We can append the previous command with the name of the service to see its current settings:
Let’s take the example of sshd service:
3. While logged in as root, we can enter the following command to enable a service in runlevels 2, 3, 4, and 5:
Let’s take the example of crond service and enable it for these four runlevels:
4. We can also specify the runlevels in which we want a service to be enabled by appending the appropriate numbers from 0 to 6 to the –level option:
For example, in runlevel 4,5, we can enable the crond service as follows:
5. Similar to previous example, we can also disable a service for the runlevels 2, 3, 4, and 5 as shown in the following:
Again, take the example of crond here:
Additionally, we can disable a service for a specific runlevel. For example, the crond service can be disabled as follows:
This disables the crond process on runlevels 4 and 5.
Conclusion
We covered the chkconfig command. Additionally, we can also use the /sbin/ntsysv utility which offers a text-based interface and may be more user-friendly than chkconfig’s command-line mode. Different distributions have different alternatives to the chkconfig command. For example, Ubuntu uses the update-rc.d command, Gentoo uses the rc-update command, and Suse Linux has the insserv command.


