This article will explain to you how to manually change the time zone on your Ubuntu system via both GUI and the command line. You can use either of these ways based on your preferences to change the time zone.
Note that, we have run the commands and procedure mentioned in this article on a Ubuntu 20.04 system.
View current time zone Via GUI
In order to view the current time zone information via GUI, follow the steps below:
Hit the super key on your keyboard and type date and time. When the result appears as follows, click on the Date & Time in front of the Settings utility.
Now the Settings utility will open in Date and Time view, where you can see your system’s current time zone.
View current time zone Via Command line
Open the command-line Terminal in your Ubuntu OS either through the right-click menu or through the Ctrl+Alt+T keyboard shortcut.
Then in the Terminal, execute the following command in order to view the current time zone information:
In the output, you will see the current time zone as well as other details about your system.
You can also find the current time zone of your system by viewing the /etc/localtime file. To do so, use the ls command as follows:
Change time zone Via GUI
In order to change the time zone of your system via GUI, open the Settings utility in Date & Time view as follows.
Now turn the toggle switch Automatic Time Zone to slide it to off position, if it is turned on. Then click the Time Zone option in order to change the time zone of your system.
In the following map, search for the time zone manually by typing the relevant keyword in the search bar. You can also use your mouse cursor on the map to locate your time zone.
After selecting the time zone, close the window. Now the new time zone will be set on your system.
Change time zone Via Command line
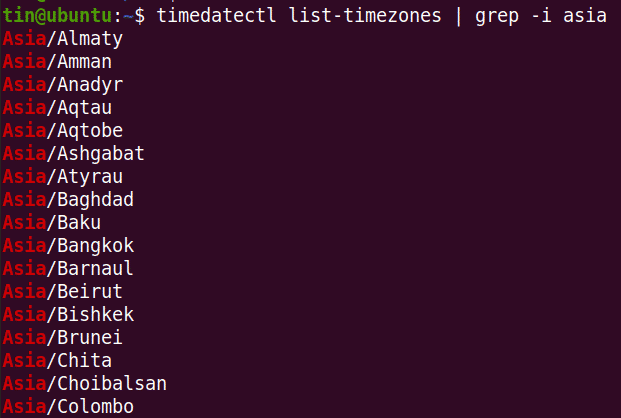
To list the time zones related to a specific region, use the following syntax:
For instance, to list all the time zones specific to Asia region, the command would be:
To change the time zone of your system via command line, follow the below simple procedure:
Here, we will change our system’s time zone to Pakistan/Karachi. To do so, you will need to first remove the link to the localtime file using the following command in Terminal:
Now, you can set a new timezone for our system. For that, use the following syntax in Terminal:
In our case, the command would be:
Now the new time zone of your system will be changed. To verify the new time zone, execute the following command:
That’s all there is to it! In this article, you have learned how to view and to change the time zone on the Ubuntu 20.04 system via GUI and the command line. I hope this will be helpful if you ever have to configure correct time zone on your Ubuntu system.


