
2. What Will We Cover?
In this article, we will explore the Fstab file in Linux.
3. What Will You Need?
You should have basic knowledge of Linux partitions so that you know what you are doing with them. It is always a safe policy to have a backup of the original file before manipulating it.
We recommend you first use virtual machines for understanding how the Fstab file works. Otherwise, if you try to use your host system firsthand, you may end up in a system crash. So be careful ahead.
4. What is the Fstab File?
The Fstab file or the file systems table is located inside the /etc directory and it is used to tell the system how and where to mount and unmount files. For newbies, Mounting refers to making the filesystem accessible as files and directories in the given mount point, which is a regular directory.
Syntax for the Fstab File
Fstab is a plain text file that may contain one or more lines. These lines are separated by a tab character. The lines starting with a ‘#’ are comments. The general syntax for this file is as:
The first line[device_name] is the device/partition name which can also be a remote file system. It has different specifiers for different types of storage.
The device name is followed by the <mount_point> option that specifies the location/directory where the device will be mounted on the root file system. From this location, we can access the content of the mounted device/partition.
The type of file system(Fat16, Fat32, NTFS, XFS, etc.) to mount is specified in <type_of_file_system>.
The <options> tag is file system specific. You can put “defaults” here or may be used for specifying usernames, passwords, credential files, or keywords like ‘ro’ for the read-only mount, ‘rw’ for the read-write-mount, the name of the user who can mount a file system, and so on.
The <Dump> field decides whether to take the backup of the filesystem. A ‘1’ here means taking a filesystem backup, whereas a ‘0’ means ignoring a backup. If you are not sure, simply use a ‘0’ here.
The last field, <pass>, is used with fsck that decides the ordering of checking the filesystem with fsck. If you do not want to check the filesystem, set a ‘0’ here. In a practical use case, set “1” for the root partition and “2” for others.
5. Why Does the Fstab File Exists?
The Fstab file automatically mounts the partition at the system boot. In the old days, devices had to be manually mounted with the help of the mount command. It decides where a partition on the filesystem will be mounted. It contains all of the information about the mount points, including the options and the mount points. The mount command is used to mount filesystems, such as the root, /boot, and swap partitions, to the filesystems they are meant to be mounted on.
In case, you are adding additional storage after installing the OS, you may edit the file to accommodate new drives. Let’s see how to use Fstab to mount a file system.
6. How to Edit a Fstab File?
By default, the file permission for the Fstab file is set to read-only for normal users. Only root users or super users can open it for editing. This is done for security purposes so that a miscreant cannot modify the file unintentionally.
The Fstab file should be edited carefully, any small error in entries can result in system boot-up problems.
List the entries on your filesystem by running the command:
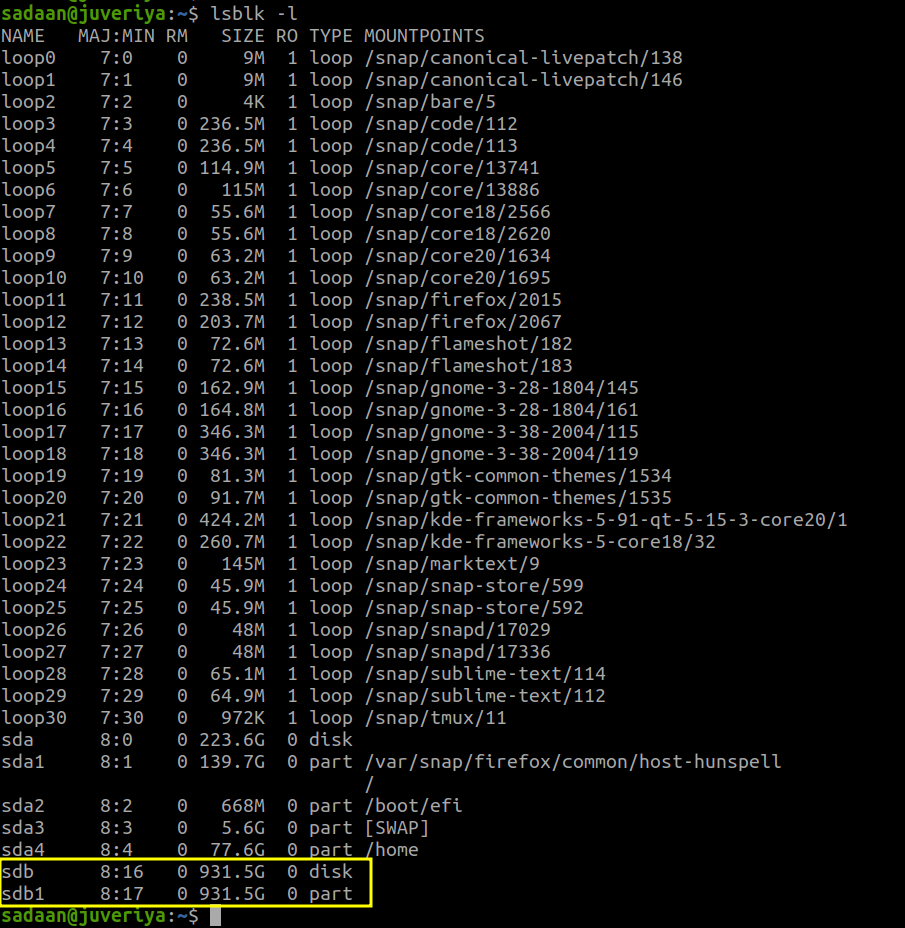
In my case, you can see the partition sdb1 is not mounted on any filesystem. Let’s move ahead and attach this partition to some point:
Step 1. Create a directory where you want to mount this partition:
Step 2. Use the mount command to mount sdb1 to /linuxhint:
Be careful here and avoid mistakes to save time.
Step 3. Run the command and check ‘mountpoint’ column to check if our partition is correctly mounted:
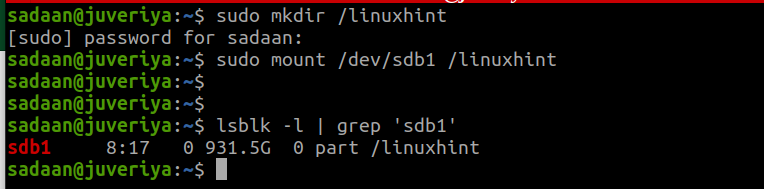
The output of the last command clearly shows the partition is successfully mounted.
Step 4. Our partition is not permanently mounted till now, to make it permanent, we need to edit the Fstab file. Since I am using the Ubuntu system, I need UUID for identifying partitions:

So the UUID=”4484868584867966“.
Step 5. If you skip this step, your partition will not be automatically mounted after rebooting your system.
To make the changes permanent, open the Fstab file (remember to take a backup of the original file):
Now, enter the below entries here:
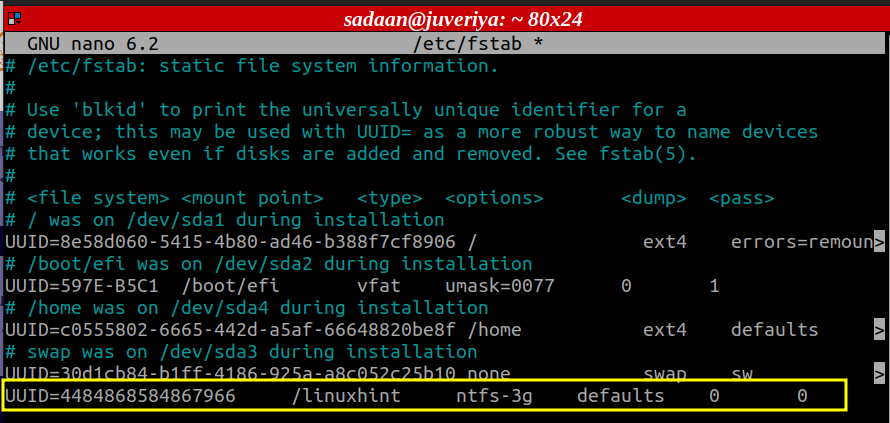
Save the file and exit.
7. Verifying the Procedure
Let us now verify if we are heading in the correct direction. Let’s reboot the system and then re-check if the target partition is mounted correctly. After rebooting the system, run the following command:
As we can see the partition sdb1 is successfully mounted on /linuxhint.
Conclusion
After going through this article, we hope you will have a better understanding of the purpose of the Fstab file and can clearly understand the various entries inside the file. If you are looking to explore more, try mounting a local and a remote file system on your virtual machine. Next, try to include various other options to see how they work.