
Note: The methods shown below have been demonstrated on Ubuntu 20.04. However, they will also work well with any other Linux distribution.
Methods of using “for each line in file” in Bash:
In these methods, we will be showing you an example in which you can read each line from a file, and then you can either display it on the terminal or you can even store these lines in another file. Let us take a look at both of these methods.
Method # 1: For Displaying the Read Lines on the Terminal:
For displaying the lines of a file on the terminal by using “for each line in file”, you will have to perform the following steps:
Step # 1: Creating a Dummy Text File:
First of all, you have to create a text file with some random data for the sake of the demonstration. Although, this text file can be created anywhere, however, it is highly recommended that you create it in the Home folder. For doing that, click on the File Manager icon highlighted in the image shown below:

Now right-click anywhere in your Home folder and select the New Document option from the menu that appears. Then select the Empty Document option. Once an empty document has been created in your Home folder, provide the name of your choice for it followed by the .txt extension. In this example, we have named it as ForEachLine.txt.
Double click on this text file to open it and then type any random text in it as shown in the following image. After doing this, save this file and close it.

Step # 2: Creating the Bash Script:
Now create a Bash file in the same manner as you have created the text file in the Home folder except that this time, you have to provide its name followed by the .sh extension instead of the .txt extension. We have named our Bash file as ForEachLine.sh but you can give it any name of your choice.

Open this file by double-clicking on it and then type the script shown in the image below in your newly created Bash file. Here, the first line is there to indicate that the following script is a Bash script. We have simply created a variable named “File” and have assigned it the name of our text file as its value i.e. ForEachLine.txt. Then we have created a variable named “Lines” and equalized it to “$(cat $File)”. Here, the cat command reads the contents of our text file and when it is preceded by a “$” symbol, then the contents read by this command will be stored in the Lines variable. In this way, all the lines of the file named ForEachLine.txt will be stored in the Lines variable. Then we have applied the “For” loop which has an iterator “Line”. This iterator works on the “Lines” variable that we have created above and it will iterate through all the lines one by one. Then in the “do-done” block, we have simply displayed all these lines on the terminal by making use of the echo command.

Step # 3: Running the Bash Script:
Now launch the terminal in Ubuntu 20.04 and then run the following command in it to execute the Bash script created above:
bash ForEachLine.sh
![]()
When this command will make the bash script to execute, then you will be able to see all the lines of your text file on your terminal as shown in the following image:

Method # 2: For Saving all the Read Lines in another File:
In this method, we have slightly modified the Bash script created in the method above for saving all the read lines in a new text file rather than displaying them on the terminal. For doing this, perform the steps mentioned below:
Step # 1: Modifying the Bash Script Created Above and Running it:
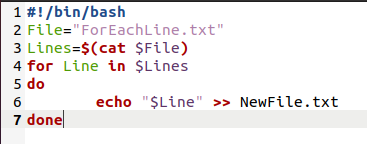
Open the Bash script that you have created in the method above and modify it as shown in the following image. We have simply added the”>>” symbol followed by a new file name after the echo command within the “do-done” block. This modification will save all the read lines to a new text file instead of displaying them on the terminal. Now run the Bash script again via the terminal with the bash command followed by the Bash file name. This time when the Bash script will run, it will create a new text file whose name in this case is NewFile.txt.
Step # 2: Accessing the Newly Created Text File:
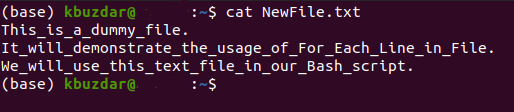
To verify if all the “read” lines have been saved to the new text file, you can simply view the contents of that file by running the following command in your terminal:
cat NewFile.txt
![]()
The output shown in the image below will assure you that all the read lines have been copied to the new text file.
Conclusion:
In this way, you can make use of “for each line in file” to read all the lines of a file and then manipulating it with these lines. We have just talked about the two basic scenarios in this article, however, you can even use this loop for more complex problems.