Install Bash extensions in Linux. If it is already installed, then you need to upgrade the version because the version must be above 4.
Example 1
Here, we need a file having the Bash code. So, create a file using a “touch” command by using the Ubuntu terminal. That is written as:
We will take two approaches here. One is to use “set –e” outside the function body whereas the other is to use it inside the function. Consider a file “file1.sh”. We need the file with an extension of .sh as we are writing the code in Bash language. This example deals with adding a function named “helo”.
In this function, we want to print a line so we just used the echo command here to display the message. As we have declared a function here so the function call must be required here. So in the end, we have used the name of the function as a function call. Here “set –e” is used at the start means outside the body of the function.
Set –e just relate to writing or setting an error showing code.
We have used a simple text editor that is present in the Ubuntu system by default.
Now, moving towards the second approach where we have to use “set –e” inside the function. We will see the difference between these approaches. Edit the given code by replacing “set –e” from outside of the function body to inside the body of the “helo” function, whereas the remaining code is the same as the previous one. You can check from the image inserted.
Run the same command again on the terminal to get the result.
This means that “set –e” causes no change when it is used inside or outside the function body.
Example 2
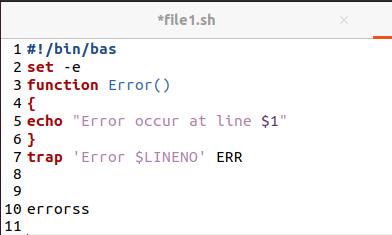
This is quite an easy example in which after the declaration of bash extension in a file, we have used “set –e” in the outer body of the function. The “set –e” allows the terminal to throw an exception where it finds the error and then the code stop execution. Then, the error function is declared here. The only purpose of this function is to display the error message along with the line number that contains the error.
There is something special in this example that is the use of the “trap” keyword. This keyword allows the usage of a built-in function ERR that take the line number of error and then pass it to the error function. For this purpose of error identification and displaying, we need to add a statement or a variable that is not included in bash or use some meaningful line with changing the syntax values.
According to this code, the result must show the error at line 10.
Execute the code on the terminal by using the file. You can relate that the file name is shown with the line number and an exception is thrown that shows the command is not found. Secondly, having a message of the function to depict the line number where an error has occurred.
Example 3
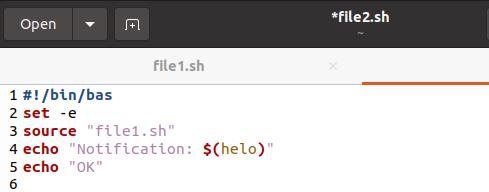
This example deals with using two bash files. One is file1.sh and the other is file2.sh. Consider file2.sh first. Here we have used “set –e” and it is not used in the other file. Similarly, in this file only we have used the function call, whereas the whole function body is declared in the other file. We have linked both the files by using the keyword “source” so that the function call we made here will be able to execute the function from the other file.
After that, in the function call, a word is also displayed.
“Helo” is the name of the function.
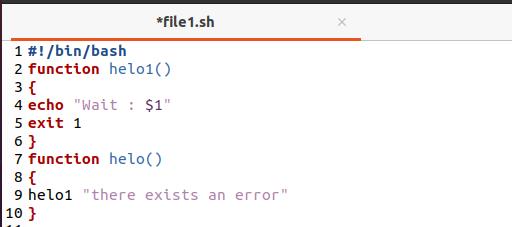
Now, consider the other file file1.sh. in this file helo1() function is declared. In the function body, we have displayed a message only.
Moving towards the other function that is helo(). This is the same function that was called by the name in the first file we have discussed. Inside this function, we have again used a function call of helo1(). This is declared above the current function in the same file so we don’t need to link both files by using the “source” keyword. With the function call, a message is displayed:
The whole performance is done in such a way that we will run the file2.sh in the terminal. So, the first function call will be executed and the control will move towards the helo() function in file1.sh. That will execute this function call and now the control will move towards the first function of the file. Let us see how the output is displayed.
Now you can see that first the word is displayed from the file2.sh and then the message of function “helo1()” that is “wait” and then the message of function helo(). As we have used “exit 1”, the control is not given to that so there is no role of “set –e” again. If the function call is not handled, there must be an error to prevail.
Example 4
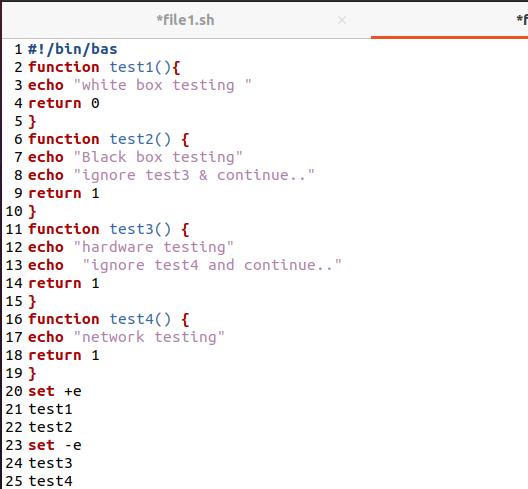
This example contains a complete understanding of “set –e”. Take four functions in this example. As we know that the set –e built-in is used to exit the code when it gets non-zero status. In this example, we have used “0” for only one function that is the first one. All other functions return 1. This means that the code will exit execution after the first function is displayed. But it will not. Here, we have used “set +e” which is the opposite of “set –e”. Whenever “set –e” forced the code to terminate execution, the opposite one will oppose it whenever it encounters the non-zero value. “set +e” is declared before the function call of the first two functions and “set –e” before the function call of the last two methods.
Now, first two functions will be executed. In the second function, as it is a non-zero value, the compiler will force to throw an error but “set +e” will neutralize the value. When it’s the time for the third function, both the messages will be displayed by echo but when the control goes to the “return 1” value, then the code will stop. As here, we did not use “set +e”. That’s why the 4th function is not executed here.
Execute the code in the terminal so that you will see the resultant value.
Conclusion
This tutorial shows the working of “set –e”. In the examples, that’s how it is used to terminate the execution. However, the opponent “set +e” is also utilized here to illustrate the working.


