What is PowerShell?
The Windows 10 PowerShell is basically a configuration management and task automation program designed by Microsoft. However, it does not mean that you cannot use this program on an operating system other than Windows. You can easily use it on the different Linux distributions as well as on macOS. However, the only difference is that it comes pre-installed with Windows, whereas you will have to install it by yourself for the other operating systems. Nevertheless, for this particular article, we will be using the PowerShell program on Windows 10.
The Windows 10 PowerShell program has a command-line shell that consists of some associated scripting languages. You can easily write and execute scripts while using this program in Windows 10. Now, when you have developed a sufficient understanding of the Windows 10 PowerShell program, it is good to get started with the Base64 encoding and decoding in PowerShell.
How to do Base64 Encoding and Decoding in PowerShell in Windows 10?
In this section, we will explain the process of performing the Base64 encoding and decoding using the PowerShell program in Windows 10. For that, you just need to follow the three simple steps described below:
Step 1: Accessing the Windows 10 PowerShell
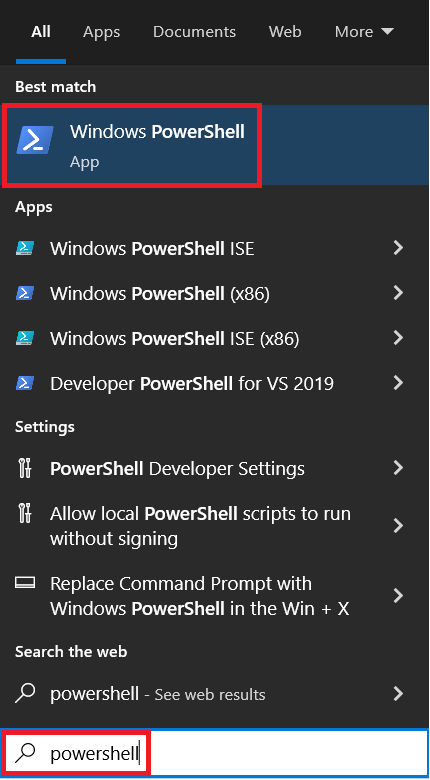
First of all, you will have to access the PowerShell application on Windows 10. You need to locate the search section present on your Windows 10 taskbar and type “powershell” in it. You will be presented with a few results from which you need to click on the Windows PowerShell option as highlighted in the following image for launching the PowerShell application on Windows 10.
We have also shown the general interface of the Windows 10 PowerShell application in the image below for your convenience. This is what the Windows 10 PowerShell normally looks like.
Step 2: Performing the Base64 Encoding in PowerShell
The Base64 encoding in PowerShell will be performed in three steps. First, we will show you those three commands that will be responsible for performing the Base64 encoding in PowerShell, and then we will explain them to you one by one. The following image shows the whole Base64 encoding process in PowerShell in one glance:
In the first step of the Base64 encoding process, we have defined a variable named “TEXT” with the “$TEXT” notation and have assigned a string to it that we want to be encoded. Then, for performing the actual encoding of this string and for holding these results, in the second step, we have created another variable “$ENCODED” and equalized it to the statement “[Convert]::ToBase64String([Text.Encoding]::Unicode.GetBytes($TEXT))”.
In this statement, the text string that we had defined in the first step is converted into Unicode bytes, and then those Unicode bytes are encoded and stored into the “$ENCODED” variable. Finally, in the third step, we want a statement that is capable of printing our encoded string on the PowerShell window. For that, we have used the statement “Write-Output $ENCODED.” This statement will simply print the contents of the “$ENCODED” variable on the PowerShell window.
A point to be noted over here is that all of these steps will be executed one by one, i.e., you will have to press the Enter key after typing every single statement. However, as soon as you press the Enter key after typing the last statement, the result of this encoding process, i.e., our encoded string, will appear on the PowerShell window as shown in the image below:
Step 3: Performing the Base64 Decoding in PowerShell
Now, for the Base64 decoding in PowerShell in Windows 10, we will perform the reverse process of the Base64 encoding. Again, we will first share with you the three steps that will carry out the Base64 decoding process in PowerShell, and then we will describe all these steps one by one. The following image shows the whole Base64 decoding process in PowerShell in Windows 10:
In the first step of the Base64 decoding process in PowerShell, we have defined a variable “$ENCODED” that holds an encoded string. By the way, we have used the same string over here that we have encoded above. Then in the second step, we have created another variable, “$DECODED,” for holding the decoded string. We have assigned the results of the statement “[System.Text.Encoding]::Unicode.GetString([System.Convert]::FromBase64String($ENCODED))” to the “$DECODED” variable.
This statement will simply convert the encoded Unicode bytes to a normal decoded string. Then in the third step, for printing the decoded string on the PowerShell window, we have used the “Write-Output $DECODED” statement that will be responsible for printing the contents of the “$DECODED” variable on the PowerShell window.
As soon as you hit the Enter key after typing in the third statement, the decoded string will appear on the PowerShell window, as shown in the image below. You can compare this decoded string with your original string, and you will be able to verify that the Base64 encoding and decoding processes have been correctly performed using the PowerShell application in Windows 10.
Conclusion
This guide was designed to share with you the process of doing the Base64 encoding and decoding in PowerShell in Windows 10. In this regard, we shared with you the PowerShell commands that help in performing the Base64 encoding and decoding of the desired data. By making use of these commands, you can easily encode and decode any given strings with the Base64 coding in PowerShell in Windows 10.


