In order to follow this article, first, you need to configure the AWS CLI credentials on your system. The following guide explains how these credentials can be configured on windows, linux, or Mac.”
https://linuxhint.com/configure-aws-cli-credentials/
Following is the list of the topics which will be covered in this article.
- Create Elastic IP
- Associate and Disassociate Elastic IP from EC2
- Delete Elastic IP
- Create network interface
- Attach and remove network interface from EC2
- Delete Network Interface
Create Elastic IP
Elastic IPs are used to associate a public static IP address to an EC2 instance, and this IP address does not change even if the instance is rebooted. In order to associate a static public IP address to an EC2 instance that does not change on reboot, Elastic IPs are used.
In this section, we are going to discuss how we can create an Elastic IP using the AWS command line interface. First, list all the available Elastic IPs using the following command in the terminal.
--region us-east-1
The above command will list all the elastic IPs allocated to your account in the us-east-1 region.

Now after checking the Elastic IPs, use the following command to create a new Elastic IP.
--region us-east-1
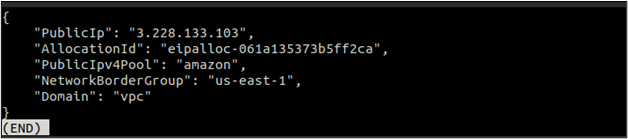
After creating an elastic IP, again list all the elastic IPs using the following command in the terminal.
--region us-east-1

This time you can see an Elastic IP there that was created when you executed the previous command. Note this IP, and we will associate it with an EC2 in the next section.
Associate and Disassociate Elastic IP From EC2
After creating an Elastic IP, we can now use it by associating it with an EC2 instance. Remember, if you allocate an Elastic IP and do not associate it with an EC2 instance can charge you some amount hourly. So if you are not going to use it, you must release the elastic IP.
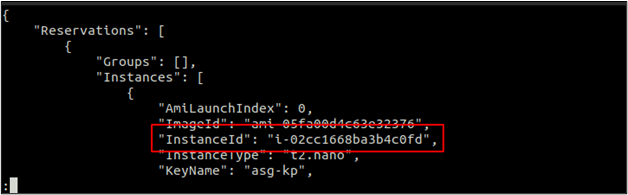
First, you need to get the EC2 instance ID to which the Elastic IP will be associated. Use the describe-instances method of ec2 to list all the EC2 instances.
After getting the instance ID, use the following command to associate the elastic IP to the EC2 instance.
--instance-id <EC2 instance ID> \
--public-ip <Elastic IP>

The above command, when executed, will associate the Elastic IP to the EC2 instance and return the association ID. Note this Association ID, and it will be helpful to disassociate the Elastic IP in the next section.
Now use the describe-instances method of the ec2 to check the public IP of the EC2 instance to confirm whether the Elastic IP is attached to the instance or not.
--instance-id <EC2 instance ID>
Scroll down to the output of the above command and find the Public IP section. You can see the Elastic IP attached to the EC2 instance here.

Just like association, you can Disassociate an Elastic IP as well, which is associated with an EC2 instance using AWS CLI. The following command can be used to disassociate the elastic IP using the association ID.
--association-id <Elastic IP association ID>

When you disassociate an Elastic IP from an EC2, the EC2 will automatically get a random IP from AWS public IP pool, and the Elastic IP is available to use with another EC2 until it is released.
Delete Elastic IP
So after disassociating the Elastic IP from the EC2 instance, you should release the Elastic IP from your account if it is not required anymore. An Elastic IP that is allocated but not being used can charge some amount hourly.
First, list all the available Elastic IPs in your AWS region using the following command in the terminal.
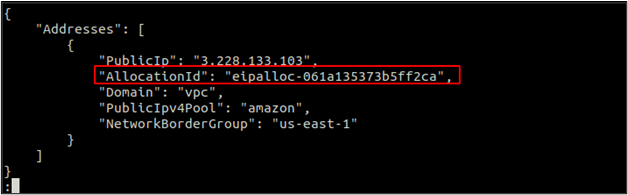
Note the allocation ID, and we will use this ID to release the Elastic IP using the following command.
--allocation-id <allocation id>

Create Network Interface
You can attach more than one network interface to a single EC2 instance. A network interface can have one primary public and one primary private IP address. You can attach more secondary private IPs to a network interface.
In this section, we will discuss how we can create a network interface using the AWS CLI. While creating a network interface, you can specify a subnet in which the network interface will be created and a security group that will be attached to the interface.
--subnet-id <subnetwork ID> \
--groups <security group ID>
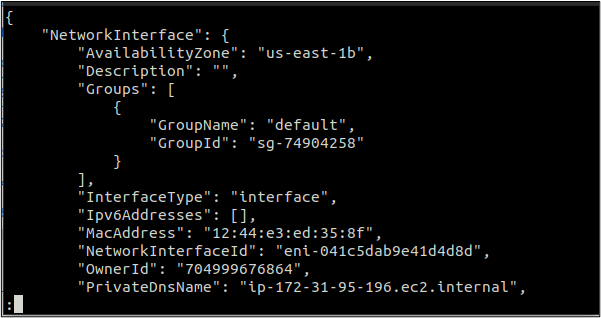
The above command will create a network interface with a random private and public IP. The private IP will be from the range assigned to the subnet in which the network interface is created.
Attach and Remove Network Interface From EC2
After creating a network interface, you can attach it to an EC2 instance which is in the running or stopped state. Also, you can attach the network interface while launching the EC2 instance.
In order to attach the network interface to an EC2 instance, the attach-network-interface function is used that accepts instance ID and network interface ID as parameters.
--instance-id <EC2 instance ID> \
--network-interface-id <network interface ID> \
--device-index <Device Index>

The above command will successfully attach the network interface to the EC2 instance and return an attachment ID. Note this attachment ID as it will be used to remove the network interface from the EC2 instance.
Just like a network interface can be attached to an EC2 instance, we can also remove it from an EC2 instance if it is not a primary one. In order to remove the network interface from an EC2 instance, the detach-network-interface function is used.
--attachment-id <attachement ID>

The above command will successfully remove the network interface from the EC2 instance using the attachment ID. The network interface has been detached from the instance, but it is still available to use with another EC2 instance until you delete it.
Delete Network Interface
In this section, we will see how a detached network interface can be deleted using the AWS command line interface. We can use the delete-network-interface function, which accepts network-interface-id as a parameter to delete the network interfaces.
--network-interface-id <Network Interface ID>

The above command will remove the network interface if it is not attached to an instance.
Conclusion
This article describes how we can handle elastic IPs and network interfaces in AWS EC2 using the AWS command line interface. Performing all these tasks using the AWS CLI helps to automate the flow. We discussed how we could use the AWS command line interface to create, attach, detach and then remove the Elastic IPs and Elastic Network Interfaces to an EC2 instance.