In this tutorial, we are going to learn about one of the important modules of Ansible which is authorized_key. We will learn how we transfer the SSH decryption key that is stored in the inventory file to the remote hosts in Ansible.
To accomplish the tasks in the Ansible playbook on distant remote host devices, we must either remove the credentials from the SSH connection to the remote host or we can supply the credentials and keys to authenticate as the playbook is being executed. In Ansible, we have two different keys which are the public key and the private key known as the SSH key pair. To establish a connection with the target remote hosts, we must exchange our public SSH key with them while keeping the private SSH key on local machines. The OpenSSH is the default connectivity mechanism in the Ansible tool. Ansible assumes that we are connecting to the target remote hosts using the SSH keys.
Different Steps of SSH Connection Using the Keys in Ansible
The following are the steps that we are going to use to build the SSH connection between the Ansible controller and the remote hosts by utilizing the public key and private key:
Step 1: Make a key pair by generating the private and the public keys with the respective names, id, rsa, and pub.
Step 2: If we don’t specify anything, Ansible is automatically produced under the /.ssh folder.
Step 3: By pasting the public key pub at the end of the document /.ssh/authorized keys, you can transmit it to distant remote hosts.
Step 4: Connect via SSH to the target remote host. Then, confirm the request to add the target hosts’ fingerprints to the /.ssh/known hosts document. If you don’t comply with this, the software will request you to specify a password whenever the SSH connection is initiated.
Prerequisites of Ansible Authorization_Key
We assume that you have an Ansible control server with an installed Ansible on it as well as the target remote hosts to construct the SSH connection between all of the Ansible modules.
Let’s go in to clarify more aspects by implementing the simple example of an authorization key in Ansible by establishing an SSH connection using public and private keys.
Example:
Here is the first example that we are going to implement in Ansible using the authorization_key module. To build the connection, we need a playbook where we write the hosts and tasks to establish the connection between the Ansible control server and target remote hosts. The following command is used to create the playbook in the Ansible tool:
After writing the provided command, the playbook is created and opened. Now, we first provide the remote hosts with which we want to build the SSH connection which is the “all” target remote hosts. Then, we use the “gather_facts” parameter of the Ansible tool. The gather_fact argument is used to call the setup module of Ansible. In this situation, we don’t want to gather the facts, so we provide the “false” value to the “gather_facts” argument because the facts are gathered by default in Ansible.
Next, we list the tasks in the playbook which we want to do. We write the “name” of the task which is “gather facts”. Then, we write the setup module and the “gather_subset” because we want to collect some of the information that are related to managing the remote hosts instead of getting all the information of all remote hosts. We use another variable of Ansible which is the “register” variable that preserves the results of tasks of the playbook and utilizes them for subsequent tasks.
Now, we want to print the name of the remote host devices, so we use a “name” variable again. Then, we debug the tasks. If the task is completed, it displays the output with the related message. The following are the complete tasks of the authorization_key_1.yml playbook:
- all
gather_facts: false
tasks:
- name: Gather facts
setup:
gather_subset:
- 'all'
register: gather_fact_data
- name: Print target machine's hostname
debug:
msg: "{{gather_fact_data.ansible_facts.ansible_hostname}}"
After that, we use the Ctrl+X buttons to end the playbook. The information about the targeted remote host1 is then written to the inventory file by creating the file. We type the following command to generate the inventory:
In the host.yml inventory file, we provide the information of the host by giving the basic information like the Ansible IP address, user name, connection name, the port number of the Ansible host, etc.
hosts:
Host1:
ansible_host: 192.168.7.10
ansible_user: iris
ansible_connection: ssh
ansible_port: 22
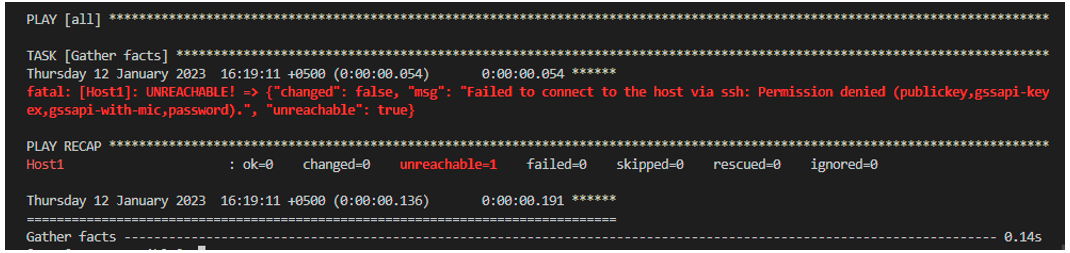
Close the host.yml inventory file. Now that the host.yml file is updated, we execute the Ansible playbook to check whether the connection has been made or not. We write the following command:
After executing the previous command, we get the following outcome. As you see, we get the error which says that it failed to connect to the host through an SSH connection and is unreachable. This is because we didn’t provide the SSH key pair to the Ansible controller.
We execute the command that follows to give the controller the SSH key pair:
Here is the output of entering the previous command:

We simply hit enter. After this, it shows the two root files with the SSH keys in the output:

Now, we create another playbook for the Ansible control server and set the SSH connection of the controller server. To create another playbook, we write the following “nano” command:
After generating another playbook, we now list the hosts and then use the Ansible authorized module. In this module, we first write the host’s name and the state of the user. Then, we pass the controller device’s produced public key file which we recently generated to the target remote host.
- all
gather_facts: false
tasks:
- name: add the public key to authorized_keys using the Ansible module
authorized_key:
user: iris
state: present
key: '{{ item }}'
with_file:
- ~/.ssh/id_rsa.pub
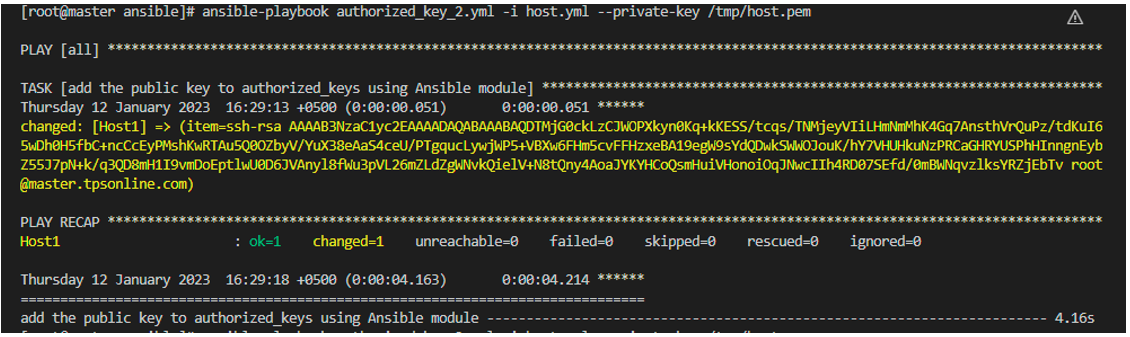
Use the following command to run the authorized_key_2.yml playbook along with the host.yml inventory file and the private key file:
The following output is the outcome of running the aforementioned playbook with the inventory file:
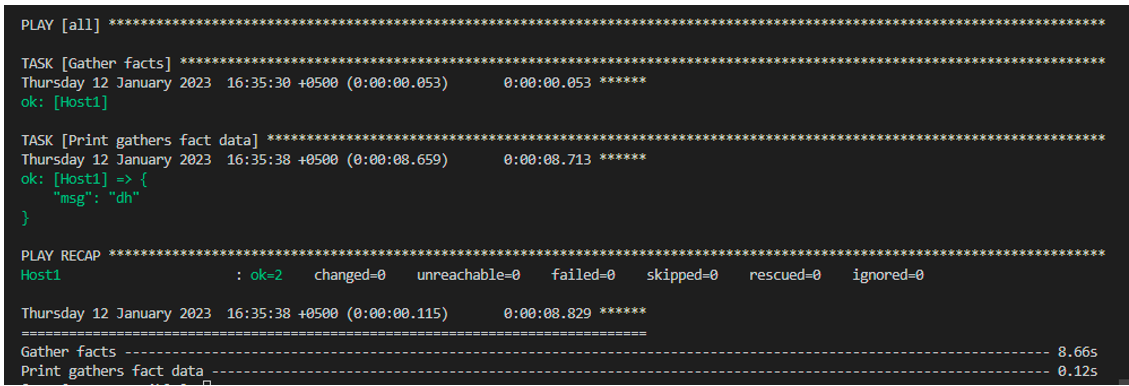
As you can see from the provided example, we successfully implemented the second playbook which is the authorized_key_2. Now that we have an established connection between the controller and the remote host, let’s check by running the playbook one which is the authorized_key_1 playbook and see if it is executing or not:
Here is the output of the previous command which is executed successfully:
Conclusion
We learned how to connect the controller to the remote hosts using Ansible’s authorization key module. We developed the example with a thorough description so that the authorization module’s basic approach would be simple to comprehend.