Introduction to Arduino Frequency
In microcontrollers and embedded systems clock rate or clock speed is referred to the frequency of generated clock using the clock sources such as ceramic resonator or crystal oscillator.
Similarly, Arduino frequency determines how fast it can execute instructions inside the microcontroller. It is used to synchronize operations of all the peripherals attached to Arduino. In Arduino and other microcontroller frequency is proportional to the execution speed and performance of microcontroller. More frequency means less time to execute command and instruction.
Here is a list of all Arduino board working frequencies:
| Arduino Board | Microcontroller | Working Frequency |
| Arduino Uno | ATmega328P | 16 MHz |
| Arduino Uno WiFi rev 2 | ATMEGA4809 | 16 MHz |
| Arduino / Genuino MKR1000 | ATSAMW25 (SAMD21 Cortex) | 48 MHz |
| Arduino MKR Zero | ATSAMD21G18A | 48 MHz |
| Arduino Zero | ATSAMD21G18A | 48 MHz |
| Arduino Due | ATSAM3X8E (Cortex-M3) | 84 MHz |
| Arduino Leonardo | ATmega32U4 | 16 MHz |
| Arduino Mega2560 | ATmega2560 | 16 MHz |
| Arduino Ethernet | ATmega328 | 16 MHz |
| Arduino Nano | ATmega328
(ATmega168 before v3.0) |
16 MHz |
| Arduino Micro | ATmega32U4 | 16 MHz |
| LilyPad Arduino | ATmega168V or ATmega328V | 8 MHz |
| Arduino Pro Mini | ATmega328P | 8 MHz (3.3V), 16 MHz (5V) |
Working Frequency of Arduino UNO
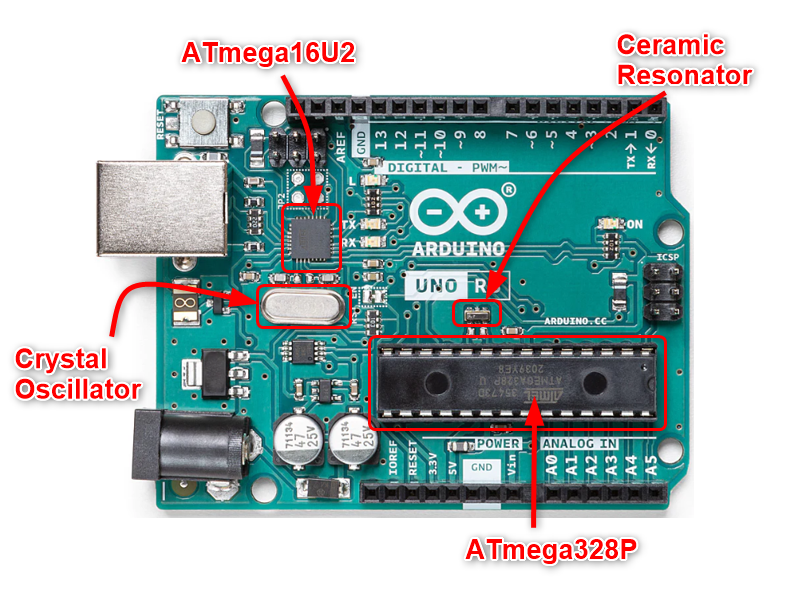
By default, the working frequency of Arduino UNO is 16MHz. As we know that Arduino UNO comes with two different microcontrollers one is ATmega328p and the other one is ATmega16U2. Both microcontrollers contain an internal clock of 8MHz. By default, the internal clock is not used, rather we use an external clock of 16MHz.
ATmega16U2 which is used for serial UART communication between Arduino and PC have an external clock of 16MHz coming from a crystal oscillator. The main microcontroller chip ATmega328p used for logic building inside the Arduino also has an external clock of 16MHz, but this is not from a crystal oscillator, instead the source for this clock is ceramic resonator.
If we investigate the datasheet of these two microcontrollers both of them have support up to 20MHz frequency but for that we need a constant 4.5V for working. That’s why an external clock with 16MHz is preferred. However, we can also modify this 16MHz for Arduino and an external clock of 20MHz can also be used.
Using an External Clock Source for Arduino Frequency
The ATmega chip in Arduino can use an external TTL voltage level clock as the clock source. But to use the external clock with custom frequency one needs to change fuse settings as per datasheet of ATmega328p.
Fuse settings cannot be only done using the Arduino IDE software however we need proper hardware and a proper chip programmer software to use an external clock.
For more details on using a custom hardware clock read the article Arduino Hardware Clock. For detailed reference of using custom fuses Section 8 of ATmega328p datasheet covers this.
Conclusion
Frequency determines the microcontroller efficiency and speed for executing instructions. Default frequency for the Arduino board is 16MHz however we can also configure Arduino microcontrollers to use their internal 8MHz clock or an external clock such as a crystal oscillator. But for using external clock source microcontroller fuses to be set first.

