The Jinja2 filters are an incredibly strong tool that can assist us with a variety of activities for manipulating information in Ansible. Based on this, we are going to discuss the Ansible selectattr and rejectattr Jinja filters in this article. But before jumping on to the selectattr and rejectattr, let us first understand what the role of filters in jinja2 is.
What are the Filters of Jinja2 in Ansible?
When we require information handling, structuring, and translating, we use Ansible. Jinja2 offers several pre-built filters as well as user-created customizable filters. These filters are jinja2 filters that work in the backend, which transforms the provided information inside a template expression. The targeted remote servers are not involved in the templating, it takes place on the Ansible Controller system. As a result, filters are applied to local data that the Ansible controller provides. Additionally, Ansible’s selectattr and rejectattr filters are derived from these filters.
Selectattr Filter in Ansible
The selectattr stands for select attribute filter. Each select attribute is used to perform testing on each object that is a defined attribute and only picking those that pass the testing filters, is a succession of items. The result of the select attribute would be assessed as a boolean even though no test is defined in Ansible. In the Ansible selectattr filter, three parameters are passed in Ansible which are the attribute, a Boolean operator, and an argument. One of Jinja’s built-in testing can be selected as the operator.
Example:
Here is a simple example where we are going to utilize the selectattr filter in Ansible. To understand how it will work in Ansible, we are going to implement a scenario so that we will understand how it will function in Ansible. To do so, first, we will create a playbook because playbooks are collections of instructions that run across target remote hosts autonomously.
An Ansible Playbook has different modules and each module carries out a certain functionality. Each module provides metadata that establishes when, where, and by which remote host the task is carried out. The following is the command we will write in the terminal to create a playbook.
To create the playbook, we also write the extension of the playbook, which is YAML, or Yet Another Markup Language, which is a file format that uses the extension.yml. Now the playbook is launched into a new ansible terminal of the name ansible_filter.yml. In the playbook, we first write the information regarding the remote hosts. In hosts, we are using the localhost as a target remote host.
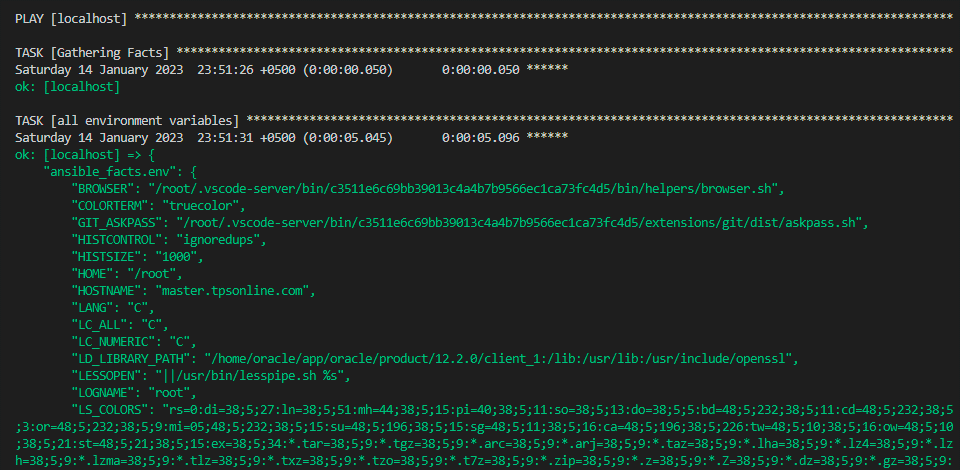
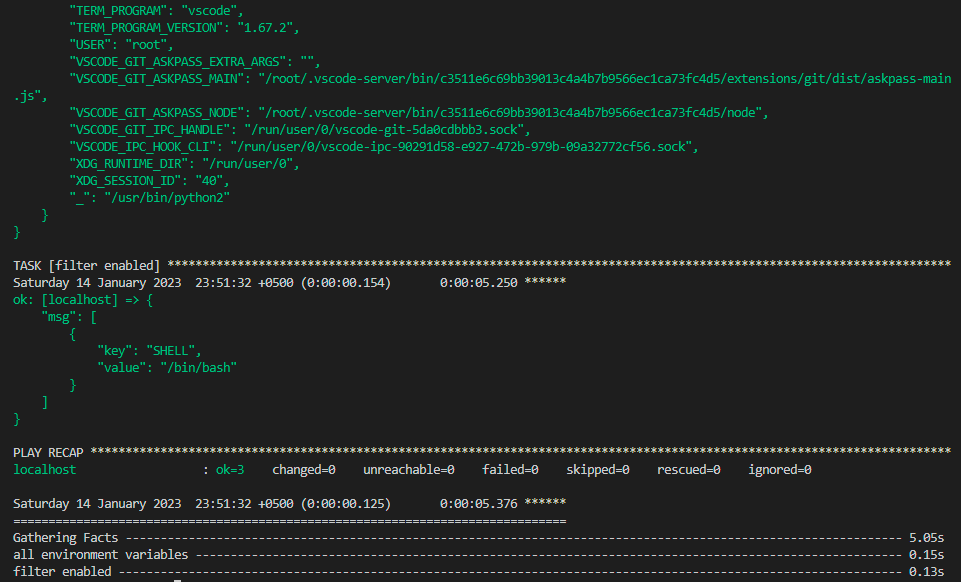
Next, we have passed the “true” value to the gather_facts option in the playbook so that we can get all the information related to the localhost in the output. After establishing the host, we will now make a list of every task we intend to complete. The first task name is “all environment variables” and we have passed the variable in it so that we can debug it. In the next task, we want to enable the filter of jinja2 that is used in ansible which is the selectattr filter. In the selectattr filter, we have passed the three arguments that are the key, match, and the shell.
- localhost
gather_facts: true
tasks:
- name: all environment variables
debug:
var: 'ansible_facts.env'
- name: filter enabled
debug:
msg: "{{ (ansible_facts.env | dict2items | selectattr('key', 'match', 'SHELL') ) | list }}"
After listing all the tasks, we want to do, we will end the playbook by hitting CTRL + X and then save the updates. Now, we want to execute the playbook we will write the below command in the terminal:
Here is the required showcase by utilizing the selectattr attribute in the playbook. As you have seen, we have gotten a very long output because we have used the gathering fact option as a true in the playbook. So, that is why it is displaying all the information of the localhost in the output in the Ansible terminal.
As shown, the select attribute is enabled by showing the ok signal at the end of the output terminal.

Rejectattr Filter in Ansible
The rejectattr stands for the reject attribute of jinja2 in Ansible and it is the opposite of selectattr. The Rejectattr removes any items from the specified iterable which do not satisfy the provided attribute and successfully pass the test. Performing testing on each item’s given attribute, as part of the filtering process, results in the rejection of any items that pass the test. A boolean evaluation of the attribute’s value will take place if no test is provided.
Example:
Here is the example that we are going to perform by using one of the important attributes of jinja2 in Ansible which is the reject attribute. In this example, we are trying to apply a condition to every item in a dictionary to eliminate matched items from the dictionary. So, for that, we will again launch the playbook so that we can alter the tasks according to the reject attribute. Below is the command to launch the module_filter.yml playbook:
Now, in the playbook, we have passed the “false” to the gathering fact option because we don’t want to get the extra information related to the localhost, as we have already gotten the information in the selectattr filter example. Now, we will write the variable in the playbook. In the vars, we have to write the name and the type of the medicines. Next, we have to write the task. In the task, we want to filter all the medicines except suppositories and we debug it by passing the rejectattr filter in it.
- localhost
gather_facts: false
vars:
medicines:
- { name: measles, type: injections }
- { name: nepawell, type: drops }
- { name: colace, type: suppositories }
tasks:
- name: filter all medicines other than suppositories
debug:
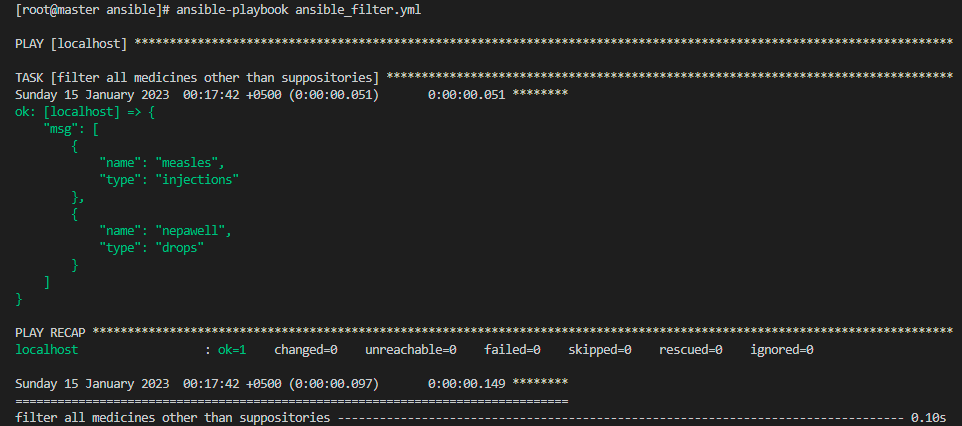
msg: "{{ (medicines | rejectattr('type', 'match', 'suppositories') ) | list }}"
Now, we will terminate the playbook. After that, we want to run the playbook so we can get the suitable output of the reject attribute of Ansible.
Here is the result of a reject attribute in the Ansible tool. The terminal is displaying measles and nepawell medicine and it rejects the Colace medicine from the playbook.
Conclusion
We have learned what filters are in jinja2 and which filters we are going to use in this session of Ansible. We have discussed the two important filters that are the selectattr and rejectattr filters in Ansible. We have implemented each example of a filter so that users can easily understand the concepts and the working of these filters in Ansible.