Utilizing one of the latest management techniques, “Ansible”, we introduce how we list every monitored host on the device. In Ansible, we use the “inventory” plugin to list all hosts in the network.
It is crucial to have a list of all of your host machines in Ansible. Keeping an inventory file organized is just as crucial as maintaining the playbooks or tasks because you’ll constantly find yourself in a state of uncertainty and ask yourself with several concerns if your inventory file is mismanaged. In addition to the foregoing, the inventory file’s definition of the required variables minimizes the task’s content in playbooks and speeds up the interpretations. There are a group of variables that can be declared in both your playbooks and Ansible inventory files that are responsible for connecting and configuring the behavior of connectivity to the host machine.
Prerequisites:
The following are the requirements before implementing the host list inventory command in Ansible:
- To start implementing, we first need a software that is used for Ansible configuration which is installed in the server device with the latest version. Ansible must be configured so that we can easily list the all-host machine in our network.
- To do any configuration task in Ansible, we need a main configuration manager. In this tutorial, we use the controller server as the main controller.
- To implement any changes, we need to target the host servers in the host list inventory tutorial. Here, we have two target remote hosts.
Example: Host List Inventory in the Machine
Here is the example that we implement in the Ansible tool to check or define the host list inventory. For that, we will do this example in different steps so that we can easily understand the working and the implementation of this tutorial. The following are the steps:
Step 1: Check the Default Host List Inventory in the Target Remote Host Device
First, we check how many hosts are in the inventory of the Ansible tool. For that, we employ the “ansible” statement with “—list-hosts” so that we can display the default handled nodes in the inventory.
Here is the output after writing the previous command:
![]()
The Ansible terminal displays “0 hosts” as you can see in the provided response because we didn’t declare the inventory. We generate the inventory to list the host’s inventory in the terminal before we address this.
Default Inventory:
When we install Ansible in the software, Ansible builds an inventory file which is found by writing the following statement in the terminal:
The outcome is generated when we write the previous statement. Then, it asks you to enter the password:
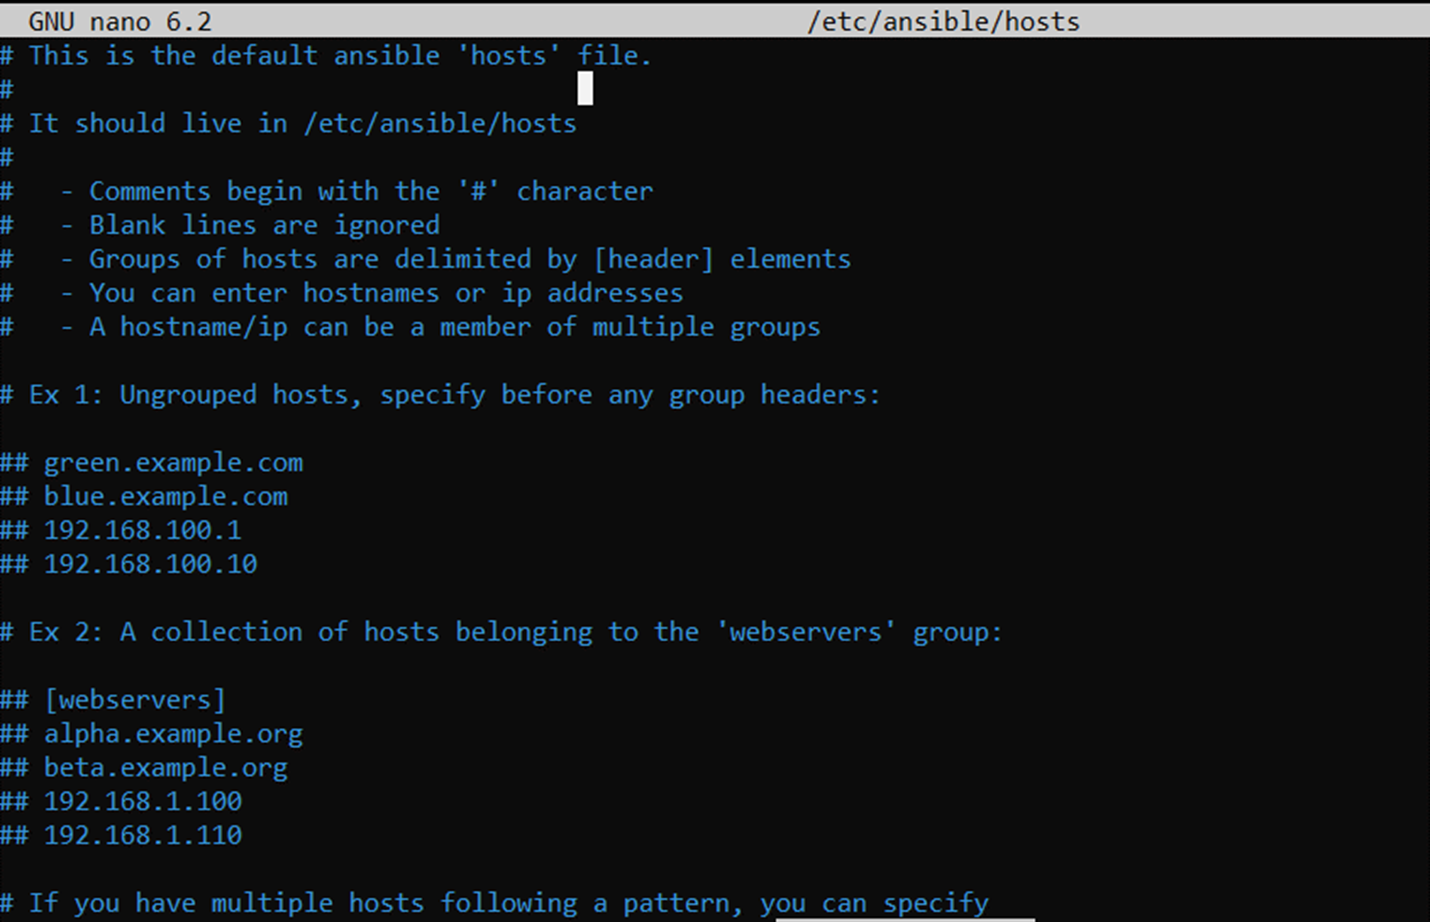
In this snapshot, the default Ansible hosts file provides the information regarding the ungrouped hosts and webservers group hosts. These hosts include the URLs and different IP addresses.
Step 2: Define the Custom Inventory in Ansible
In Ansible, we can also define our inventory by writing multiple statements in the Ansible terminal. Defining the inventory when running the statements and playbooks is a wise decision that prevents clashing the hosts and failure while connecting with the hosts.
To start defining the inventory on our own, we first write the following statement so that we can build the inventory in Ansible and list the hosts in it so that we make the connection between the Ansible controller and the targeted remote hosts.
After writing the previous statement, the inventory is created and launched in a new Ansible terminal with the “hosts.yml” title. Next, we list the targeted hosts one by one in the inventory. The very first host that we connect with is a Linux host. We provide the IP address of the Linux host, the Ansible user, the Ansible password, the type of connection, and the Ansible port number. We also do the same with the second target host. The second host that we use is the Ansible host. All hosts that we listed are under the Ansible parameter in the inventory.
hosts:
Linux_Host:
ansible_host: 192.168.3.229
ansible_user: root
ansible_password: tpstps_22
ansible_connection: ssh
ansible_port: 22
Ansible_Host:
ansible_host: 192.168.7.10
ansible_user: iris
ansible_password: TpsTps_1
ansible_connection: ssh
ansible_port: 22
After making the inventory file and providing the hosts in it, we now terminate the inventory file and go back to the main Ansible terminal.
Step 3: Create the Playbook in Ansible
Next, we create the playbook in the Ansible tool so that we define the tasks. For that, we write the following command in the Ansible main terminal:
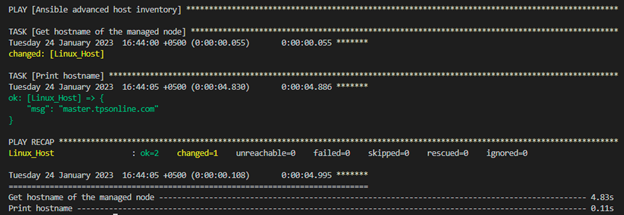
Now, the playbook is launched into a new terminal. First, we write the title of the playbook. In the next line, we provide the target host. We use the gather fact option that is used to get the whole information of hosts. But here, we pass “no” which means we don’t want to get all the data of the hosts.
Next, we list the tasks in the playbook. The first task is used to display the target host with the hostname. In the next task, we print the host results.
hosts: Ansible[0]
gather_facts: no
tasks:
- name: Get hostname of the managed node
shell: "hostname"
register: result
- name: Print hostname
debug:
msg: "{{result.stdout}}"
Now, we want to execute the playbook along with the inventory file. So, we first end the playbook. The following is the statement that we use to run the command:
The following is the output display which shows that the connection is successful. Since we passed the Ansible[0] in the playbook, the first host is displayed in the output:
Conclusion
We had an in-depth discussion at the Ansible inventory throughout this tutorial. We learned how to build up the inventory in Ansible and then connect them with the target remote hosts. We also implemented an example so that we can easily understand the concepts of Ansible inventory.