
In this guide, we will see various ways to configure various network operations on the Debian system. Although this guide is for the Debian system, most operations should run on other Debian based systems like Ubuntu and other Linux operating systems as well.
1. If you want, you can print the IP address of a specific interface or device, just use the below command:

here enp0s8 is any interface or device. The naming convention may vary depending upon the naming mechanism used.
2. IP command can also be used to show the network performance statistics as follows:
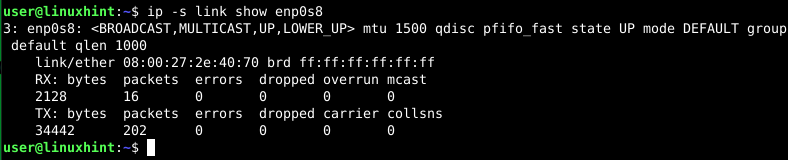
The above command output reveals the number of packets transmitted and received, packets dropped, and the packet with errors. This information can be used to troubleshoot network issues like low memory, connectivity issues, packet congestion, etc.
3. Using nmcli or Network Manager Command Line Interface tool to create a DHCP network connection

The above command will create a new connection named “MyCon1” on the device enp0s8. Let us see some details about this command:
- The configuration of this connection will be based on DHCP. The type of this connection is ethernet. Other types of network connection can be wifi, Bluetooth, vlan, bond, team, bridge, etc.
- The con-name argument defines the name of the connection.
- The ifname option specifies the name of the interface or the device assigned for this connection.
4. To create a static connection using nmcli, we will need to specify the IP address and the gateway as the argument

To activate the connection, use the following command:
To verify the new connection, run:
$ ip addr show enp0s3
5. Configuring the network with Network Interfaces File
The /etc/network/interfaces file contains the definitions of various interface configurations. We can add configuration details to create a new connection. Let us see some manual configuration:
I. Adding a static IP address:
1. Open the /etc/network/interfaces file with sudo privileges:
Now add the following lines:
iface enp0s3 inet static
address 192.168.1.63
netmask 255.255.255.0
gateway 192.168.1.1

You can add this configuration to the /etc/network/interfaces file or add it to a new file under the /etc/network/interfaces.d directory.
After modifying the above file, let’s restart the networking service for changes to take effect:
Now we will reload this interface by running the command ifdown followed by ifup:
$ sudo ifup enp0s3

The ifup and ifdown commands are used to manage the interfaces defined in this file. These tools are very helpful while configuring the network from the command-line interface. These commands can be found in /sbin/ifup and /sbin/ifdown.
II. Adding a DHCP Address:
The dhcp IP address is automatically assigned from the IP address pool of the DHCP server.
To configure a DHCP address, enter the following line to /etc/network/interfaces file and save the file:

Now restart the networking service and again run the command ifdown and ifup as above:
$ sudo ifdown enp0s3
$ sudo ifup enp0s3
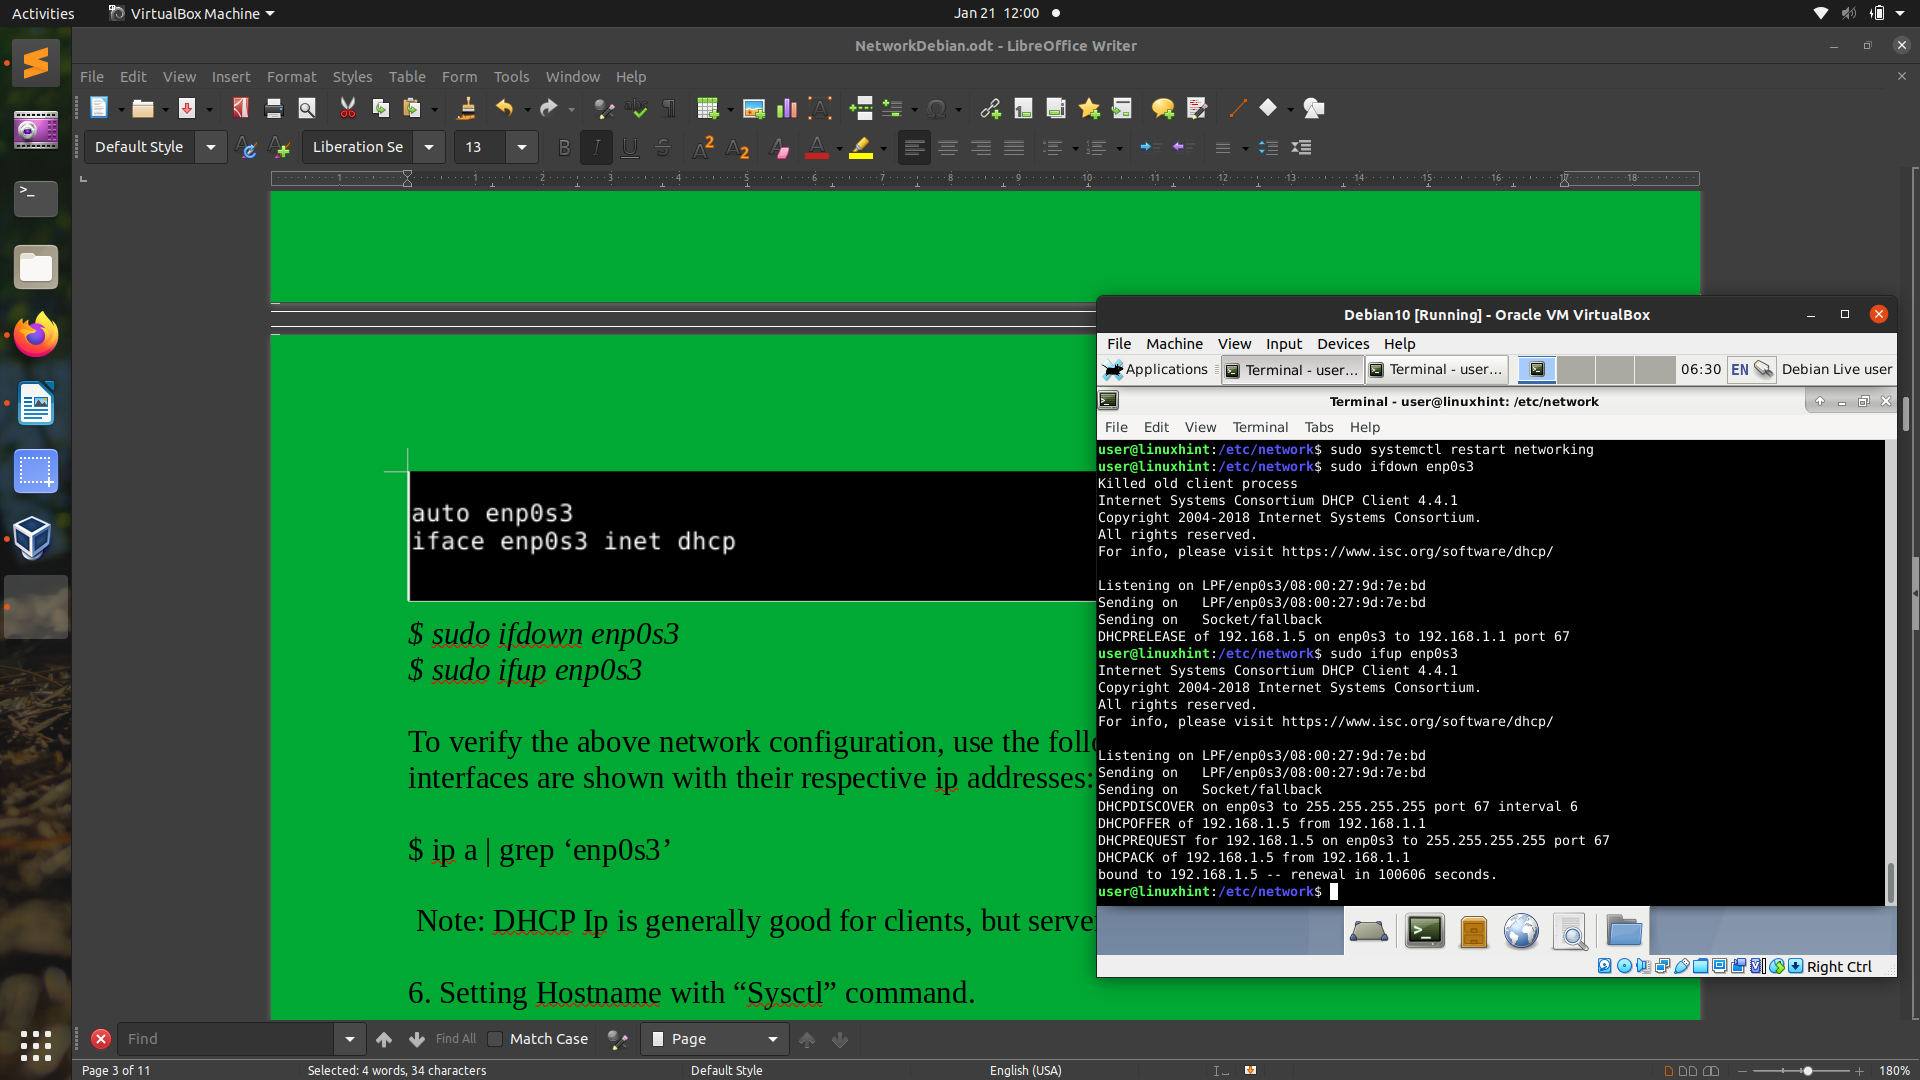
To verify the above network configuration, use the following ‘ip’ command to see if the interfaces are shown with their respective ip addresses:
Note: DHCP Ip is generally good for clients, but the server usually works on a Static IP address.
6. Setting Hostname with the “Sysctl” command
Linux provides a sysctl utility to display and set the hostname as shown below:
i) Displaying the hostname:
kernel.hostname = debian

ii) Setting the hostname
Now run the command bash exec to verify the new hostname:

Now to make this hostname permanent, we will have to edit the /etc/hosts and /etc/hostname files, so open the files and put the new hostname there:


Now from this point, you should see your new hostname every time you open a new terminal.
7. DNS configuration
DNS or domain name service is a naming system that is used to translate domain names into network addresses (IPv4 or IPv6). The DNS service has much more capability than simply translating domain names. The DNS service can work on both internet as well as on a private network.
We will configure a client to use a specific dns server. In the example below, we will configure a client to use a dns server from 8.8.8.8. Open the file /etc/resolv.conf and make the following changes to it:
Go to the line containing the string “nameserver” and add the IP address of the DNS server(8.8.8.8) as shown below:
8. Using Bonding on Debian 10
Bonding is a method in which two or more interfaces are merged to make a new logical interface. This bonded interface makes the network more reliable. In case a link fails, the other link will automatically balance all the network traffic. This increases the network availability as well. You can try bonding your wireless interface with the cable interface. If for some reason, the ethernet cable is unplugged or not working, the network traffic will automatically start flowing over the wireless interface.
Tip: We can use bonding to add multiple network interfaces (NICs) with the same IP address.
To check if your linux kernel version supports bonding, use the following command :
An output like “CONFIG_BONDING=m” shows that the bonding is enabled as a module
Let us see how to apply bonding on two ethernet interfaces, “eth1″ and” eth2″ on a Debian system. Follow the steps below:
Step 1. Install the ifenslave package to configure bonding:
Step 2. Now bring down the interface before configuring it:
Note: Before proceeding, make sure that the interface you are modifying should not be in use; otherwise, it will break your network connectivity.
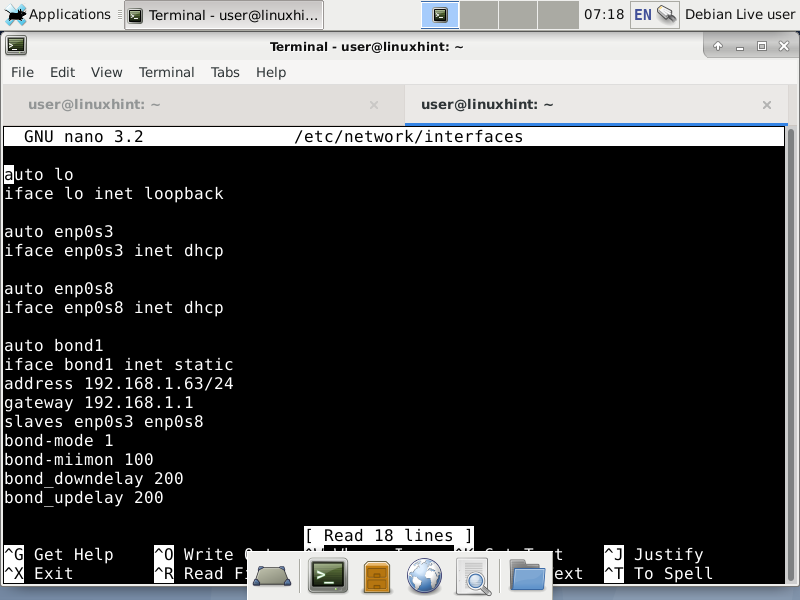
Step 3. Create a new bonding configuration and called it “bond1”. To do this, open the default network configuration file:
Now add the following lines:
iface bond1 inet static
address 192.168.1.200
netmask 255.255.255.0
gateway 192.168.1.1
slaves enp0s8
bond-mode 1
bond-miimon 100
bond_downdelay 200
bond_updelay 200
Restart the networking service
Linux supports different bond modes: balance-rr (mode=0), active-backup (mode=1), balance-xor (mode=2), broadcast (mode=3), 802.3ad (mode=4), balance-tlb (mode=5), balance-alb (mode=6). In this example we are using mode 1 or active backup as a bond mode.
Step 4. Bring the new bonded interface (bond1) up with command ifup. Now check if it works:
To check if the bind interface is created, run the following command:
or
9. Configuring bridging on Debian
Bridging is the most common way to connect two different networks. A bridge (hardware) device is used when connecting two different networks of an organization, usually located at different locations. Linux system also has the capability to create a bridge between two interfaces having different networks. This way we can pass traffic between them.
Let us create a bridge between two different interfaces, “eth0″ and” eth1,” on a Debian system.
Step 1. Install the “brctl” tool to configure bridging on the Debian system:
Step 2. Run the following command to get a list of all the network interfaces available on your system:
Step 3. create a new interface using the brtcl tool:
This will create a new virtual interface to link between eth0 and eth1.
Step 4. Now add both the interfaces to this virtual interface.
Step 5. To make this configuration permanent, we will add the new interface details to the file /etc/network/interfaces.
i) For setting a DHCP address, use the following details
auto lo
iface lo inet loopback
# Set up interfaces manually, avoiding conflicts with, e.g., network manager
iface eth0 inet manual
iface eth1 inet manual
# Bridge setup
iface br0 inet dhcp
bridge_ports eth0 eth1
Now run the below command to bring the interface up:
ii) For setting a static IP address, use the following details
auto lo br1
iface lo inet loopback
# Set up interfaces manually, avoiding conflicts with, e.g., network manager
iface eth0 inet manual
iface eth1 inet manual
# Bridge setup
iface br1 inet static
bridge_ports eth0 eth1
address 192.168.1.2
broadcast 192.168.1.255
netmask 255.255.255.0
gateway 192.168.1.1
Now run the below command to bring the interface up:
If the network does not work after rebooting, try removing /etc/network/interfaces.d/setup file to fix the issue.
10. Configuring Networking from Command-line tools
i) Adding an additional IP address to a network card:
Step 1. Run the following command to list all the available interfaces with their IP address:
or
While running “ifconfig,” you may encounter an error: “ifconfig: command not found”. For fixing this error, we need to install the “net-tools” package:
Step 2. From the output of the above command, you can select the interface on which you want to add an extra IP address. Let us add an extra IP address (10.0.2.65) to the interface enps03.
Step 3. Verify if the IP has been added to this interface:
You should see here the new and old IP address in the output.

Step 4. To make this IP address permanent, put the following lines in the /etc/network/interfaces file:
auto enp0s3
iface enp0s3 inet dhcp
iface enp0s3 inet static
address 10.0.2.65/24
Step 5. Now save the file and bring down the interface and then again bring up the interface to apply the changes:
$ sudo ifup enpo3
Now verify the connectivity of the interface with the ping command:
If everything goes right, you should see a ping coming from the new IP address.
ii) Changing the mac address of an interface.
Step 1. Run the below command to select the interface for you which you want to change the MAC address for:
It will show you all the interfaces with their mac address, state, and other information.
Step 2. Let us change the mac address of the “eth0” interface and bring it down:
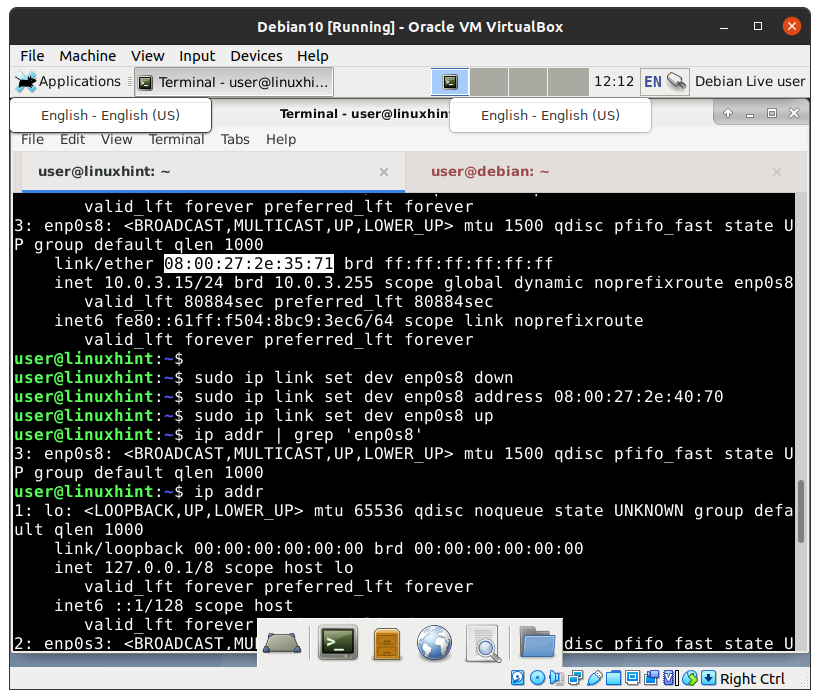
Note: Before proceeding, make sure that the interface you are modifying should not be in use. Otherwise, it will break your network connectivity.
Step 3. Now enter the new mac address as below:
Step 4. Now bring up the interface again:
That’s all configuring the new mac address; you should see the new mac address:

The output of the above command should show you the new mac address. Macchanger can also be used for changing the mac address from the command line.
iii) Enable and disable interfaces.
Besides ifup and ifdown tools, the ifconfig command can also be used to bring up and bring down an interface.
a) To bring down an interface:
b) To bring up an interface:
iv) Remove an IP address from a network interface.
To delete an IP from the network interface, use the below command:
Replace ‘your IP address’ with your IP address, e.g., the following command will delete the IP 192.168.2.2
If you have multiple IP addresses for an interface, you can delete all as shown below:
v) Set the Default Gateway
The route or ip command can be used to set a Default Gateway:
or

This guide has seen how we can modify and configure various network settings in a Debian 10 OS. If you like this guide, please share it with others.