Prerequisites:
Install GitHub Desktop
GitHub Desktop helps the git user to perform the git-related tasks graphically. You can easily download the latest installer of this application for Ubuntu from github.com. You have to install and configure this application after download to use it. You can also check the tutorial for installing GitHub Desktop on Ubuntu to know the installation process properly.
Create a GitHub account
You will require to create a GitHub account to check the output of the commands used in this tutorial.
Create a local and remote repository
You have to create a local repository and publish the repository in the remote server to test the commands used in this tutorial.
Create a simple git tag:
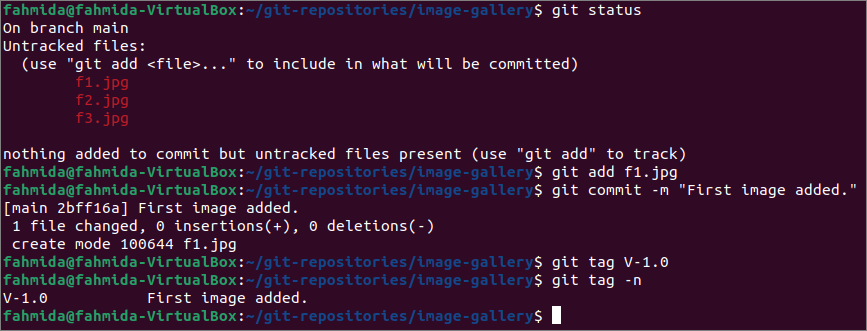
You can create a new local repository or any existing repository to check the commands used in this part of this tutorial. I have used an existing local repository named image-gallery and opened the repository folder from the terminal. Run the following commands to check the current status of the repository, add an untracked file, commit the task, create a tag, and display the list of the existing tag.
$ git add f1.jpg
$ git commit -m "First image added."
$ git tag V-1.0
$ git tag -n
The following output shows that the git repository has three untracked files, and the file f1.jpg has been added to the repository. This task has been committed. Next, a tag named V-1.0 has created and displayed.
Create git tag for a commit:
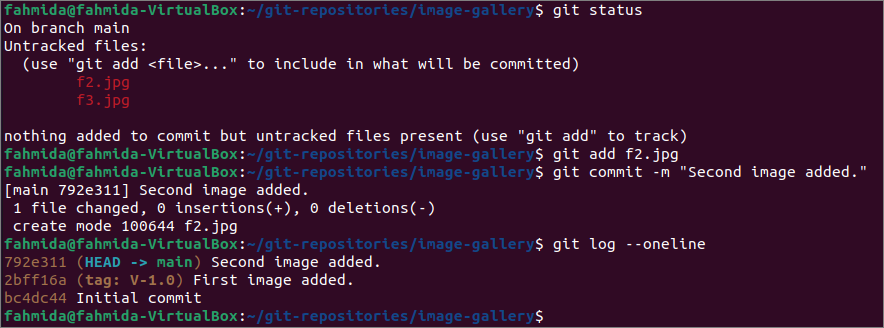
The commit SHA value is required to add a git tag for that specific commit. The `git log` command with –oneline option is used to get the short SHA code of a commit. Run the following commands to check the current git status, add an untracked file named f2.jpg, commit the task, and get the list of all commits with a short SHA value.
$ git add f2.jpg
$ git commit -m "Second image added."
$ git log --oneline
The following output shows that the repository has two untracked files, one file is added, and the task is committed. Next, the `git log` command shows that the list of three commit tasks with SHA values.
Select the commit SHA value from the log output and run the following commands to create a tag for that specific commit and check the log information again.
$ git log --oneline
The following output shows that a tag named V-2.0 has been added for the commit SHA value, 792e311.
Create git tag for the last commit:
Creating a new tag-based on any commit SHA value has been shown in the previous example. But if you want to create a tag for the last commit, then you don’t need to know the Commit SHA value. A new file has been added, and the task has been committed like the previous part of this tutorial. Run the `git log –online` command to check the last committed task.
The following output shows that the last committed message is “Third image added,” and it has committed in the branch main.
The last committed task can be referred by the HEAD, and you don’t need the commit SHA to create a tag for the last commit. Run the following commands to create a tag for the last commit with HEAD and display the log information after creating the tag.
$ git log --oneline
The following output shows that a tag named V-3.0 has been created for the last commit.
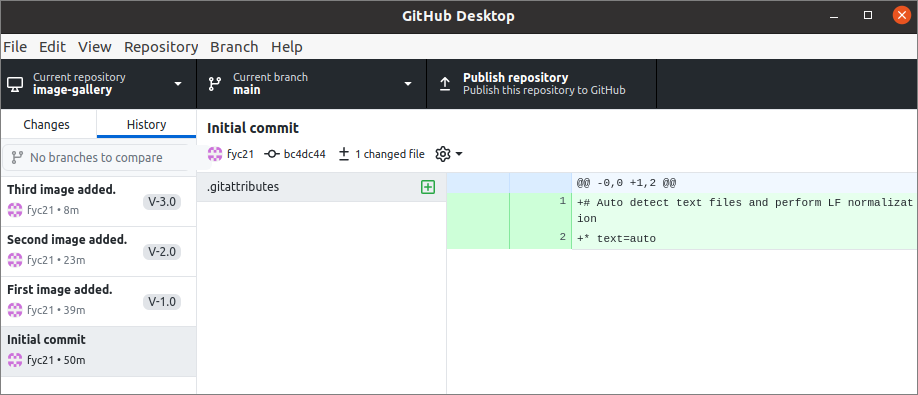
Now, open the repository from the GitHub Desktop. The following image shows three commits’ messages with the three tag names created in the previous part of this tutorial. Now, click on the Publish repository option to publish the updated content of the local repository to the remote repository.
When the repository is published through GitHub Desktop, then it does not publish the added tag information. So, the added tag can be published to the remote repository by using the `git push` command. Run the following command to push the tag information to the remote server. You have to provide the username and password of the git account to execute the command properly.
The following output shows that three new tag entries have been pushed into the remote repository.
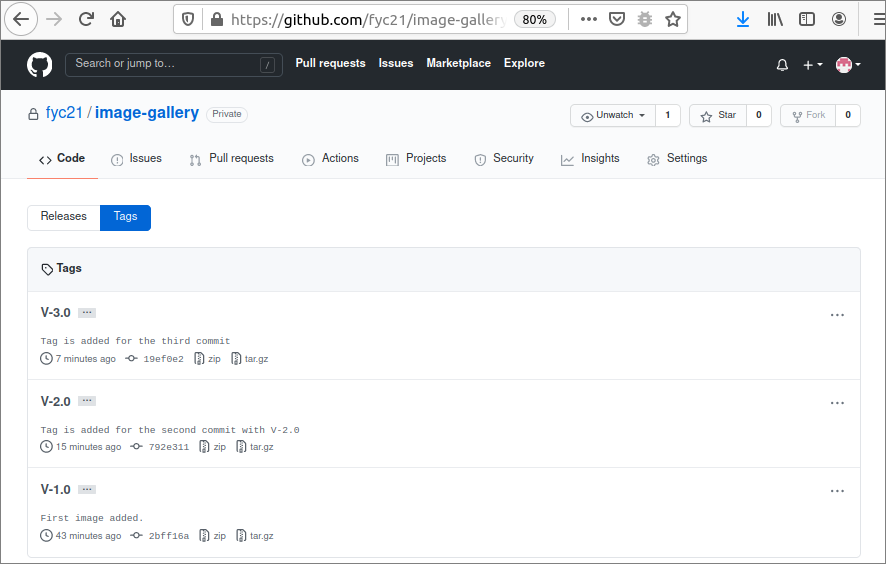
Now, login to the git account from github.com and open the remote repository named image-gallery that has been published in the earlier step. When the tag link has clicked, then the information has appeared. All the published tags with tag messages are displaying here.
Conclusion:
Different ways to add the tag-specific commit have been described in this tutorial by using a demo git repository. A simple tag, a tag with a specific commit SHA, and a tag for the last commit have been created in this tutorial to help the readers know how to create a tag and apply it properly in their repository.


