This article will exemplify the method of adding dimensions to a Tensor in PyTorch.
How to Add a Dimension to the Specific Tensor in PyTorch?
Users can add dimensions to any Tensor, such as a 1D tensor or 2D tensor in PyTorch. To add new dimensions to tensors at a specific position, check out the following examples for a better understanding:
- Example 1: Add Dimension to a 1D Tensor in PyTorch
- Example 2: Add Dimension to a 2D Tensor in PyTorch
Example 1: Add Dimension to a 1D Tensor in PyTorch
In this example, we will create a 1D tensor and add a dimension to it at a particular position. Follow the below-listed steps for a practical demonstration:
Step 1: Import Library
First, import the torch library:
Step 2: Create 1D Tensor
Then, create a one-dimensional tensor. For instance, we have created the following tensor and stored it in the “x” variable:
Step 3: View Tensor Shape
Next, display the newly created tensor shape to view its dimensions:
The below output indicates that our tensor is one-dimensional:
Step 4: Add Dimension to 1D Tensor
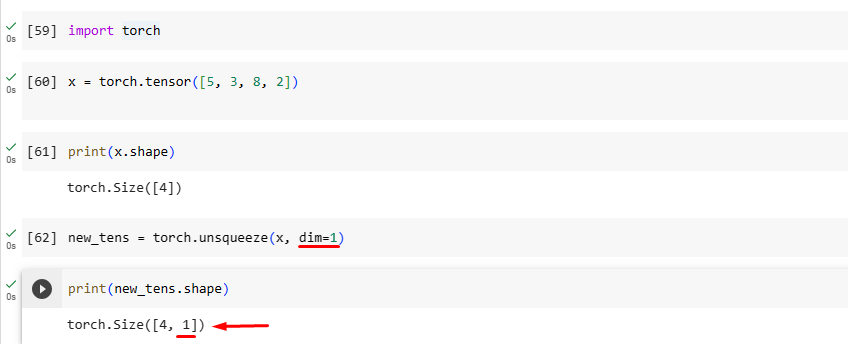
Now, utilize the “torch.unsqueeze(input, dim)” function to add the dimension to the 1D tensor at the specific position. For instance, we are adding the dimension to the tensor at 0 index:
Here,
- “new_tens” is the variable that includes the added dimension.
- “x” is the input tensor.
- “dim=0” is used to add dimension at 0 index.
Step 5: Verify Output
Finally, ensure that a new dimension has been added to the tensor or not:
In the below output, it can be observed that the new dimension has been added to the 1D tensor at the 0 index:
Moreover, users can also add dimensions to other positions. Here, we have added the dimension at first index:
Example 2: Add Dimension to a 2D Tensor in PyTorch
Here, we will create/make a 2D tensor and add a dimension to it at the specific position. Try out the given-provided steps for practical implementation:
Step 1: Import Torch Library
First, import the torch library:
Step 2: Create a 2D Tensor
Then, create a two-dimensional tensor. For instance, we have created the following tensor and stored it in the “x” variable:
Step 3: View Tensor Shape
After that, display the newly created tensor shape to view its dimensions:
According to the below output, this tensor is two-dimensional:
Step 4: Add Dimension to 2D Tensor
Now, add the dimension to the 2D tensor at the specific position using the “torch.unsqueeze(input, dim)” function. For instance, we are adding the dimension to the tensor at 0 index:
Step 5: Verify Output
Lastly, verify whether the new dimension has been added to the 2D tensor or not:
The below output indicates that the new dimension has been successfully added to the 2D tensor at the 0 index:
Note: You can access our Google Colab Notebook at this link.
We have efficiently explained the method of adding dimension to a tensor in PyTorch using different examples.
Conclusion
To add dimensions to a tensor in PyTorch, first, import the PyTorch library. Then, create a 1D or 2D tensor and view its dimensions. After that, add the dimension to a tensor at the specific position by using the “torch.unsqueeze(input, dim)” function. Users need to pass the input tensor and desired index position as a parameter to this function. This article has exemplified the method of adding dimensions to a tensor in PyTorch.


