Pre-requisites:
Install GitHub Desktop
GitHub Desktop helps the git user to perform the git-related tasks graphically. You can easily download the latest version installer of this application for Ubuntu from github.com. You have to install and configure this application in order to use it after downloading. You can also check the tutorial for installing GitHub Desktop on Ubuntu to know the installation process properly.
Create a GitHub account
You will be required to create a GitHub account to check the added commit message in the remote server.
Create a Local and Remote Repository
You have to create a local repository for checking the commands used in this tutorial to add a git commit message. Next, you have to publish the local repository to your GitHub account to check the commit message.
Add a Commit Message:
Open the terminal and go to the location of the local repository. Run the following command to initialize the git before adding the commit message.
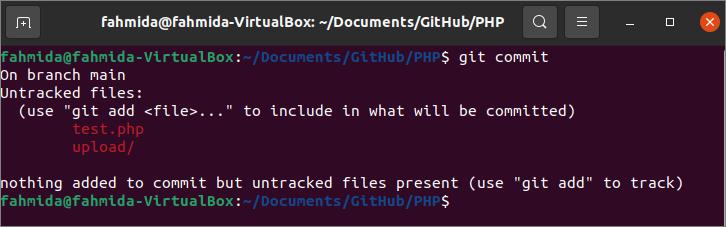
Run the following command to check if any message is committed or not before, and the list of the tracked and untracked files:
The following output shows that the repository folder contains a file and folder that are untracked and no commit message is added before.
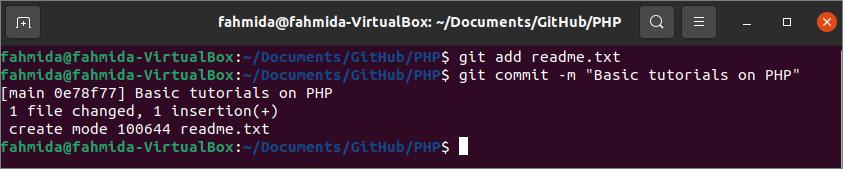
Create a readme.txt file in the current repository folder and run the following command to add the file to the repository:
Run the following command to add the first commit message for the repository:
The following output will appear after executing the above commands. Here, a text file and a commit message have been added to the local repository.
Change the Commit Message:
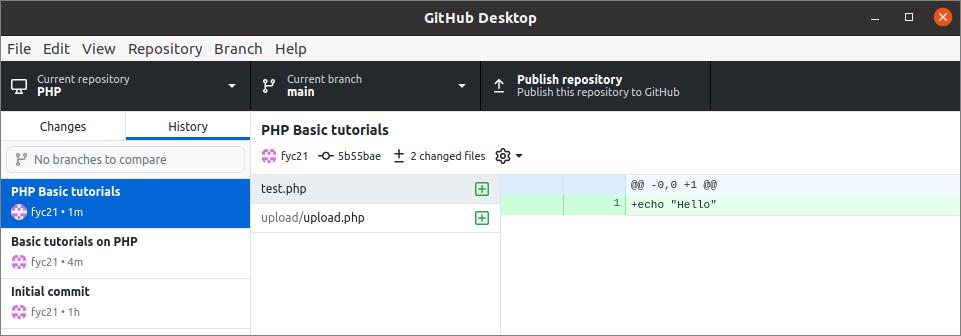
You can change the commit message after adding a new file and folder in the local repository. Run the following commands to add the upload folder and test.php file in the repository that was untracked before.
$ git add test.php
Run the following command to add the new commit message for the local repository.
The following output will appear after executing the above three commands. The output shows that test.php and the upload folder with upload.php have been added to the repository and a commit message, “PHP Basic tutorials“, has been added for these files and folder.

Now, open the above local repository in the GitHub Desktop and click on the Publish repository option to publish the repository in the remote server.
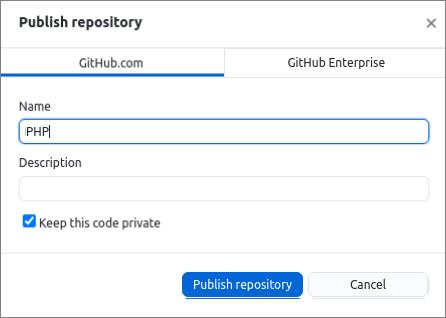
The following dialog box will appear to select the remote server and set the repository name for the remote server. A github.com account has been used in this tutorial for publishing the repository. So, GitHub.com has been selected as the remote server and the repository name has been set to PHP. To keep the repository private in the remote server, the “Keep this code private” option has been selected before publishing the repository.
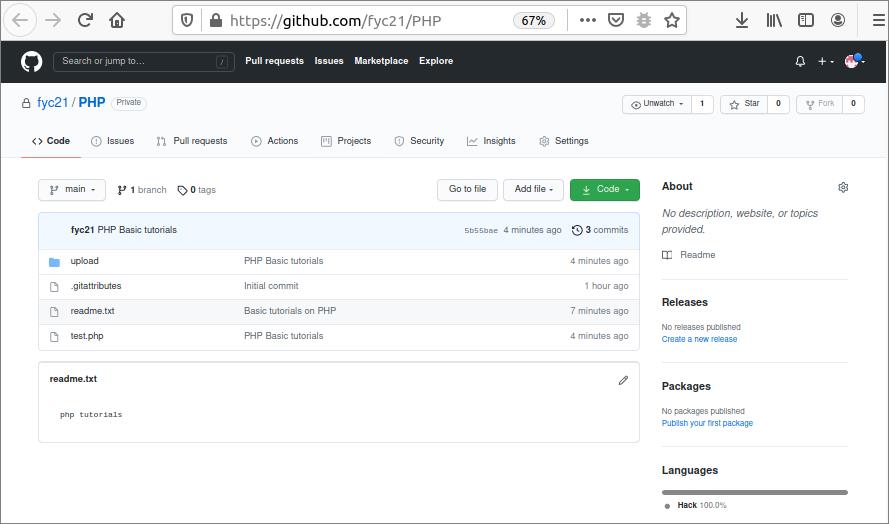
The following information will be displayed when the previously published repository is opened from github.com. Here, three commit messages are displaying. “Initial commit” is added by GitHub. “Basic tutorials on PHP” and “PHP Basic tutorials” are the custom commit messages; these have been added before.
Add Commit Message with Description for a Particular Folder:
In the previous two commit commands, the commit messages were set on all added files and folders. But you can add commit message with the description for any particular file or folder. If you want to add commit message in the local repository after publishing the repository, then you have to re-initialize the repository again. Run the following commands to re-initialize the repository that will remove all previously added files and folders from the repository.
$ git init
Now, run the following command to add the upload folder in the local repository:
Run the following git commit command to add the commit message with a description for the upload folder. Here, “Upload file” is the commit message title, and the “Using PHP Script” is the commit message description. When the user keeps the mouse on the message title, then the message description will be displayed with the title after publishing the repository.

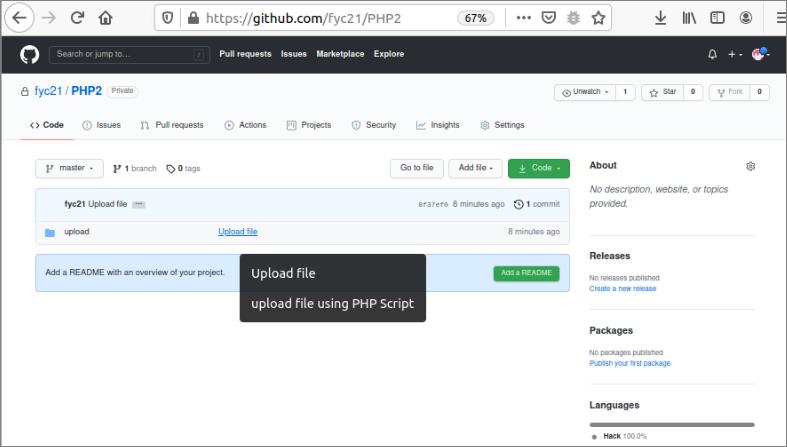
Publish the repository with the name, PHP2, in the private mode by using GitHub Desktop application that was shown in the previous part of this tutorial. Open the repository from the remote server, github.com. The following content will be displayed when the user will keep the mouse on the “Upload file” link.
Conclusion:
Using meaningful commit message helps the GitHub users understand the purpose of using any file or folder of the GitHub repository. The ways to add new commit message, change a commit message, and add commit message for a particular folder with description and title, all of these have been shown in this tutorial using a demo repository.