Designed by Graydon Hoare at Mozilla Research, Rust was created with contributions from many renowned developers including Brendan Eich, the developer of JavaScript, and Dave Herman, the developer of Servo, the internet browser engine with “asm.js”. The designers of the Rust language improved this language and added new features while writing the Servo scanner engine. Rust, which has a free and open-source compiler, has succeeded in being the “most loved software language” in the Stack Overflow developer surveys for the last four years.
Through this guide, we will go and explain all the basic concepts of Rust programming language starting from the installation to variables, constant functions, and all the important aspects to get started using Rust.
Install Rust on Linux, Windows, and Mac
To run the Rust code on our machines, we need a compiler that translates our Rust code into a machine code. Fortunately, there are two convenient installation methods available: using Rustup or using the installer.
Install Rust Using Rustup
Rustup is the official tool for Rust tooling management. Rustup simplifies the process of installing Rust and updating or changing the versions of Rust.
How to install rustup for each operating system can be seen in the following demonstrations:
Install Rust in Linux/Mac
Run the following command to install rustup and check the installation results:
After the installation is completed, we can check the installed tools using the following command:
rustc --version
cargo --version

This shows you the version for each tool. The “rustc” is the command line compiler for Rust. Rustup is a tool that allows us to manage Rust like update, delete, or switch between Rust versions in case you install more than one version.
Note: If you are using Fish Shell, run this command to add Rust to Fish Shell’s environment variables.
If you did this, you just installed Rust on your Linux/mac machine.
Install Rust on Windows
Download the “rustup-init.exe” file at Rust tool.
After that, we get a file called “Rustup-init.exe”. Open this file by double-clicking it to start the installation process.
After the installation is completed, you can then run the following command to check the installation results:
rustc --version
cargo --version
This shows the version for each tool.
In case you are using WSL (Windows Subsystem for Linux), you can use the following command:
Install Rust Using the Standalone Installers
Download the installer according to the operating system and platform that are used using this link.
After the installation is completed, you can check by the same instruction: Open CMD then type the commands:
rustc --version
cargo --version
This shows the version for each tool. It means that the installation of Rust on Windows has been successful.
How to Update Rust
If you use “rustup”, updating the Rust tooling can be done simply by running the following command:
For Rust which is installed using the installer, the “update” method is done by downloading and running the latest version of the installer which can be downloaded from this link.
Optional Tools for Rust Programming
1. Cargo
Cargo is a build system and package management for Rust projects. Cargo functions to download the packages, compile or build the projects, and upload the packages to “crates.io”.
2. Rustfmt
Rustfmt is a program to format the Rust syntax. Usually, we need to clean up the messy syntax.
3. Clippy
Clippy is a linter that checks Rust’s syntax to follow the correct writing standards.
4. Text Editor/IDE
To write the Rust programs, we need a text editor or integrated development environment (IDE) that provides a comfortable and efficient environment for coding. While the choice of text editor or IDE is subjective and depends on personal preference, we use Vim as an example. However, feel free to use any text editor or IDE that you are comfortable with.
In the initial stages, we only need the Rust compiler and the text editor. For other tools such as Cargo, Rustfmt, and Clippy, we don’t really need them now.
Create your First Rust Program
After installing all the necessary tools, we create the first program. To do this, we need a text editor (you can choose either the simplest one like a regular notepad or Notepad ++ or a more fancy ones like Visual Studio Code).
First, let’s create a folder on the hard drive for the files with the source code. In our case, we create a folder named “rust-guide”.
Let’s create a new text file in this folder and name it as “main.rs” (usually, files with Rust code have the “rs” extension). Let’s open it in a text editor and define the following code in it:
println!("Welcome to Rust Guide With LinuxHint");
}
In this case, we define a function called “main”. This function starts the execution of any Rust program.
A function definition starts with the “fn” keyword followed by the name of the function; it is “main” in this case. After the name of the function, in parentheses, there is a list of parameters. In our case, the main function does not require parameters, so we leave the brackets empty.
Then, there are curly braces {} which define the body of the function – the actions that the function actually performs. In this case, this is the output of a string to the screen in the console. To print a string to the screen, a special macro is used which is available in Rust by default (println!) in parentheses after the “!” defines the string that is printed to the console – in this case, it is the “Welcome to Rust Guide With LinuxHint” string.
The macro call ends with a semicolon (;). After each individual statement in Rust, it ends with a semicolon. Accordingly, after calling a macro that represents a separate instruction, a semicolon is also placed.
Now, let’s compile this program. To do this, open the console/command line and use the “cd” command to navigate to the folder with the “main.rs” file. Since in our case, this file is located in the “rust-guide” folder, we need to enter the command in the console:
Next, to compile our code, enter the following command in the console:
After executing this command, the binary file which is “main” appears in the folder with the source file. Let’s run it:

If you are in Windows, the filename is “main.exe” and to run it just like this:
That’s it! You just wrote your first Rust program.
Variables in Rust
Rust uses variables to store the data in a program. Each variable is characterized by three elements: the name of the variable, the data type of the variable, and its value.
Rust uses the “let” keyword to define a variable:
The “let” keyword is followed by the name of the variable. Then, a colon is used to indicate the type of the variable. Since a variable definition represents a single statement, it ends with a semicolon.
For example:
In this case, the variable is named “name” and has the “str” type. The “str” type represents a string value which is a variable that can store a string value.
Once a variable is defined, it can be assigned with a value. The value that is assigned to a variable must match its type. For example, the previous variable which is “name” is of “str” type which is a string. Therefore, only a string value can be assigned to it. Use the equal sign (=) to assign a value to a variable:
name = "LinuxHint";
In this case, the “name” variable stores the “LinuxHint” value. Assigning an initial value to a variable is called initialization, and the variable after the first assignment of a value to it is initialized.
You can also immediately assign a value to a variable when it is defined:
A variable in Rust must have a specific type. However, we cannot specify the type if we immediately assign a value to it when declaring a variable. Rust itself, based on the assigned value, deduces the type of the variable:
Using Variables
Once we defined and initialized a variable, we can use it. For example, print the value of a variable to the console:
let title: &str;
title = "Learn Rust With LinuxHint";
println!("Title of Tutorial = {}", title);
}
The macro “println!” is used for the output to the “!” console. It outputs a string of text that is enclosed in double quotes:
To add the value of a variable to the output string, the curly braces “{}” are used in the string. The output variable is specified after the line, separated by commas:
That is, instead of curly braces, the value of the variable is inserted.
As a result, the following is displayed on the console:

Similarly, we can print the values of several variables to the console at once:
let title = "Learn Rust With LinuxHint";
let website = "LinuxHint.com";
println!("Title = {} Website = {}", title, website);
}
In this case, two variables are defined. One variable which is “full_name” stores the strings, while the other variable stores the “LinuxHint.com” value.
Since we now need to display the values of two variables, two pairs of curly braces are defined in the string that is passed to the macro “println!”:
After the line, the variables are listed – the values of which must be inserted into the line instead of curly braces:
The first variable in this list name provides the value for the first pair of curly braces, the second variable provides the value website for the second pair of curly braces. As a result, the following is displayed on the console:

The macro println!() adds a newline. That is, each new call to this macro displays the data on a new line. But there is also a macro print!() that outputs the data on the same line:
let age = 33;
let full_name = "Linux HInt";
print!("Name = {} ", full_name);
print!("Age = {}", age);
}
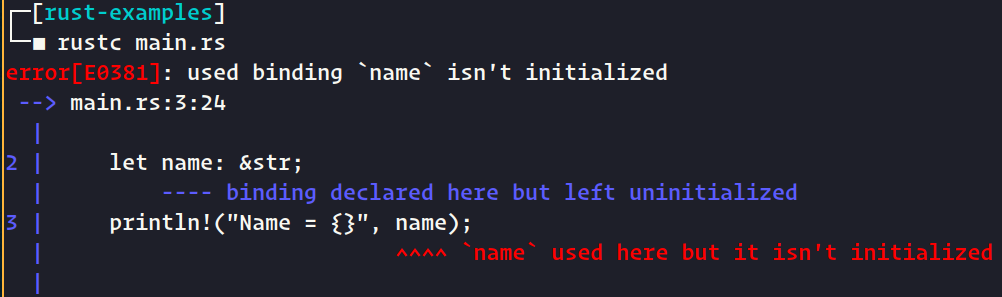
It should be noted that we can’t use an uninitialized variable (a variable that hasn’t been assigned with a value). For example, in the following case, when compiling, the compiler displays an error to us:
let name: &str;
println!("Name = {}", name);
}
The output looks like this:
Change the Value of a Variable
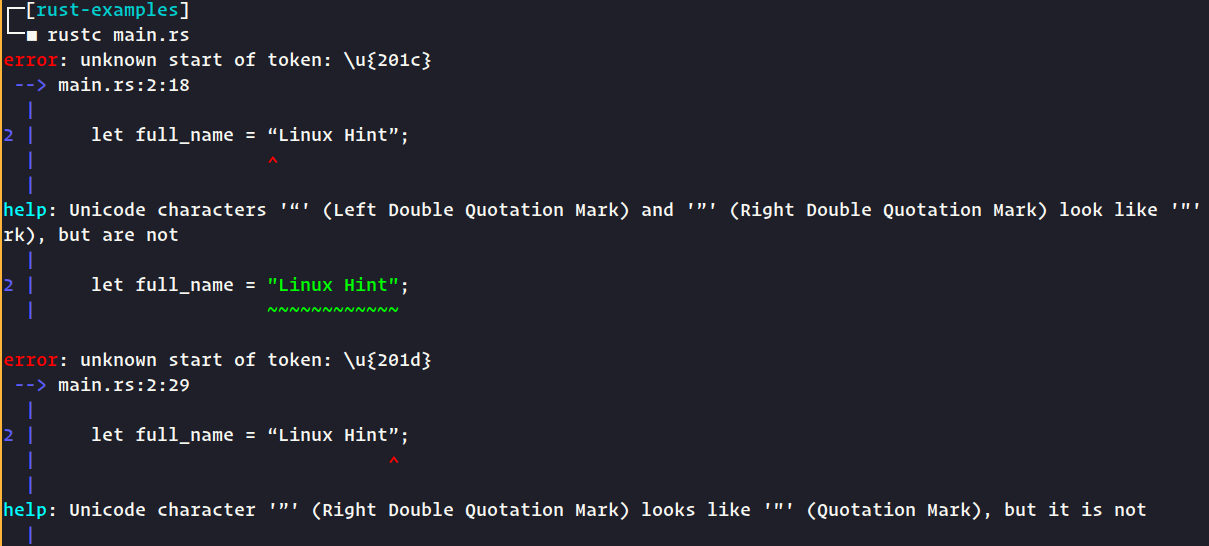
By default, all variables in Rust are immutable. This means that once a variable is assigned with a value, its default value can no longer be changed. If we try to do this, we will encounter an error as such as in the following case:
let full_name = “Linux Hint”;
full_name = “Mead”;
println!("Name = {}", full_name);
}
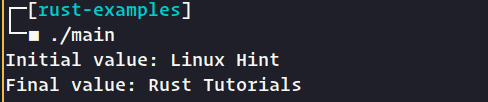
However, it may sometimes be necessary to change the value of a variable. So that the value of a variable can be changed during the program, when defining a variable, the “mut” keyword is used before its name:
After that, you can change the value of the variable:
let mut full_name = "Linux Hint";
println!("Initial value: {}", full_name );
full_name = "Rust Tutorials";
println!("Final value: {}", full_name);
}
The output looks like this:
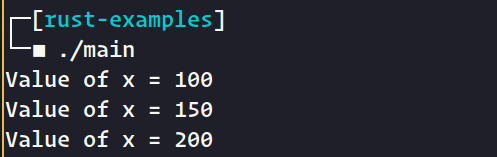
Variable Shading
In Rust, you can use something that is called shadowing or shading/hiding variables. That is, we can define a variable with the same name and it hides (shades) the definition of the previous variable with the same name.
let x = 100;
println!("Value of x = {}", x);
let x = 150;
println!("Value of x = {}", x);
let x = 200;
println!("Value of x = {}", x);
}
The output looks like this:
Data Types in Rust
Rust is a statically typed language which means that every variable must have a defined data type. Every value in Rust has a specific data type. The data type defines the set of allowed values and specifies the set of operations that can be applied to those values and how much memory they can occupy.
Data types are primitive (or scalar) and composite. Consider the following primitive data types:
Integer Data Types
A number of data types can store the integers:
i8: It stores a signed integer and occupies 8 bits in memory (value range -128 to 127).
u8: It stores a positive integer and occupies 8 bits in memory (range 0 to 255).
i16: It stores a signed integer and occupies 16 bits in memory.
u16: It stores a positive integer and occupies 16 bits in memory.
i32: It stores a signed integer and occupies 32 bits in memory.
u32: It stores a positive integer and occupies 32 bits in memory.
i64: It stores a signed integer and occupies 64 bits in memory.
u64: It stores a positive integer and occupies 64 bits in memory.
i128: It stores a signed integer and occupies 128 bits in memory.
u128: It stores a positive integer and occupies 128 bits in memory.
isize: It stores a signed integer whose dimension depends on the computer architecture – 64 bits on a 64-bit architecture and 32 bits on a 32-bit architecture.
usize: It stores a positive integer whose dimension depends on the architecture of the computer – 64 bits on a 64-bit architecture and 32 bits on a 32-bit architecture.
As you can see from the list of types, they have logical names. First comes the letter “i” if the number can be positive and negative, or the letter “u” if the number can only be positive. Next comes the dimension of the number in bits – how much it occupies in memory.
Examples of using types:
let x: i8 = 200;
println!("value of x: {}", x);
let y: u16 = 1000;
println!("value of y: {}", y);
let z: isize = 5678;
println!("value of z: {}", z);
}
If no type is specified, the numeric value is assumed to be of type i32:
Integers can be specified in binary, octal, decimal, and hexadecimal format.
The binary format precedes the number with “0b”:
The octal format precedes the number with “0o”:
The hexadecimal format precedes the number with “0x”:
Fractional Numbers
Fractional numbers, or more precisely floating point numbers, are represented by two types:
f32: It stores a floating point number that occupies 32 bits in memory.
f64: It stores a floating point number that occupies 64 bits in memory.
A dot is used as a separator between the integer and fractional parts. If the type is not explicitly specified, the fractional value is assumed to be of type “f64” by default:
let p: f32 = 3.14;
println!("value of p: {}", p);
let x: f64 = 125.573;
println!("value of x: {}", x);
let z = -56.008;
println!("value of z: {}", z);
}
Boolean Type
The Boolean type or bool can store one of two values: true (true) or false (false).
let admin: bool = true;
println!("value of admin : {}", admin);
let x = false;
println!("value of x: {}", x);
}
Character Type
The character type or char can store the individual Unicode characters. Each character is enclosed in single quotes. It occupies 4 bytes in memory.
let x: char = 'y';
println!("value of x: {}", x);
let y = 'x';
println!("value of y: {}", y);
}
Strings
Strings are not primitive types, but let’s consider them because they are used quite often. The string stores the UTF-8 character set which is enclosed in double quotes that is used as a “&str” type specifier:
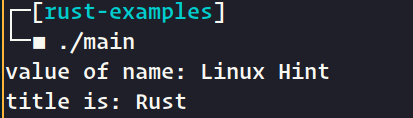
let name: &str = "Linux Hint";
println!("value of name: {}", name);
let title = "Rust";
println!("title is: {}", title);
}
Arithmetic Operations
Rust supports all basic arithmetic operations. Arithmetic operations are performed on numbers, namely on values that represent the “i8”, “i16”, “i32”, “i64”, “i128”, “isize”, “u8”, “u16”, “u32”, “u64”, “u128”, “usize”, “f32”, “f64” types.
Consider the following binary arithmetic operations:
The addition (+) operation returns the sum of two numbers:
The subtraction (-) operation returns the difference of two numbers:
The multiplication (*) operation returns the product of two numbers:
The division (/) operation returns the quotient of two numbers:
It should be noted that if both operands of the operation represent the integers, then only the integer part is returned when dividing from a fractional result:
The (%) operation is used to obtain the remainder of an integer division:
A Number of Operations Combined with Arithmetic Operations and the Assignment (=) Operation
(+=) Assignment after addition. It assigns the sum of the left and right operands to the left operand: A += B is equivalent to A = A + B.
result += 6; // result = 18
(*=) Assignment after multiplication. It assigns the product of the left and right operands to the left operand: A *= B is equivalent to A = A * B.
result *= 6; // result = 72
(-=) Assignment after subtraction. It assigns the difference of the left and right operands to the left operand: A -= B is equivalent to A = A – B.
result -= 6; // result = 6
(/=) Assignment after division. It assigns the quotient of the left and right operands to the left operand: A /= B is equivalent to A = A / B.
result /= 6; // result = 2
(%=) Assignment after modulo division. It assigns the remainder of the integer division of the left operand by the right to the left operand: A %= B is equivalent to A = A % B.
result %= 6; // result = 3
Bitwise Operators
Bitwise operations are performed on individual digits or bits of numbers. These operations are performed only on integers.
Shift Operations
Each integer in memory is represented as a certain number of digits. Shift operations allow you to shift the bit representation of a number by several bits to the right or left. Shift operations apply only to integer operands. There are two operations:
(<<) – Shifts the binary representation of the number that is represented by the first operand to the left by the number of bits that is specified by the second operand.
(>>) – Shifts the binary representation of a number to the right by a specified number of digits.
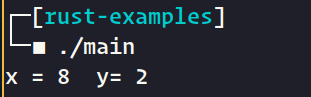
let y = 16 >> 3;
The number 2 in binary is 10. If you shift the number 10 two places to the left, you get 1000 which is 8 in decimal.
The number 16 in binary is 10000. If you shift the number 10 three digits to the right (the last three digits are discarded), you get 10 which represents the number 2 in decimal.
For a more visual representation, you can also use the binary format of numbers:
let y = 0b10000 >> 3;
println!("x = {} y= {}", x, y);
The result is the same:
Two more operators combine the assignment and shift operations:
(<<=) – The assignment after a bit shifts to the left. It assigns to the left operand the result of shifting its bit representation to the left by a specified number of bits that is equal to the value of the right operand: A <<= B is equivalent to A = A << B.
(>>=) – The assignment after a bit shifts to the right. It assigns to the left operand the result of shifting its bit representation to the right by a specified number of bits that is equal to the value of the right operand: A >>= B is equivalent to A = A >> B.
Operation examples:
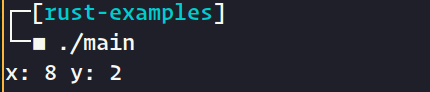
let mut result = 8;
println!("result = {}", result);
result <<= 2; // 8 in binary is 1000,
// then shift 2 digits to the right 100000 or 32 in the decimal system
println!("result after shift 2 digit to the right = {}", result); // 32
}
The result should be as follows:

Bitwise Logical Operations
The bitwise logical operations are also performed only on the corresponding bits of integer operands:
(&): The bitwise conjunction (AND operation or bitwise multiplication) returns 1 if both of the corresponding digits of both numbers are 1.
(|): The bitwise disjunction (OR operation or bitwise addition) returns 1 if at least one of the corresponding digits of both numbers is 1.
(^): The bitwise XOR returns 1 if only one of the corresponding digits of both numbers is 1.
Application of Operations:
let y = 6 & 2;
let z = 5 ^ 2;
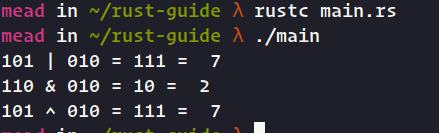
For example, the expression 5 | 2 is 7. The number 5 in binary notation is 101, and the number 2 is 10 or 010. Let’s add the corresponding digits of both numbers. When adding, if at least one bit is equal to 1, the sum of both bits is equal to 1. Therefore, we get the following result:
0 1 0
1 1 1
As a result, we get the number 111 which represents the number 7 in decimal notation.
Let’s take another expression which is 6 & 2. The number 6 in binary notation is 110, and the number 2 is 10 or 010. Let’s multiply the corresponding digits of both numbers. The product of both bits is equal to 1 if both of these bits are equal to 1. Otherwise, the product is equal to 0. Therefore, we get the following result:
0 1 0
0 1 0
We get the number 010 which is 2 in decimal.
Conditional Expressions in Rust
Conditional expressions represent a condition and return a bool value: true (if the condition is true) or false (if the condition is false). Conditional expressions include the comparison operations and logical operations.
Comparison Operations
Comparison operators compare two values and return true or false depending on the result of the comparison. Rust has the following comparison operators:
Operation equals. It returns true if both operands are equal and false if they are not equal:
let y = 8;
let z: bool;
z = x == y; // = false
Operation not equal. It returns true if the first operand is not equal to the second operand and false if both operands are equal:
let y = 8;
let z: bool;
z = x != y; // = true
Operation “greater than”. It returns true if the first operand is greater than the second operand and false if the first operand is less than the second operand:
let y = 8;
let result: bool = x > y; // result = false
Operation less than or equal to. It returns true if the first operand is less than or equal to the second operand and false if the first operand is greater than the second operand:
let y = 8;
let z = x < y; // = true
Greater than or equal to operation. It returns true if the first operand is greater than or equal to the second operand and false if the first operand is less than the second operand:
let y = 8;
let z = x >= y; // = false
Boolean Operations
Logical operations usually combine several comparison operations. The logical operations include the following:
(!) – A unary operator that returns true if the operand is false. If the operand is true, the operation returns false.
let y = false;
let mut z = !x; // z= false
z = !y; // z = true
(&&) – It returns true if both operands are not equal to false. It returns false if at least one operand is false.
let y = false;
let mut z = x && y; // z = false
println!("z = {}", z);
z = 10 > 4 && 4 < 8; // z = true (10 > 4 equals true and 4 < 8 equals true)
println!("z = {}", z);
(|) – It returns true if at least one operand is true. It returns false if both operands are false.
let y = false;
let mut z = x || y; // z = true
println!("z = {}", z);
z = 4 > 10 || 8 < 4; // z = false (2 > 10 equals false and 5 < 4 equals false)
println!("z = {}", z);
If Conditions
The “if..else” conditional directs the program to one of the possible paths depending on the condition.
If Construct
The “if” construct checks if the condition is true. If it is true, it executes the block of statements. This operator has the following abbreviated form:
{
instructions;
}
The condition is a conditional expression that returns a bool value of true or false. If the condition returns true, the subsequent statements that are included in the “if” block are executed. If the condition returns false, the instructions from the block if are not executed. A block of statements is enclosed in curly braces.
For example:
let a = 5;
if a == 5
{
println!("Condition is true: a is equal to 5");
}
}
Here, the “if” construct checks if the condition is true a == 5. If it returns true, the statement is executed in println! (“Condition is true : a is equal to 5“); which prints the string to the console. Since the “a” variable in this case is equal to 5, the instructions from the block are executed in “if”. Let’s see the corresponding message on the console:
Condition is true: a is 5
Consider another case:
let a = 5;
if a < 3
{
println!("Condition true: a smaller than 3");
}
println!("End of programs");
}
Here, the “if” construct checks the truth of the “a < 3” condition (whether the value of the variable number is less than 3). Since “a” is 5, this condition is false and returns false. So, the instructions in the “if” block will not be executed.
Else Statement
We can also use the full form of the “if” construct which includes an “else” statement:
{
instructions;
}
else
{
instructions;
}
After the “else” statement, we can define a set of statements that are executed if the condition after the “if” statement returns false. If the condition is true, the block statements are executed in “if”. If this expression is false, the block statements are executed in “else”.
let a = 5;
if a > 6
{
println!("Condition is true: a is greater than 6");
}
else
{
println!("Condition is false: a is NOT greater than 6");
}
}
In this case, the “a > 6” condition is false. Since it returns false, the “else” block is executed. As a result, the following line is displayed on the console:

Else If Statement
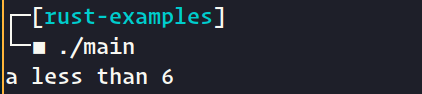
However, it is often necessary to process not only two possible alternatives but many more. For example: in the previous case, three conditions can be counted: a variable can be greater than 6, less than 6, and equal to 6. To test the alternative conditions, we can enter an “else if” statement after which the alternative condition is specified:
let a = 5;
if a > 6
{
println!("a greater than 6");
}
else if a < 6
{
println!("a less than 6");
}
else
{
println!("a equal 6");
}
}
In this case, we get three branches of the development of events in the program. And since the condition in the “else” expression if “a < 6” returns true, the statements from the block are executed in “else if”:
If Let Statement
The “let-if” construct allows you to get the result of the construct into the “if..else” variable:
{
value if condition is true
}
else
{
value if condition false
};
For example:
let condition = true;
let a = if condition { 4 }
else { 5 };
println!("a = {}", a); // a = 4
}
Here, if the condition that is represented by the variable condition is true, “a” is 4. If the condition is false, “a” will be 5. And since the condition here is true, “a” is 4.
Match Construct
The “match” construct evaluates some expression and compares it to a set of values. The matching of values executes a certain code.
The match construct has the following formal definition:
{
value1 => actions1,
value2 => actions2,
.................
_ => actions,
}
The “match” statement is followed by a comparison expression such as a variable. The following is a list of values to compare against.
After each value, after the => operator, there are actions that are performed if this value matches the compared expression.
At the end, after all values, a generic value “_” is indicated. The actions of which are performed if none of the values match the compared expression.
For example:
let num = 2;
match num
{
1=>println! ("x is equals to 1"),
2=>println! ("x is equals to 2"),
3=>println! ("x is equals to 3"),
_=>println! ("x is not 1 or 2 or 3")
}
}
Here in the construction, the value of the “x” variable is sequentially compared with the values of 1, 2, and 3. Since the “x” variable is equal to 2, it corresponds to the following value:
Rust Control Flow
Loops allow you to perform an action multiple times. Rust has the following kinds of loops: for, while, and loop.
The loop has the following definition:
{
// instructions to be executed
}
After the loop statement, it specifies a block of statements that are executed in a loop. For example:
println!("Rust Tutorials ");
println!("LinuxHint.com");
}
This loop prints two lines to the console. It should be noted that a loop by default organizes an infinite loop. That is, the two lines that are previously defined in the loop displaye an infinite number of times until “CTRL + C” is pressed.
The “break” statement is used to exit the loop. In particular, we can call this operator in a loop under a certain condition and exit the loop:
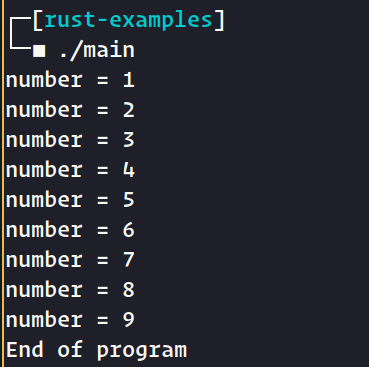
let mut number = 1;
loop{
println!("number = {}", number);
number = number + 1;
if number == 10{
break;
}
}
println!("End of program");
}
In this case, the loop prints the value of the variable (number) to the console. This value is then incremented by one. When the value of the variable reaches 10, the “break” statement is called which exits the loop. As a result, we get the following console output:
Returning a Value from a Loop
The loop can return some value using the “break” statement.
let mut number = 2;
let x = loop
{
if number == 4 { break number * 2;}
number = number + 1;
};
println!("x = {}", x);
}
The return value is specified after the “break” statement. In this case, this is the value of the variable number multiplied by 2:

While loop
The “while” loop executes some code while its condition is true which means that it returns true. It has the following formal definition:
{
// actions performed
}
The “while” keyword is followed by a conditional expression that returns true or false. Then, in curly braces, comes the set of instructions that make up the loop block. And as long as the condition returns true, the statements in the loop block are executed.
For example, let’s rewrite one of the previous examples with a loop only that we now use a “while” loop:
let mut number = 1;
while number < 10
{
println!("number = {}", number);
number = number + 1;
}
println!("End of programs");
}
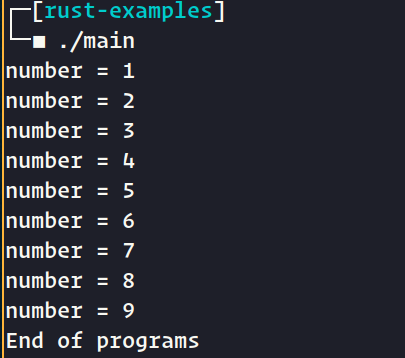
Here, while the “number < 10” condition is true, the “while” loop is executed in which the value of the variable number is displayed on the console, after which it is incremented by one. At some point, if the variable number increases to 10, the “number < 10” condition returns false and the loop will end.
For loop
The “for” loop allows you to go through all the elements of some set.
The “for” loop has the following formal definition:
{
// actions to be performed
}
After the “for” keyword, the name of the variable is indicated to which the elements from the iterated set are assigned one by one. Then comes the “in” keyword, followed by the set to iterate over.
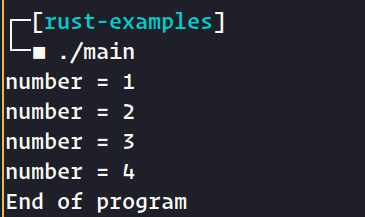
Thus, the “for” loop goes through all the elements of the set and passes each element from the set to a variable in turn. For example:
for number in 1..5
{
println!("number = {}", number);
}
println!("End of program");
}
Here, we use the 1..5 sequence. The “..” operator allows you to create a sequence of values. The initial element of the sequence is indicated to the left of the operator, and the final element which is not included in the set is indicated to the right. In this case, the sequence [1, 2, 3, 4] is created.
The “for” loop iterates through each element of this set in order and passes these elements one by one to the “num” variable which is printed to the console in the loop.
As a result, the “for” loop block works 5 times:
Nested Loops
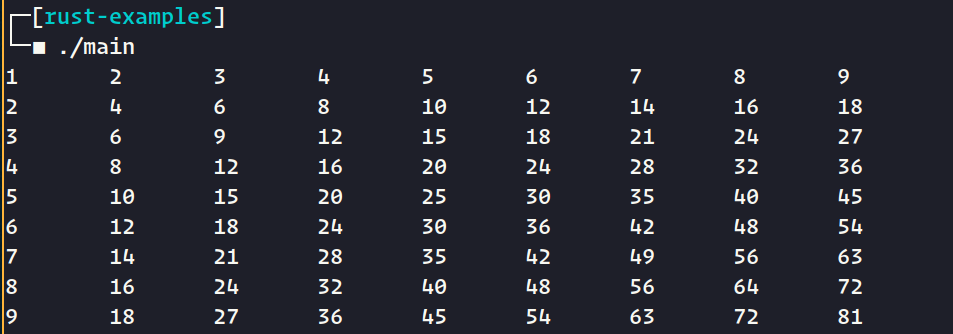
Loops can be nested. This means that one loop can contain another loop, and so on. For example, we use a “nested” loop to display the multiplication table:
let mut x = 1;
let mut y = 1;
while x < 10
{
while y < 10
{
print!("{}\t", x * y);
y = y + 1;
}
println!();
x = x + 1;
y = 1;
}
}
Here, the outer while loop runs 9 times until the variable “x” is equal to 10. Within the outer loop, there is an inner while loop that also runs 9 times until the variable “y” is equal to 10.Inside the inner loop, the print!() macro is used to display the result of multiplying the variables “x” and “y” on the console. Unlike the println!() macro, print!() does not add a newline after displaying the data which allows the output to appear on a single line. To separate the data during output, a tab character is added using the “\t” sequence.
Console Output:
Functions in Rust
Functions represent a named block of statements that perform some action. Functions allow you to divide the program into separate functional parts that perform a specific task, and call them repeatedly in different parts of the program.
Formal function definition:
{
}
A function definition begins with the “fn” keyword followed by the name of the function. After the name of the function, the list of parameters is indicated in brackets.
By default, when creating any Rust program, we already encounter one special function which is “main” which starts the execution of a Rust program. Let’s define another function:
{
}
fn welcome()
{
println!("Welcome to LinuxHint");
}
Here, in addition to the “main” function, another function is defined which is called “welcome”. It does not take any parameters like the “main” function. So, there are empty brackets after its name. All these functions does is print the “Welcome to LinuxHint” string to the console.
The function is defined outside the “main” function, but it doesn’t matter whether it is before or after the “main” function.
However, if we compile and run the program, nothing will happen and no “Welcome to LinuxHint” string is printed to the console because the “welcome” function is not being run anywhere. Moreover, when compiling, the compiler displays a warning that the “welcome” function is not used.
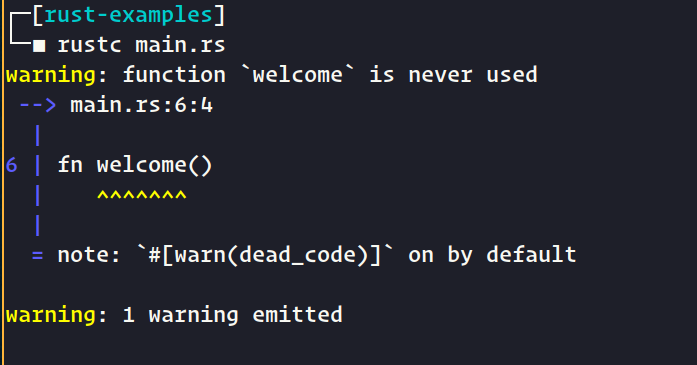
The “welcome” function is not executed by itself. Rust only executes the “main” function by default. Therefore, in order to execute the “welcome” function, it must be called in the “main” function. The function call is in the form:
After the name of the function, the parentheses are indicated in which the arguments are listed – the values for the function parameters.
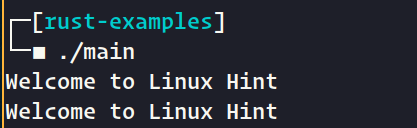
For example, let’s call the “welcome” function twice:
{
welcome();
welcome();
}
fn welcome()
{
println!("Welcome to Linux Hint");
}
As a result, the program prints the “Welcome to LinuxHint” string to the console twice:
Constants in Rust
To store values that should not change during the execution of the program, Rust provides constants. To define a constant, we use the keyword const in the following format:
Let’s define a constant and print its value to the console:
const NAME: &str = "LinuxHint";
println!("Name = {}", NAME);
}
A constant is defined here NAME, which has the value “LinuxHint”. By convention, constant names are in upper case. Since a constant stores an immutable value, when we try to change it, we will encounter an error, as in the following case:
const NAME: &str = "LinuxHint";
println!("Name = {}", NAME);
NAME = "Mead";
const NAME: &str = "LinuxHint";
}
The question may arise as to what is the difference between constants and ordinary variables, the default value of which also cannot be changed.
First of all, the differences between constants and variables are in syntax: the const keyword is used to define constants, and the data type must be specified for constants. Variables are defined using the let keyword, and their type need not be specified if, when declaring a variable, it is immediately assigned a value. Additionally, variables can be defined with the mut keyword and made mutable, which is not possible with constants.
const NAME: &str = "LinuxHint";
Another difference is that a variable can be declared first and then assigned a value (at least before it is used):
tutorials = 100;
A constant must be assigned a value immediately upon its declaration:
NAME = "LinuxHint";
We will get an error (Error!! The constant must be assigned a value).
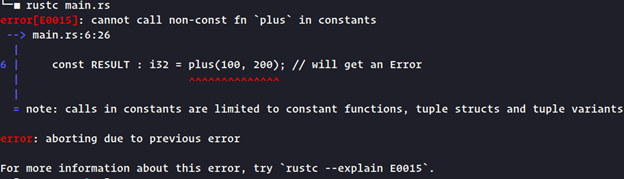
The third difference is that a constant only takes a constant value, which must be known at compile time. A variable can be assigned a value that can be calculated already in the execution of the program, for example, the result of a function.
let nums : i32 = plus(100, 200);
println!("numbers = {}", nums);
const RESULT : i32 = plus(100, 200); // will get an Error
println!("Result = {}", RESULT);
}
fn plus(x: i32, y: i32) -> i32 { x + y }
As expected we will get an error:
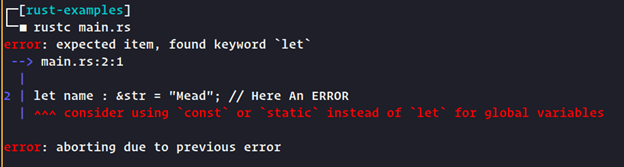
The fourth difference is that a constant can be defined in any scope, including the global scope.
let name : &str = "Mead"; // Here An ERROR
fn main(){
println!("Website = {}", WEBSITE);
println!("name = {}", name);
}
In this case, the constant WEBSITE and the variable name are defined in the global scope (outside the main function). However, if we can define a constant in the global scope, we cannot define a variable. Therefore, an error will occur when compiling this program:
Anonymous functions
Anonymous functions, unlike regular functions, do not have a name and can be stored in a variable. The formal definition of an anonymous function is:
// actions to be performed
};
An anonymous function is defined without an operator fn. Its definition actually begins with defining the parameters that are placed between two vertical bars: | parameters |. Then in curly braces are the actions to be performed. Moreover, a semicolon is placed after the closing curly brace. In this case, the anonymous function is stored in a variable.
Calling an anonymous function is similar to calling a regular function, only the variable name is used for the call.Let’s look at a simple example:
let sum = |x: i32|{
let z = x + x;
println!("the sum of {} plus {} is equals to {}", x,x, z);
};
sum(40);
}
A variable sum is defined here that stores an anonymous function. This function takes one type parameter i32 and prints its sum to the console.

Anonymous functions can also return a value:
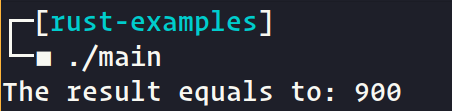
let sub = |x: i32, y: i32| -> i32{
x - y
};
let z = sub(1000, 100);
println!("The result equals to: {}", z);
}
The output is like this:
The variable is defined here sub, which represents an anonymous function that takes two parameters (two numbers) and returns their subtraction. And by the variable name we can call this anonymous function and get its result. If the anonymous function does not take any parameters, then simply specify two vertical bars:
println!("LinuxHint");
};
linux();
Type inference
Unlike a regular function, an anonymous function does not have to specify the types of parameters and the return result. For an anonymous function, the compiler itself is able to determine the types of parameters and result. For example, we could rewrite the above anonymous function sub as follows:
let sub = |x, y| {
x - y
};
let z = sub(1000, 100);
println!("The result equals to: {}", z);
}
Moreover, since an anonymous function contains only one action to be performed, we can remove the curly braces:
let sub = |x, y| x - y;
let z = sub(1000, 100);
println!("The result equals to: {}", z);
}
However, it is worth considering that types are set the first time an anonymous function is called. And on subsequent calls, the types of parameters and results of the anonymous function must match the first call. For example, in the following case we will receive a compilation error:
let sub = |x, y| x - y;
let z = sub(1000, 100);
let i = sub(100.66, 100);
println!("The result equals to: {}", z);
}
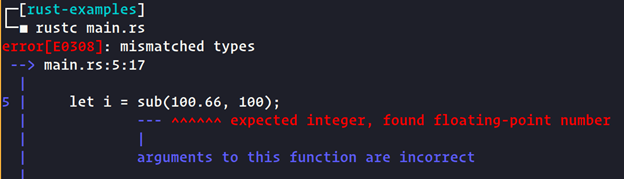
Because after the first call to an anonymous function, sub() the compiler expects that it will then accept two integers. However, the second call in this case passes two floating point numbers.
Closures
Closures in Rust represent anonymous functions that can remember their surroundings. Essentially, any anonymous function can remember its environment and is therefore a closure.
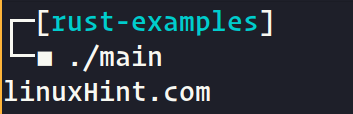
When a closure receives a value from its environment, it is stored in memory for later use in the body of the closure. Let’s look at a simple example:
let name = "linuxHint.com";
// here we do closure definition
let linux =||{
println!("{}", name);
};
linux(); // call closure
}
In this case, the variable name represents part of the lexical environment that is accessible to the closure.
The following defines a closure linux that can access this environment:
println!("{}", name);
};
We can then call a closure that uses a variable from the external environment:
As a result, the string “LinuxHint.com” will be printed to the console.
Function type
In Rust, a function can represent a separate data type. And in reality, we can even define variables with a function type and assign specific functions to them, as well as anonymous ones. What does a function type represent? The type of a function consists of the types of the parameters and the return type of the function.
For example, take the following function:
println!("LinuxHint.com");
}
This function has no parameters and returns nothing. The type of such a function can be described as fn(), after the fn keyword, the types of parameters are indicated in parentheses. But in this case, the function has no parameters, so the brackets are empty.
Let’s say we have the following anonymous function:
let name = ||{println!("LinuxHint");};
name();
}
The anonymous function that is represented by the variable name is actually of type fn() . That is, we can write:
let name: fn() = ||{println!("LinuxHint");};
name();
}
But let’s say the function takes parameters:
println!("{}", title);
}
The type of such a function is fn(&str), the type of the parameter is indicated in parentheses.
Function As a Parameter
A function can act as a parameter to another function. In this case, the parameter type is the function type. Consider the following example:
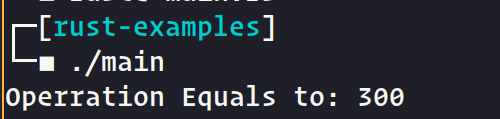
let add: fn(i32, i32) -> i32 = |x, y| x + y;
calc(100, 200, add);
}
fn calc(x: i32, y: i32, operation: fn(i32, i32) -> i32)
{
let z = operation(x, y);
println!("Operration Equals to: {}", z);
}
Here the function calc() takes as a third parameter some function that has type fn(i32, i32) -> i32. That is, a function that takes two numbers and returns a certain number. For example, a function is defined here. The add() function that returns the result of the addition of two two numbers.
When calling a function, calc() we can pass any functions into it but note so that their type matches the type of the third parameter of the function calc():
And the output should be like this:
Tuples Type in Rust
A tuple is a way of grouping data of different types into one composite type. Tuples have a fixed type according to the nested data. Once a tuple is defined, its size can neither be reduced nor increased.
The formal syntax for defining a tuple is:
A tuple is defined in parentheses, within which the values that make up the tuple are listed, separated by commas.
Definition of the simplest tuple:
Here the variable website represents a tuple, which consists of three elements. In the example above, the type of the tuple elements is inferred automatically, but we can also explicitly set their types:
That is, in this case, the tuple is of type (&str, u8), which means that its first element must represent a string, the second element must represent a number of type u8. After declaring a tuple, we can access its elements as follows:
After the name of the tuple, the index of the element of the tuple is indicated through a dot, and indexing starts from zero. For example:
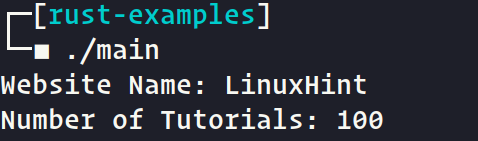
let website: (&str, u8) = ("LinuxHint", 100);
println!("Website Name: {}", website.0);
println!("Number of Tutorials: {}", website.1);
}
And the console output should be like this:
We can also change the elements of a tuple if its variable is defined with the mut keyword:
let mut website: (&str, u8) = ("LinuxHint", 100);
website.1 = 150;
println!("Website Name: {}", website.0);
println!("Number of Tutorials: {}", website.1);
}
And if we run this will get the new value of the second item like this:

Rust provides such a feature as destructuring a tuple. For example, we could assign tuple values to variables like this:
let website: (&str, u8) = ("LinuxHint", 100);
let name = website.0;
let tutorials = website.1;
println!("Website Name: {}", name);
println!("Number of Tutorials: {}", tutorials);
}
But decomposition allows you to shorten the code. Instead of creating every variable itself, we can do it like this:
let website: (&str, u8) = ("LinuxHint", 100);
let (name, tutorials) = website;
println!("Website Name: {}", name);
println!("Number of Tutorials: {}", tutorials);
}
And as the output we get the same result. But perhaps we do not need all the data from the tuple. For example, we don’t need to get the number of tutorials. However, we cannot write, for example, like this:
We definitely need to specify as many variables as there are values in the tuple. However, if we don’t need some value, we can specify an underscore instead of the corresponding variable:
let website: (&str, u8) = ("LinuxHint", 100);
let (name, _) = website;
println!("Website Name: {}", name);
}
In this case we just get the name from the tuple website.
Arrays
Arrays represent a set of elements, and all elements of the set must represent the same data type. In Rust, an array can be defined in a variety of ways. The simplest formal declaration of an array is:
After the name of the array, separated by a semicolon in square brackets, the data type of the array elements is first indicated. And then, separated by a semicolon, the size of the array, that is, the number of its elements. For example, declaring an array that has 4 elements of type &str:
In effect, the expression [&str; 4] acts as an array type. That is, in fact, we defined a variable names and indicated its type – [&str; 4] an array of 4 elements of type string. But such a variable is not yet initialized. Therefore we cannot use it. To initialize an array variable, you need to assign a set of values to it. The simplest definition with initialization:
The array elements are listed as a value in square brackets, separated by commas. For example:
In this case, the array names have 4 elements: Rust, GO, PHP, HTML.
As with a regular variable, you can first declare the variable and then initialize it:
let names : [&str; 4] = ["Rust", "GO", "PHP", "HTML"];
Also, if the array is initialized when it is defined, then you don’t have to specify the array type:
In this case, Rust will infer the type itself [&str; 4]. To access array elements, use their numeric index:
Each array element has a numeric index. Indexing starts from scratch. That is, the first element of the array will have index 0, the second element will have index 1, and so on. For example, let’s display the first and third elements of the array to the console:
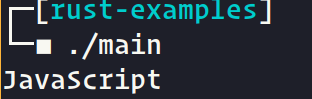
let names = ["Rust", "GO", "PHP", "HTML"];
println!("{}", names[0]);
println!("{}", names[2]);
}
In this way, you can not only get an element, but also change an array element. However, if we are going to change the elements of the array, then it must be defined with the mut modifier:
names[1] = "JavaScript";
println!("{}", names[1]); }
And the output will be like this:
It is worth considering that we cannot access a non-existent element. For example, in the example above there are only four elements in the array. Accordingly, the index of the last element is the number 3. Therefore, we cannot access elements with indices 4, 5 and more, since they simply do not exist. For example, in the following case, when trying to access a non-existent element, we will encounter an error at the compilation stage:
let mut names = ["Rust", "GO", "PHP", "HTML"];
println!("{}", names[4]);
}
You should also keep in mind that arrays in Rust have a fixed size. Once they are defined, we can neither reduce or increase their size.
Conclusion
We introduced Rust by starting with the installation process and then proceeded to explore some fundamental concepts of this beautiful language such as variables, loops, and functions. We hope that this guide will assist you in embarking on your journey of learning Rust as we delve into the basics accompanied by illustrative examples.