In Windows, User Access Control (UAC) was implemented because remaining logged in as an administrator presented a very simple security danger. With UAC, most programs run with restricted access, and Windows only prompts the user to ask for permission when a system file needs to be changed.
In Linux systems, we can run administrative applications by using the “sudo” command. It allows us to run a program as the root user. If you frequently use root as your user, you will be exposed to the risk of giving your device full access to malicious programs.
There are two options to add a user to the sudoers. One way is by doing it manually and the other is by using the usermod command.
Adding sudo User Manually
Follow the below-given guidelines to add user to sudo user on Ubuntu 20.04:
Create a New User
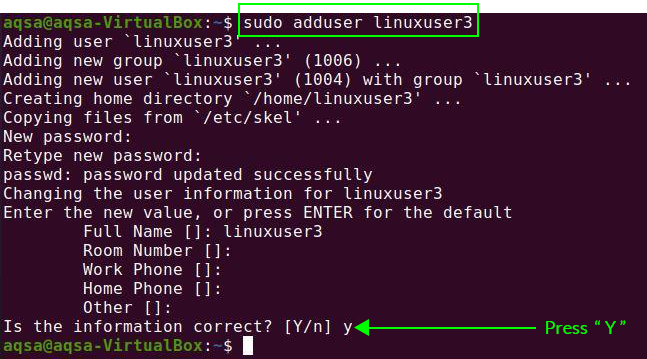
Open the root user terminal and run the following command:
Here, I am using the linuxuser3 as username:
It will ask you to assign a password to the new user. You also need to add some additional information like full name, room number, etc. It will confirm that the information is correct or not. Press “Y” to confirm.
A new user will be created successfully.
Update Your System Using New User
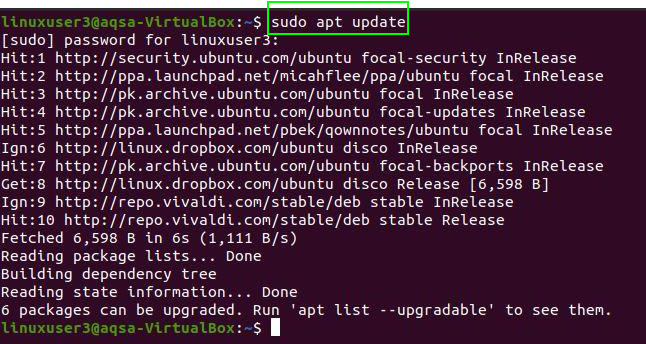
Moving forward, switch to the new user by entering the username and password on the login screen. Open a terminal and update your system using the following command:
We did not give any privilege to the new user, and we will get a message that the new user is not in the sudoers file.
We need to add a user to the sudoers file.
Open the visudo file in the text editor using the following command:
The position where you see root ALL=(ALL:ALL) ALL is where we’re going to change our username. Replace the root with “linuxuser 3” with the sudoers in my case. Insert the following lines in this file:
Linuxuser3 ALL=(ALL:ALL) ALL
Again, update your system. Now, linuxuser3 is capable to perform the sudo related actions or operations.
Adding Sudo User from Usermod Command
The usermod command enables us to add/edit the user groups.
Type the below-given command in terminal to add a user in sudoers:
- -a: This modifies the changes to the current configuration
- -G: The name of the user’s community that should be appended to.
- <username>: The user’s username needs to be changed.
When the user logs in the first time after being added into a new group, we will get a message that shows that the user privileges are changed.
Conclusion:
By using the sudo in a command, we can perform the administrative level tasks. This manual will help you add a user to sudoers in Linux. Just follow the above guidelines to add a user to the sudoers.


