Docker is an on-demand technology these days as many big companies are using it to reduce their workloads. It is used for building, packaging, and deploying applications on top of container technology. Docker can run a high resource utilization application with minimum resource usage. The hypervisor-based virtualization requires lots of resources by installing an entire operating system, whereas Docker uses very lightweight and scalable containers to run applications.
Docker can be installed on Linux, Mac, and Windows. Although It runs natively on Linux, it requires Hyper-V to be enabled on Windows.
Docker also has a Docker Hub, a cloud-based service where we can find images from verified publishers, and we can also publish and share our own custom images. Once we have pulled an image from Docker Hub, we can create numerous containers from the very same image.
Features of Docker:
- It is open-source software.
- Provides Platform as a Service for running application in a virtual environment.
- It is very easy to understand and use the Docker technology.
- Docker applications can be easily moved and run on any system with Docker installed on it.
- Migration of docker containers is very fast from cloud environment to localhost and vice versa.
Docker can read and execute the instructions inside the Dockerfile and automatically build the specified image. This guide will see how we can automatically build a docker image using a Dockerfile on the Debian 10 (Buster) operating system. We will deploy the Nginx web server and create a custom Docker image.
Prerequisites:
- Access to “sudo” privileges.
- Basic Knowledge of Docker commands.
Before we start our journey, let’s quickly review some important concepts and requirements which are necessary to understand this guide. The first thing is that you should have Docker installed on your system. If you have not already, you can follow this guide to install docker. You can also use the official guide available on the Docker website for installing Docker on Debian 10.
- Dockerfile: This file describes the whole configuration we want to have in our Docker container. It is a set of instructions that defines how to build an image.
- Docker Image: It is actually the template image we can use to build our custom container. We can say a docker image is an immutable file or a read-only image.
- Docker Container: In very simple words, a Docker container is an instance of our docker image. We can say the Docker image is a base image, and we create a custom container on the top of a Docker image by adding a writable layer on this image. We can use a single Docker image to create multiple Docker containers.
I hope this review is enough for us to get started with Docker. So let’s dive in to see how to build images using Dockerfile automatically.
Step 1: The very first step in building an image starts with a docker file. So let’s first create a working directory, and inside it, we will make a Dockerfile.
$ nano Dockerfile # This is our dockerfile.
We can use any text editor besides nano like vi or vim.
Step 2. Add the following content to the Dockerfile and save it.
MAINTAINER linuxhint
RUN apt-get update \
&& apt-get install -y nginx \
&& apt-get clean \
&& rm -rf /var/lib/apt/lists/* /tmp/* /var/tmp/* \
&& echo "daemon off;" >> /etc/nginx/nginx.conf
EXPOSE 80
CMD service nginx start
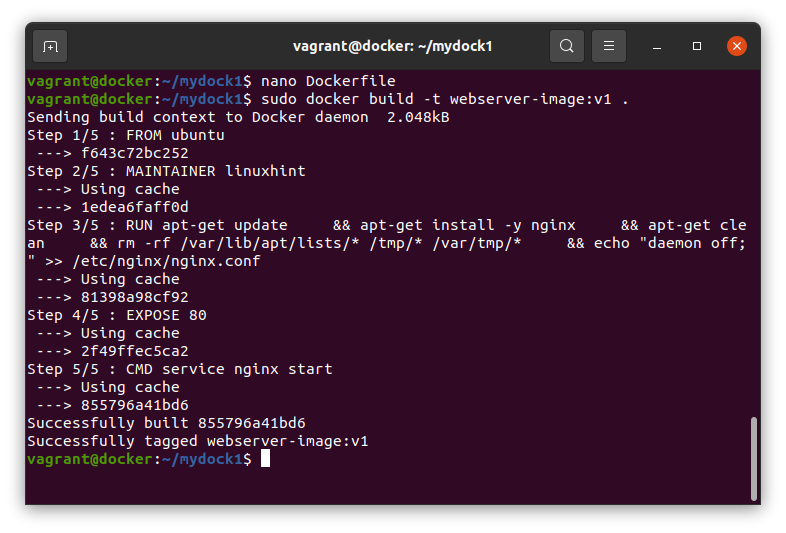
Step 3. Now, as we have our Dockerfile ready, it’s time to build The image. Just use the following command:
Syntax:
Note: Always run the docker command with root user or “sudo” privileges to avoid the error: “Got permission denied while trying to connect to the Docker daemon socket at unix:///var/run/docker”
In the above command, the webserver-image is the name of our docker image. You can use your custom name here. V1 is the tag for our image.
If everything goes right, we should see the following output:
Sending build context to Docker daemon 2.048kB
Step 1/5 : FROM ubuntu
—> f643c72bc252
Step 2/5 : MAINTAINER linuxhint
—> Using cache
—> 1edea6faff0d
Step 3/5 : RUN apt-get update && apt-get install -y nginx && apt-get clean && rm -rf /var/lib/apt/lists/* /tmp/* /var/tmp/* && echo “daemon off;” >> /etc/nginx/nginx.conf
—> Using cache
—> 81398a98cf92
Step 4/5 : EXPOSE 80
—> Using cache
—> 2f49ffec5ca2
Step 5/5 : CMD service nginx start
—> Using cache
—> 855796a41bd6
Successfully built 855796a41bd6
Successfully tagged webserver-image:v1
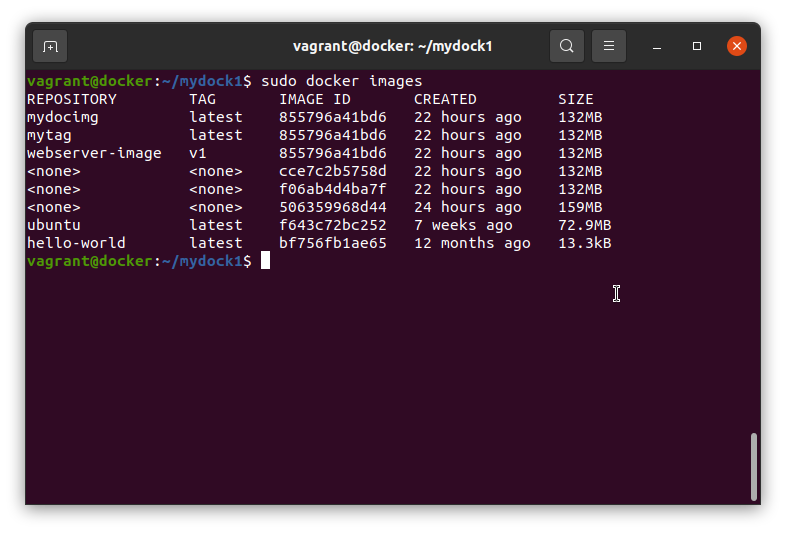
Step 4. When we have a number of images, we can use the below command to look for a specific image:
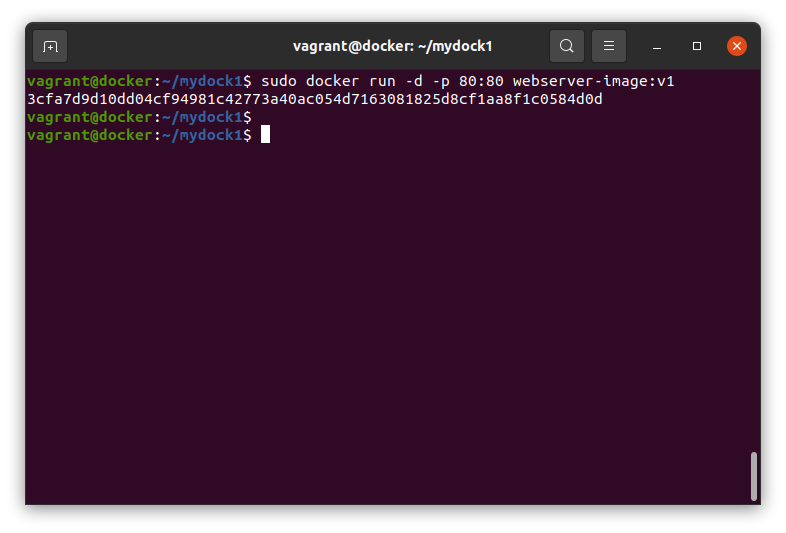
Step 5. Now we will run our docker image to see if it is working as expected:
After a successful run, it will generate a long id as shown below:
Step 6. If everything goes right, we should be able to see our web page running on our nginx web browser inside the docker. Run the below command to check it:
Please keep in mind that the IP address we are using here is the docker container’s IP address installed on our host operating system. To exactly know the ip address required here, run the following command on the host:
The above command will contain the IP address which we have to use here.
The above curl command will display the index.html content of the nginx web server.
Another simple and straight forward way is to pass the docker as the curl argument, as shown below:
Step 7. If you want, you can check which port and processes are running inside our docker container. Run the below command:
This completes our guide on automatically building Docker images on Debian 10 (Buster). We have seen how we can construct Docker images from Dockerfile instead of manually editing each image.
Although this guide is performed on Debian 10, it should also run on other Debian-based distros like Ubuntu, Linux mint, etc. Please do not forget to share this guide with others. Also, subscribe to our blog to get the latest update and HowTos on Linux.


