Today, in this article, we will give you a basic understanding of Vim buffers and how you can perform various actions using buffers. We have implemented Vim buffer tasks on Ubuntu 20.04 operating system.
What are buffers?
In Vim editor, buffers are memory portion loaded with the file content. But, not works on the original file. The original file remains the same until the buffers written on it. All files which open are associated with a specific buffer. Buffers are not associated with a file. You can make many buffers as you want.
When you use buffers in Vim, they can be hidden from the displaying view. If you open a file for editing, then it automatically creates a buffer, and each file will remain accessible until you close the Vim.
Press ‘Ctrl + Alt + t’ to open the terminal. Now, you will access the Vim command-line editor using the following command:
How to create Vim buffers?
Well, to create a new buffer on Vim, you can use a couple of commands.
Use the following command to create a new buffer. The below command will split the vim interface into two horizontal windows.
Use the following command that will create a new buffer and split the vim screen into two vertical windows.
As we mentioned above, if you will edit a file, then it will automatically make a new buffer. So, follow the below command to edit a file in vim.
For example, we have created a file named ‘buffersintro’, use the following command to edit this file on vim:
To edit multiple file buffers without saving the changes, you need to enable the option using the following command. Otherwise, you will get an error message.
How to manage Vim buffers?
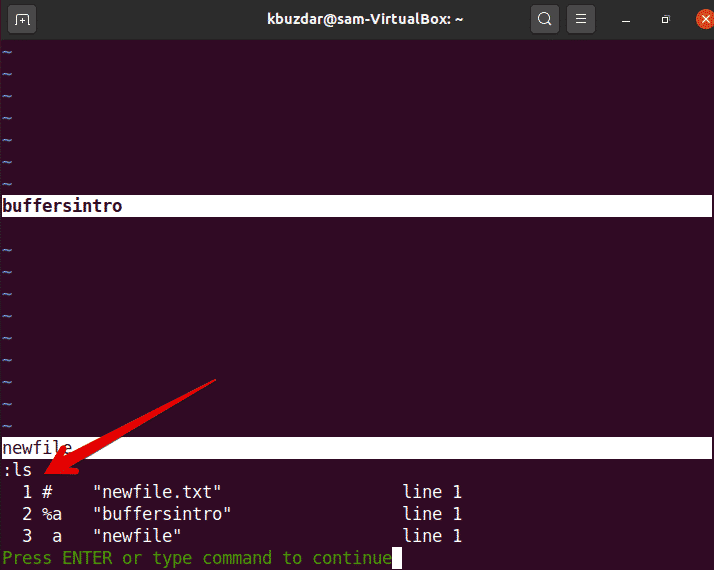
To view the list of buffers, you will run the command as follows on Vim editor:
But, alternatively, you can also use the following command to perform the same action on Vim:
The following output will be displayed on Vim. The first is the number column which indicates the buffer number, in the second column, you will see some sign indicators which represents the buffer status:
%: sign indicates the buffer in the current window
#: alternate buffer edit
a: indicates the active buffer which is visible and loaded.
h: means hidden buffer if you will show on your screen.
The third is the name of the buffer or file name. The last argument indicates the line number on which pointer points.
If you want to make any buffer in an active state, then you will type the following command:
The buffer number you will use from the buffer list.
To load all buffers in split windows, you will use the following command:
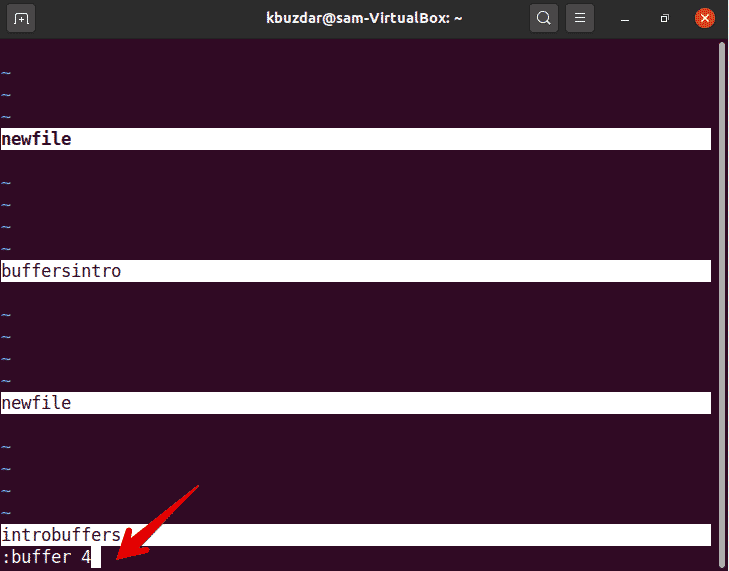
The above command will open all buffers in a new window as follows:
You can also open buffers in vertical window orientation using the following command on vim:
To open a particular buffer in a new window, for this purpose, issue the following command on Vim:
You can also use the shortcut for this purpose. Type buffer number, then you will press ctrl w^.
Delete buffers
Once the modification in a file is completed, now you can delete the buffer from the list by issuing the following command on the Vim:
Or
Where arg may be the file’s name or the number the buffer, you want to remove from the list.
First, you list buffers using :ls command.
For example, you want to delete the 3rd buffer named with ‘newfile’ from the list. So, you will type the following command to do this.
Or
Now, list all buffers. You will see that the 3rd buffer has been removed from the buffer’s list.
You can even delete multiple buffers from the list using the following command:
Or
Buffers Navigation
You can use the following command for buffers navigation:
- Add a file into the new buffer :badd <filename>
- Switch to specific buffer N :bN
- Jump to the next buffer in the buffer list :bnext
- Jump back to the previous buffer in the buffer list :bprevious
- Jump to the first buffer :bfirst
- Jump to the last buffer :blast
In this article, we have given a basic understanding of the Vim buffers. We see that how to deal with Vim buffers and use them. If you want to explore more, then using :help buffer, you can explore each and everything related to Vim buffers. I hope this article will help you to explore more advanced things related to Vim buffers.


