
Virtual Machines exported from VMware Workstation, VMware ESXi, VMware vSphere, and other VMware hypervisors can be imported to Proxmox VE 8.
In this article, I am going to show you how to import Windows and Linux virtual machines exported from VMware hypervisors to Proxmox VE 8.
If you need any assistance in exporting virtual machines from VMware Workstation Pro, read this article.
Table of Contents:
- Exporting a VMware Virtual Machine
- Accessing the Exported Virtual Machine Image on Proxmox VE Server
- Extracting Exported Virtual Machine OVA File on Proxmox VE
- Importing the VMware Virtual Machine to Proxmox VE
- Post-Import Configuration for Virtual Machines on Proxmox VE
- Changing the Allocated Memory of the Proxmox VE Virtual Machine
- Changing the Processor of the Proxmox VE Virtual Machine
- Changing the BIOS of the Proxmox VE Virtual Machine
- Changing the Machine Type of the Proxmox VE Virtual Machine
- Changing the SCSI Controller and Disk Type of the Proxmox VE Virtual Machine
- Adding a Network Device to the Proxmox VE Virtual Machine
- Changing the Boot Order of the Proxmox VE Virtual Machine
- Enabling QEMU Guest Agent for the Proxmox VE Virtual Machine
- Starting the Imported Proxmox VE Virtual Machine
- Installing the VirtIO Drivers and QEMU Guest Agent on a Windows Proxmox VE Virtual Machine
- Installing QEMU Guest Agent on a Linux Proxmox VE Virtual Machine
- Monitoring the CPU, Memory, Network, and Disk I/O Usage of a Proxmox VE Virtual Machine
- Conclusion
- References
Exporting a VMware Virtual Machine:
You can export a VMware virtual machine in OVA and OVF formats. Virtual machines exported in either OVA or OVF format can be imported back to Proxmox VE. But virtual machines exported in OVF format are easier to import in Proxmox VE as it requires fewer steps and saves a lot of time.
Read this article to learn how to export a VMware Workstation Pro virtual machine.
For more information on exporting virtual machines from other VMware virtualization products (i.e. VMware ESXi, VMware vSphere), check the official documentation of your VMware virtualization product.
Accessing the Exported Virtual Machine Image on Proxmox VE Server:
You can use one of the following methods to access the exported VMware virtual machine image on the Proxmox VE server.
- Copy the virtual machine image files to a USB thumb drive or an external USB HDD/SSD, mount it on the Proxmox VE server, and access the virtual machine image files on the Proxmox VE server. I recommend you export the virtual machine in OVF format in this case as it will save you the hassle of copying the virtual machine OVA archive file on your Proxmox VE server and extracting it to obtain the virtual disks of the virtual machine. You can directly import virtual machines exported in OVF format on Proxmox VE.
- Copy the exported virtual machine file/files in a network share and access it from your Proxmox VE server. For example, you can use an SMB/CIFS share of your Windows computer or your NAS for this purpose. To learn how to mount an SMB/CIFS share on Proxmox VE, read this article.
Extracting Exported Virtual Machine OVA File on Proxmox VE:
If you’ve exported the virtual machine in OVA format, you must extract the OVA file into OVF files to import the virtual machine into Proxmox VE.
I have an OVA virtual machine file www.linuxeveryday.com.ova in the /mnt/pve/nas-datastore/vmware directory of my Proxmox VE server. I am showing you how to extract it for demonstration.
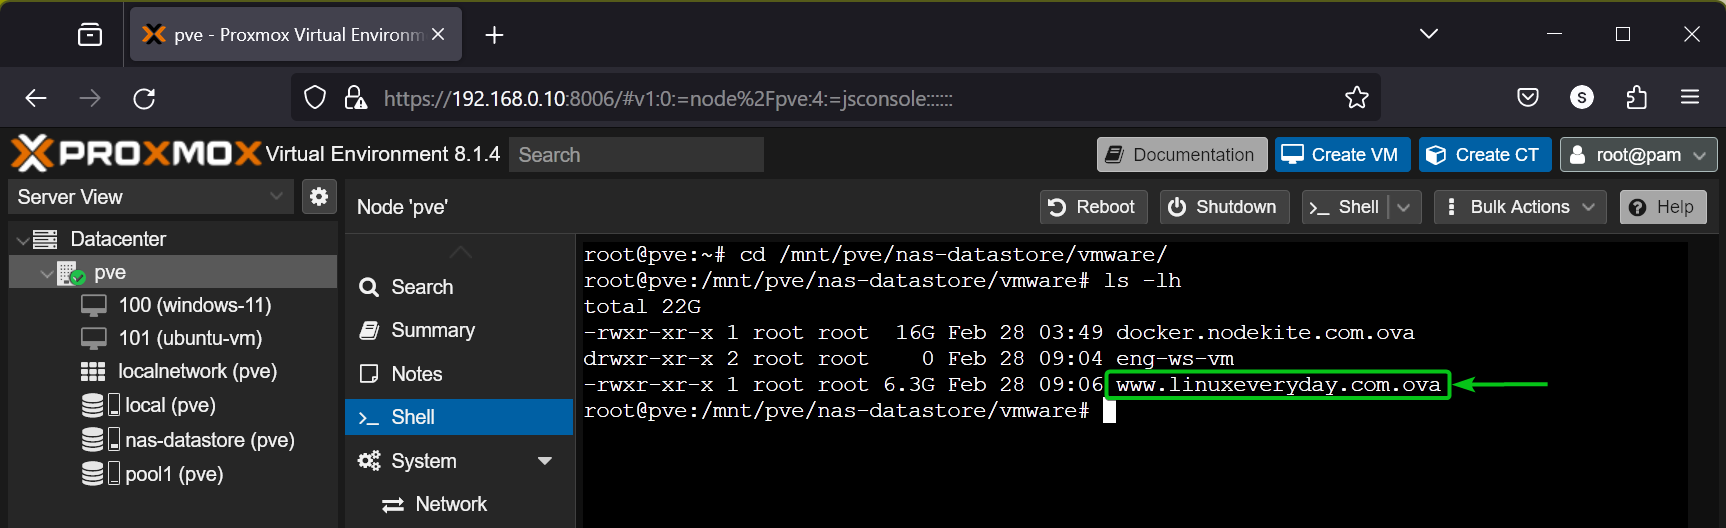
As extracting an OVA file will create multiple files, you need a dedicated directory to keep all the extracted files organized.
You can create a new directory /tmp/linux-vm (let’s say) with the following command:
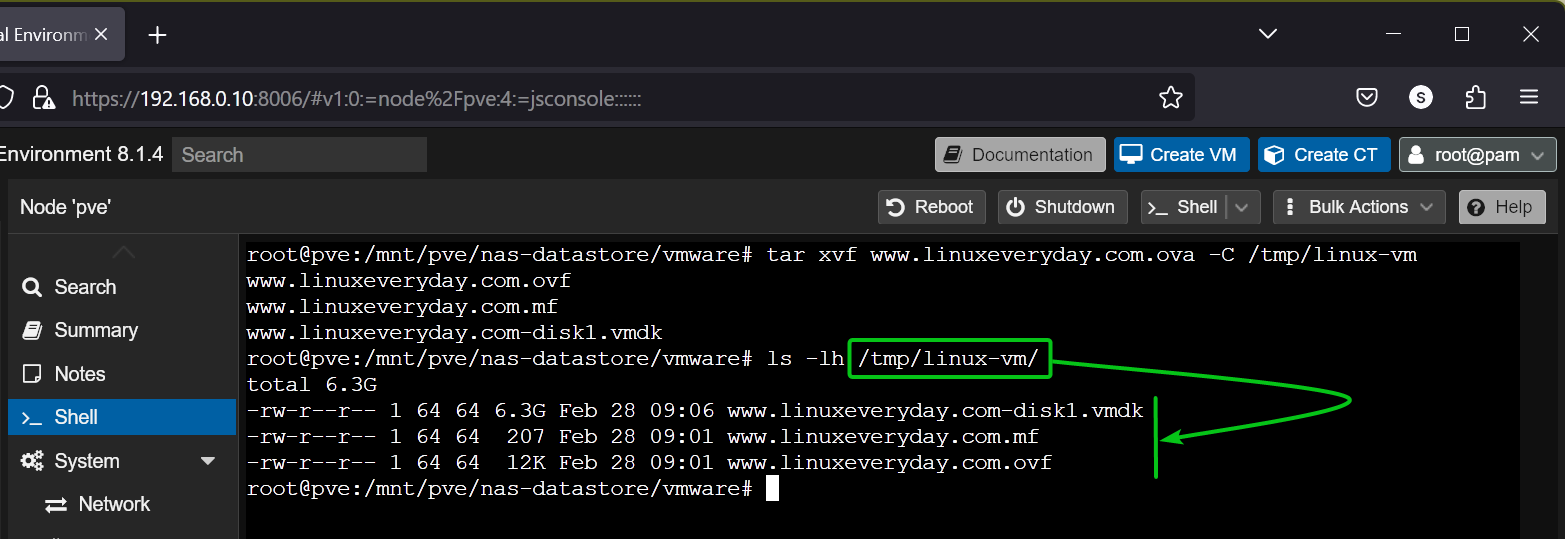
To extract the virtual machine OVA file www.linuxeveryday.com.ova into the /tmp/linux-vm directory, run the following command:

Once the virtual machine OVA file is extracted, you will find a few new files (i.e. .vmdk, .mf, .ovf) in the directory where you’ve extracted the OVA file.
Importing the VMware Virtual Machine to Proxmox VE:
At the time of this writing, you can only import OVF virtual machine images into Proxmox VE directly. So, if you have an OVA virtual machine image, you must extract it to OVF format first.
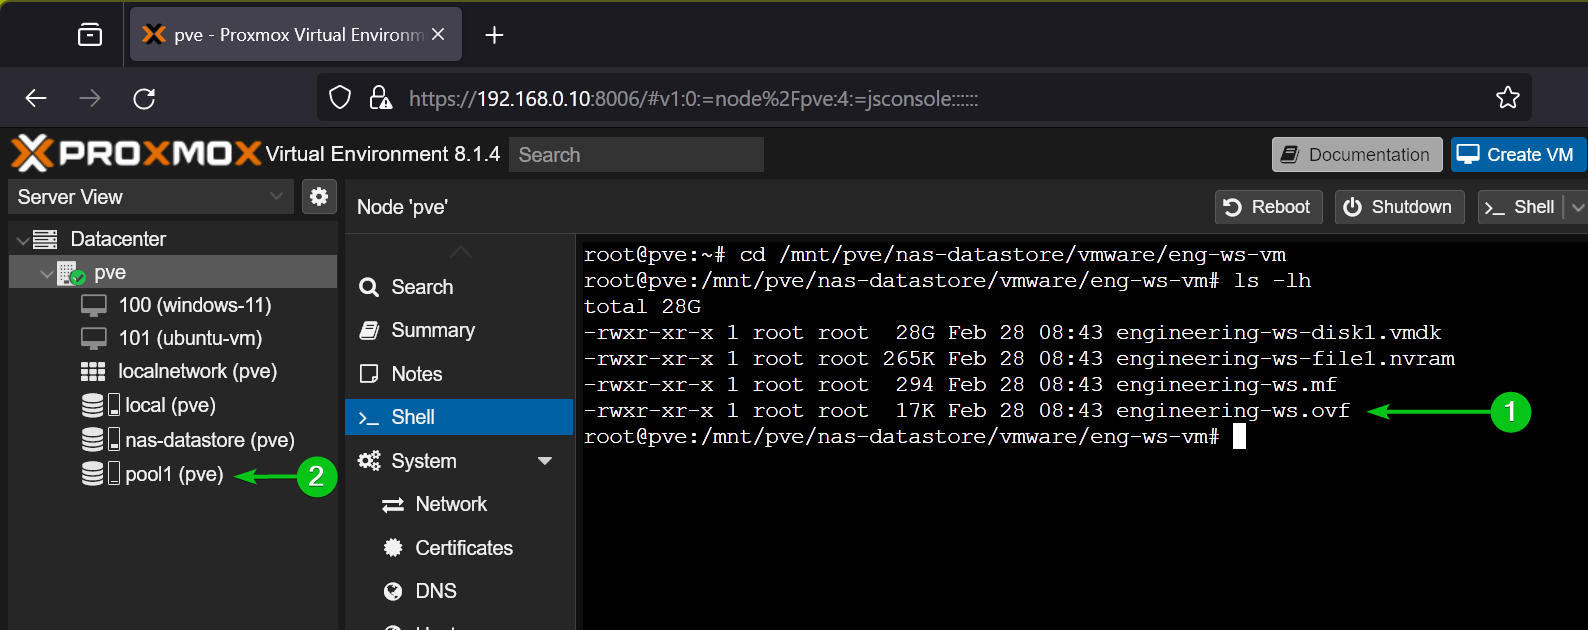
To import the virtual machine to Proxmox VE, navigate to the directory where you’ve kept the OVF virtual machine image as follows:
You will find an .ovf file in the directory where the OVF virtual machine image is exported/extracted.
To import the OVF virtual machine to Proxmox VE, you need to use the qm importovf command in the following format:
Here, <VM-ID> is the Proxmox VE virtual machine ID that the imported virtual machine will use. It must be unique. You must make sure that no other Proxmox VE virtual machine is using this ID. If you want Proxmox VE to automatically assign a unique ID for the imported virtual machine, just press <Tab> after the qm importovf command:

<ovf-filename> is the filename of the .ovf file of your exported OVF virtual machine.
<storage> is the name of the Proxmox VE storage where you want to store the disk of the virtual machine.
For example, to use the virtual machine ID 201 and import the OVF virtual machine engineering-ws from the /mnt/pve/nas-datastore/vmware/eng-ws-vm directory using the file engineering-ws.ovf and store the virtual machine disks in the pool1 storage of Proxmox VE, run the command below:
The virtual machine is being imported. It will take a while to complete.
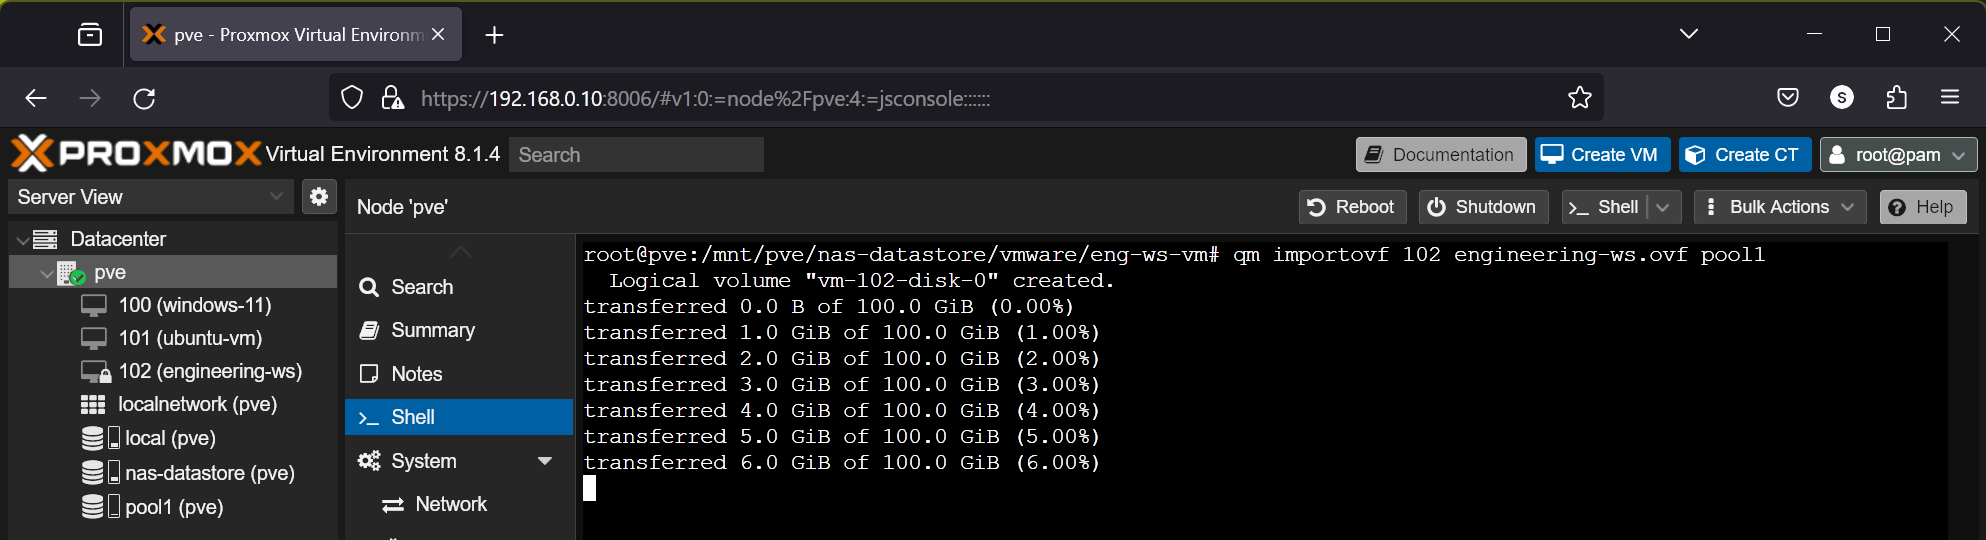
Once the virtual machine is imported, you will find it in the Proxmox VE web management interface.
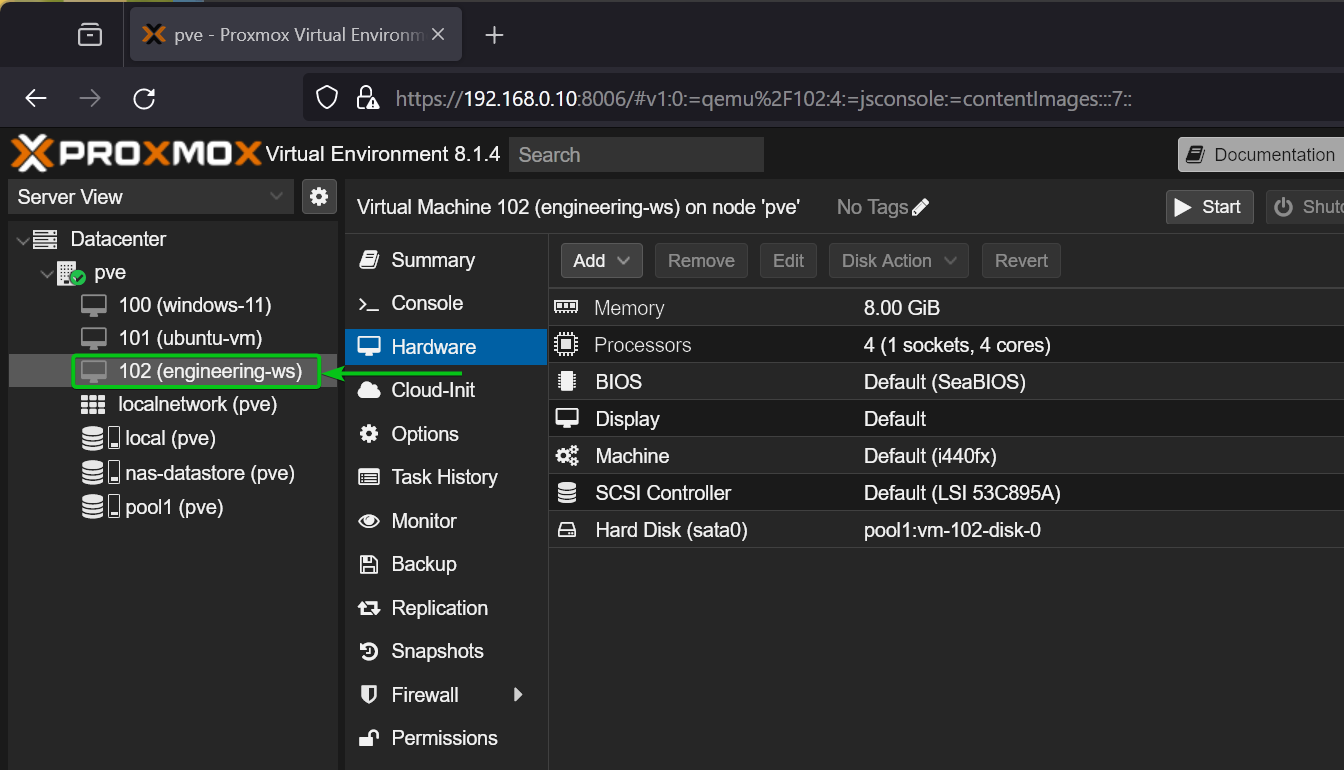
Post-Import Configuration for Virtual Machines on Proxmox VE:
Once the virtual machine is imported into Proxmox VE, you will need to make some necessary changes to the hardware and other settings of the virtual machine so that it boots correctly on Proxmox VE.
For example, you need to set the correct BIOS for the imported virtual machine. If the virtual machine uses BIOS boot firmware in VMware, you must use the BIOS boot firmware in Proxmox VE as well. If the virtual machine uses UEFI boot firmware in VMware, you must use the UEFI boot firmware in Proxmox VE as well. Otherwise, the virtual machine won’t boot on Proxmox VE.
Depending on the operating system installed on the imported virtual machine, you will need to adjust a few settings after you’ve imported the virtual machine on Proxmox VE.
In the following sections, I will show you how to make the necessary changes on the imported virtual machine on Proxmox VE.
Changing the Allocated Memory of the Proxmox VE Virtual Machine:
By default, the memory of the imported virtual machine will be the same as the original VMware virtual machine (that you’ve exported).
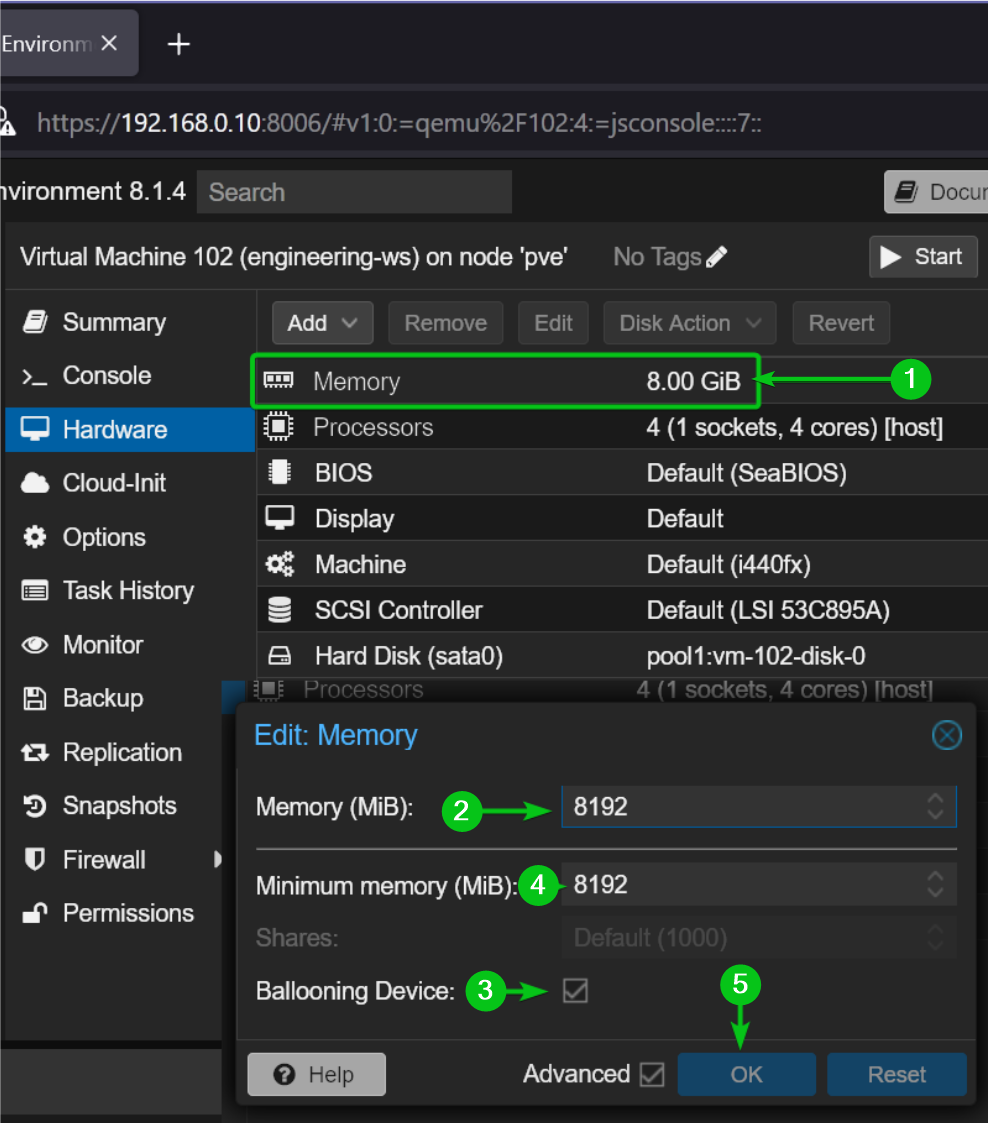
To change the memory of the virtual machine, navigate to Hardware > Memory[1].
Type in the desired amount of memory (in MB units) for the virtual machine in the Memory (MiB) section[2].
If you want the virtual machine to allocate a minimum amount of memory unless more memory is required, tick Ballooning Device[3] and set your desired Minimum memory (MiB) for the virtual machine[4].
If a memory Ballooning Device is configured, the virtual machine will try to use Minimum memory (MiB) unless there is a demand for Memory (MiB)
Once you’re done, click on OK to save the changes[5].
Changing the Processor of the Proxmox VE Virtual Machine:
Once the virtual machine is imported into Proxmox VE, you can adjust the number of processor cores assigned to the virtual machine.
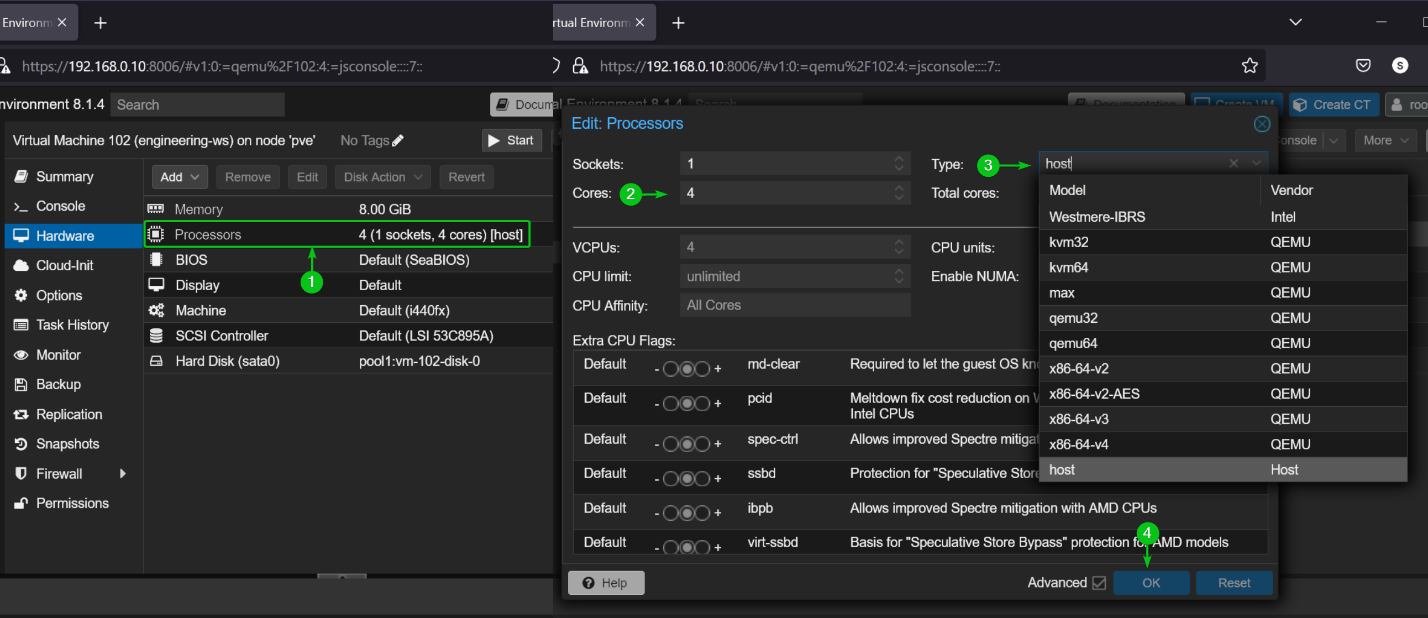
To configure the processor of the virtual machine, click on Hardware > Processors[1].
From the Cores section, you can adjust the number of cores you want to assign to the virtual machine[2].
From the Type dropdown menu, you can select a virtual processor for the virtual machine. Not all operating systems support all processor types. So, unless you’re sure of what you’re doing, selecting host from the Type dropdown menu is a safe option[3].
Once you’re done selecting a suitable processor for the virtual machine, click on OK[4].
Changing the BIOS of the Proxmox VE Virtual Machine:
The imported virtual machine must use the same BIOS firmware as the original VMware virtual machine. Configuring proper BIOS firmware is essential for booting the imported virtual machine on Proxmox VE.
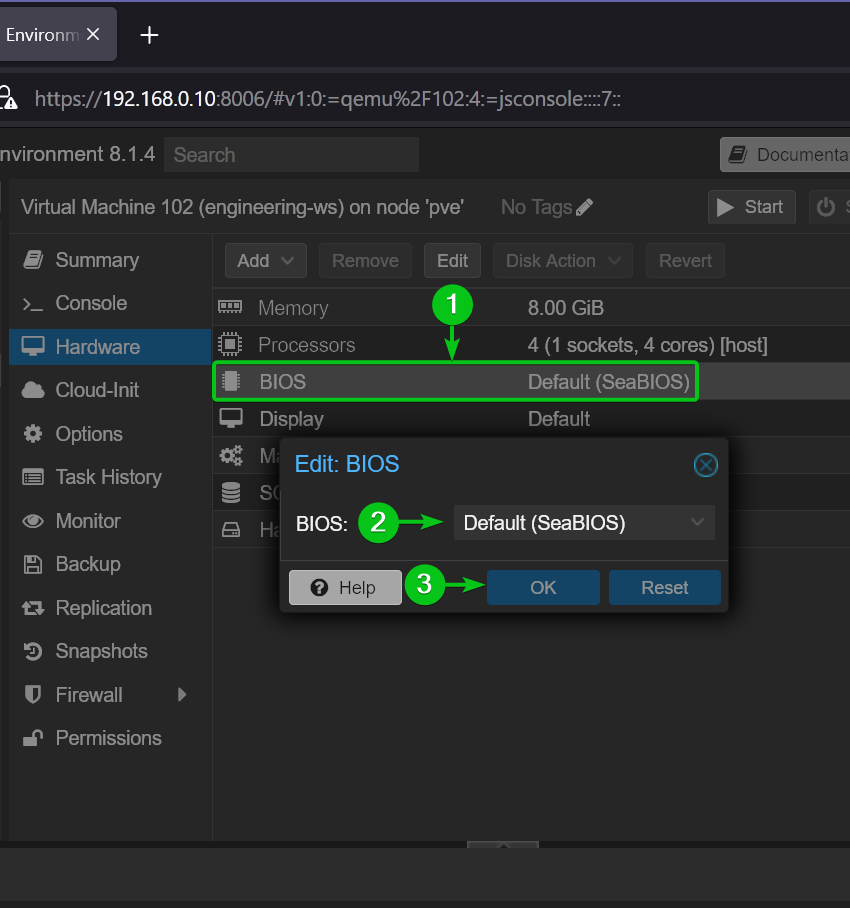
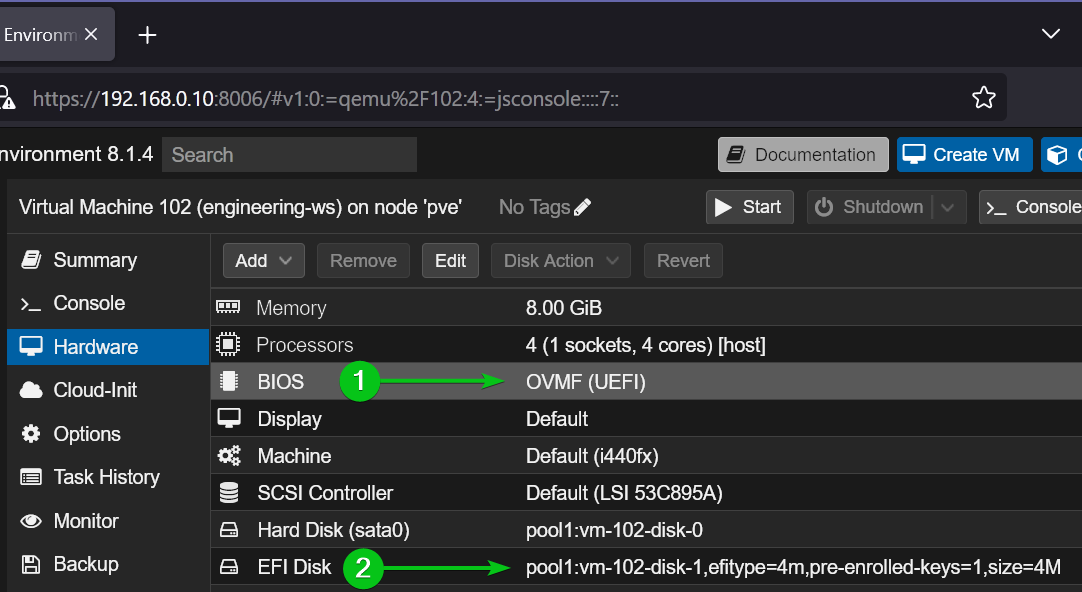
To configure a BIOS firmware for the imported virtual machine navigate to the Hardware > BIOS section[1] and select your desired BIOS firmware from the BIOS dropdown menu[2].
- SeaBIOS: SeaBIOS is the default BIOS firmware for new and imported virtual machines of Proxmox VE. It is the traditional/legacy BIOS firmware.
- OVMF (UEFI): OVMF is the UEFI BIOS firmware, an up-to-date version of the traditional/legacy BIOS firmware. For new operating systems (i.e. Windows 11), a UEFI BIOS firmware is required. Almost every operating system these days supports the UEFI BIOS firmware.
Once you’re done, click on OK to save the changes[3].
If you’re using the OVMF/UEFI BIOS firmware for the imported virtual machine[1], you should also add an EFI disk to the virtual machine.
To add an EFI disk to the imported virtual machine, navigate to Hardware and click on Add > EFI Disk[2].

Select a storage where you want to store the EFI disk of the virtual machine from the EFI Storage dropdown menu[1] and click on OK[2].
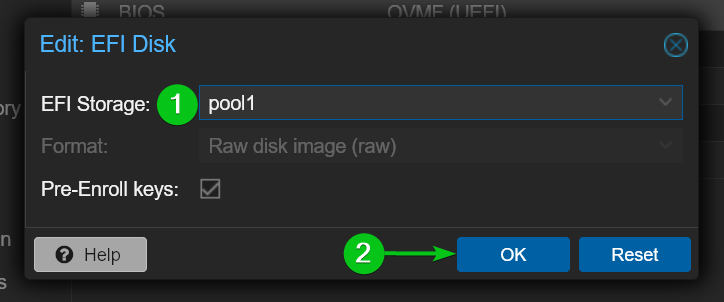
An EFI disk should be added to the virtual machine configured to use the OVMF/UEFI BIOS firmware.
Changing the Machine Type of the Proxmox VE Virtual Machine:
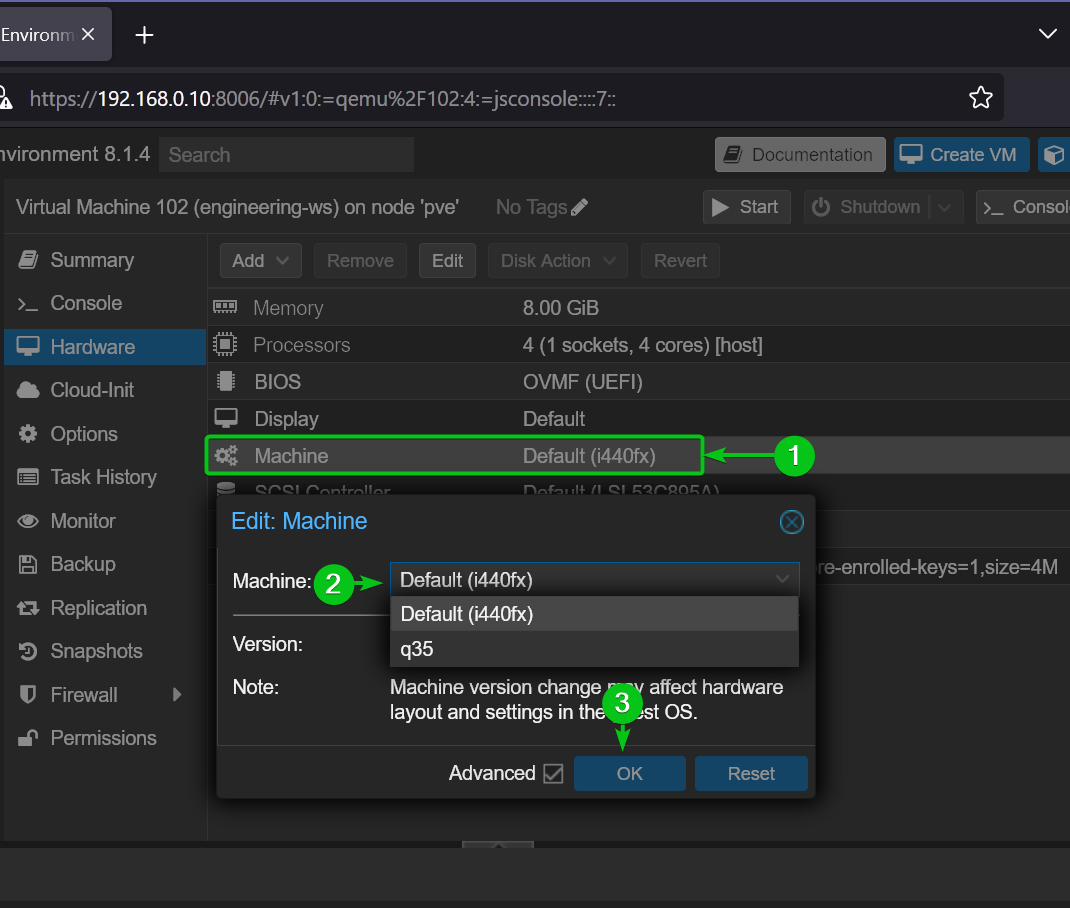
To configure a machine type for the virtual machine, navigate to the Hardware > Machine section[1] and select your desired machine type from the Machine dropdown menu[2].
- Default (i440fx): For very old or legacy operating systems, and for running usual desktop/server workload on the virtual machine, i440fx is good enough. The main limitation of i440fx is PCIe support. i440fx does not support native PCIe functionalities. So, if you don’t want to passthrough GPUs or other PCIe devices in this virtual machine, i440fx is good enough.
- q35: Q35 has native support for PCIe functionalities and other features not available in i440fx. If you plan to passthrough GPUs or other PCIe devices in this virtual machine, you should select q35.
Once you’re done selecting a machine type for the virtual machine, click on OK to save the changes[3].
Changing the SCSI Controller and Disk Type of the Proxmox VE Virtual Machine:
If you’ve imported a Windows 10/11 virtual machine from VMware, you will need to use the SATA bus for the virtual disk of the virtual machine to successfully boot Windows 10/11 on the virtual machine.
If you’ve imported a Linux virtual machine from VMware, you should use the VirtIO Block device for the virtual disk of the virtual machine for the best performance.
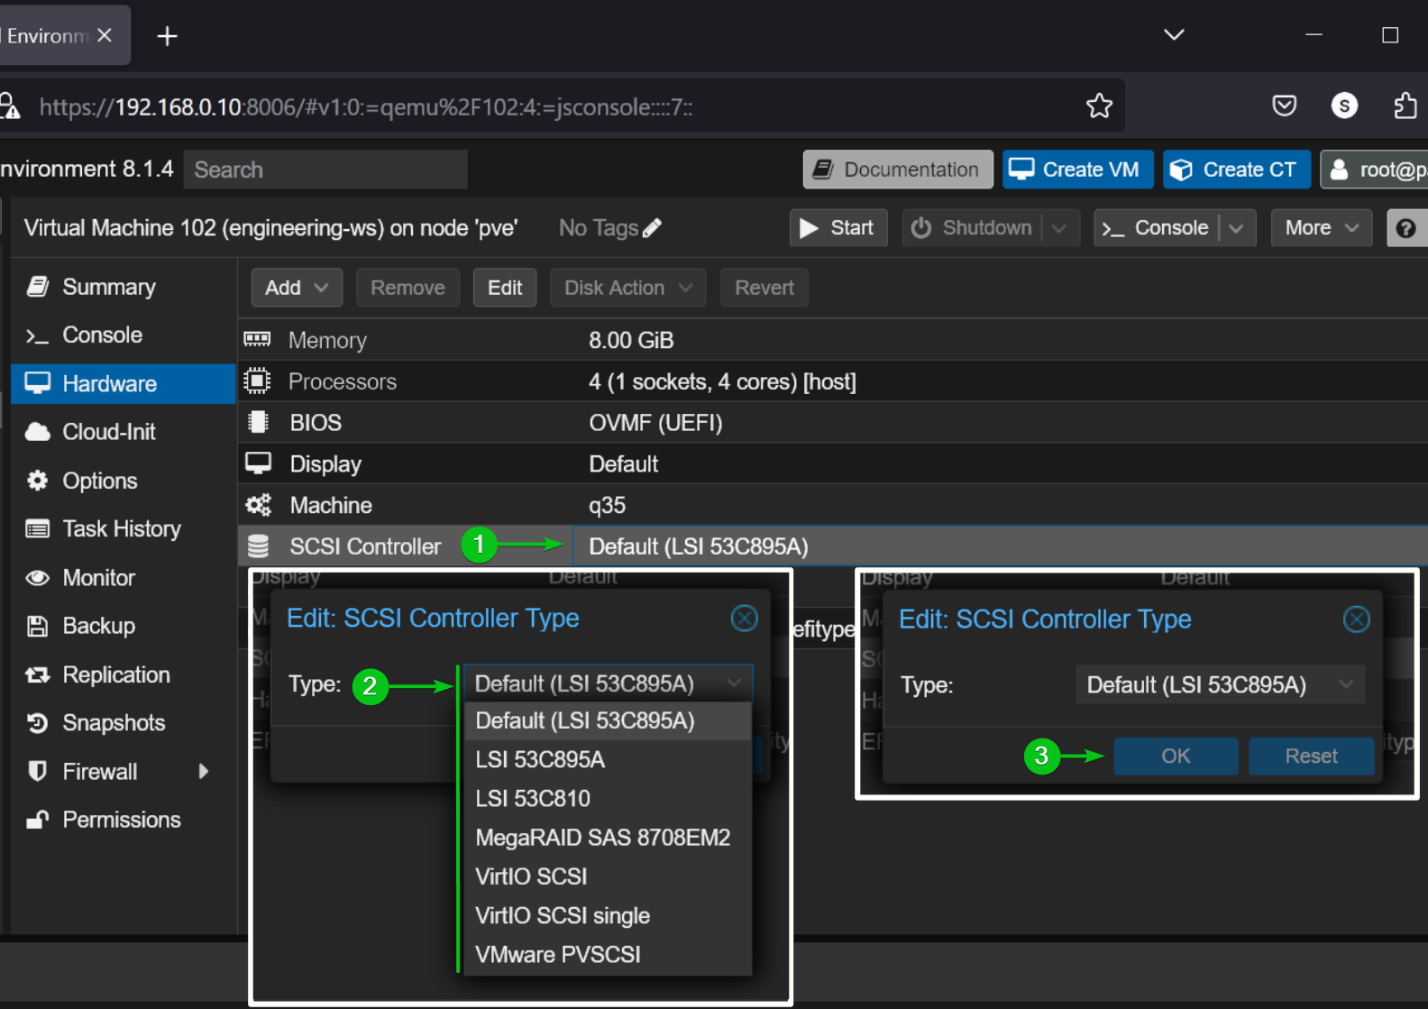
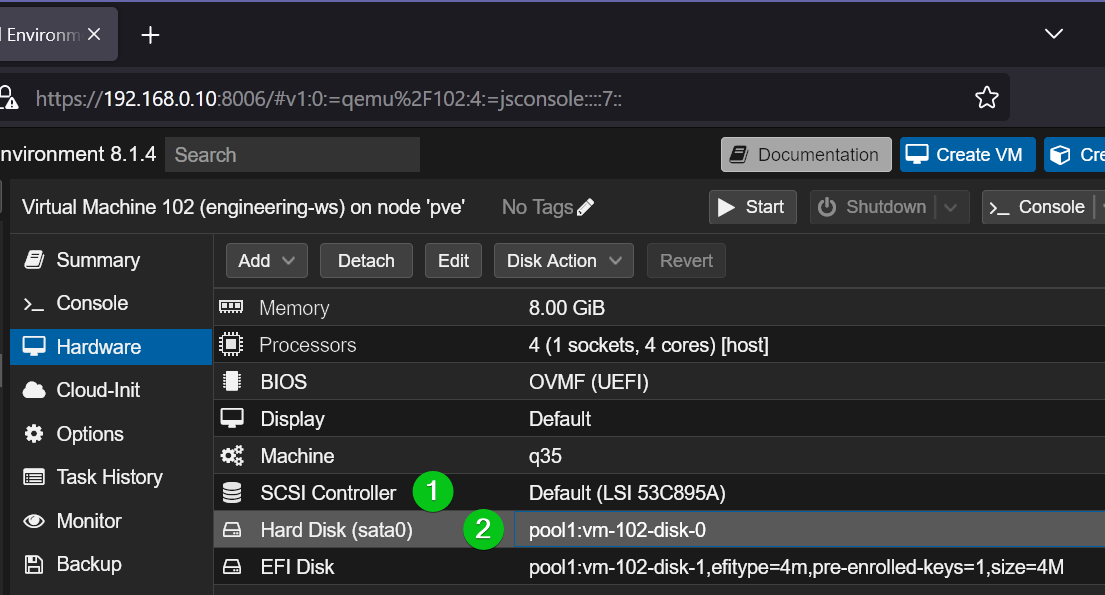
To change the SCSI controller of the imported virtual machine, navigate to Hardware > SCSI Controller[1].
If you’ve imported a Windows 10/11 virtual machine from VMware, select LSI 53C895A (default) SCSI controller from the Type dropdown menu[2].
If you’ve imported a Linux virtual machine from VMware, select the VirtIO SCSI Single controller from the Type dropdown menu[2].
Once you’re done, click on OK to save the changes[3].
If you’ve imported a Windows 10/11 virtual machine, the default SCSI Controller should be LSI 53C895A[1] and the virtual disk should already be configured to use the SATA bus[2]. You don’t need to change anything there.
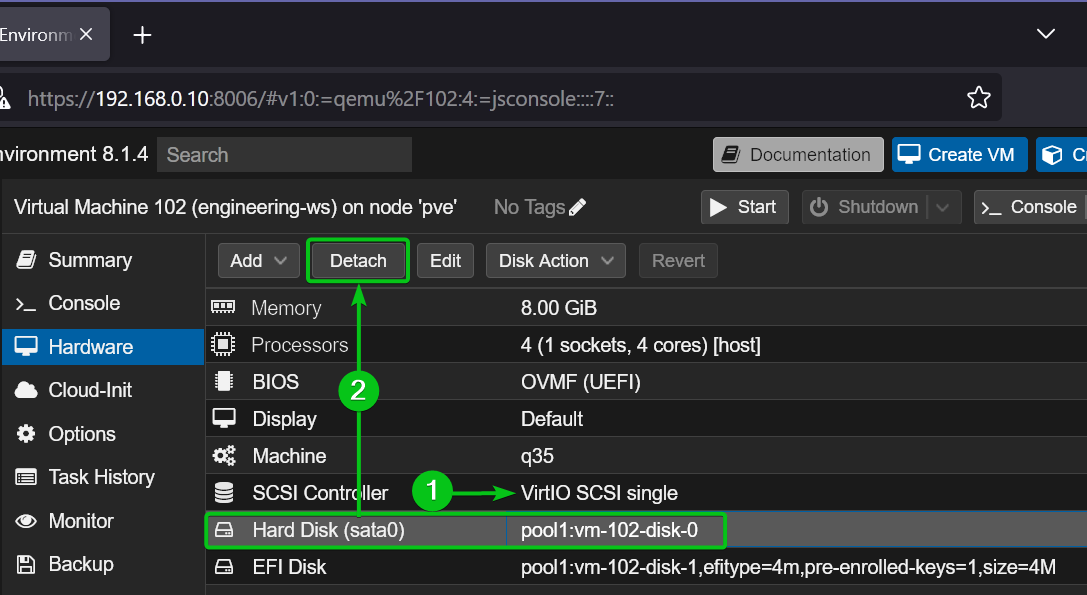
If you’ve imported a Linux virtual machine, change the SCSI Controller to VirtIO SCSI Single[1], select the virtual disk, and click on Detach[2].
Click on Yes
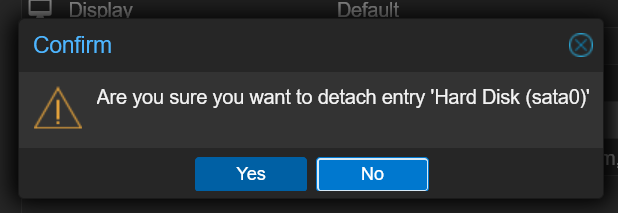
The virtual disk should be detached.
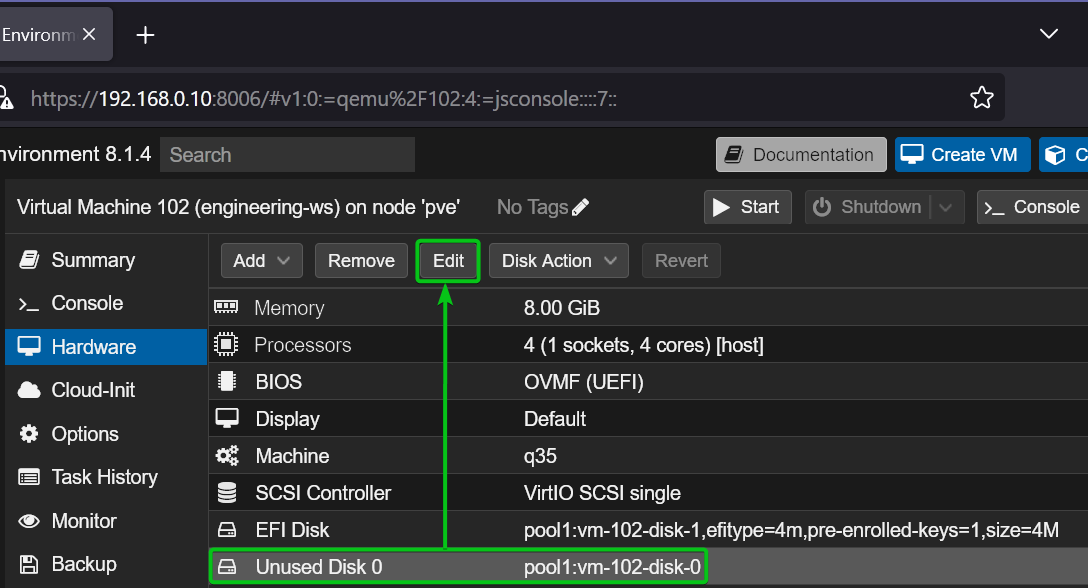
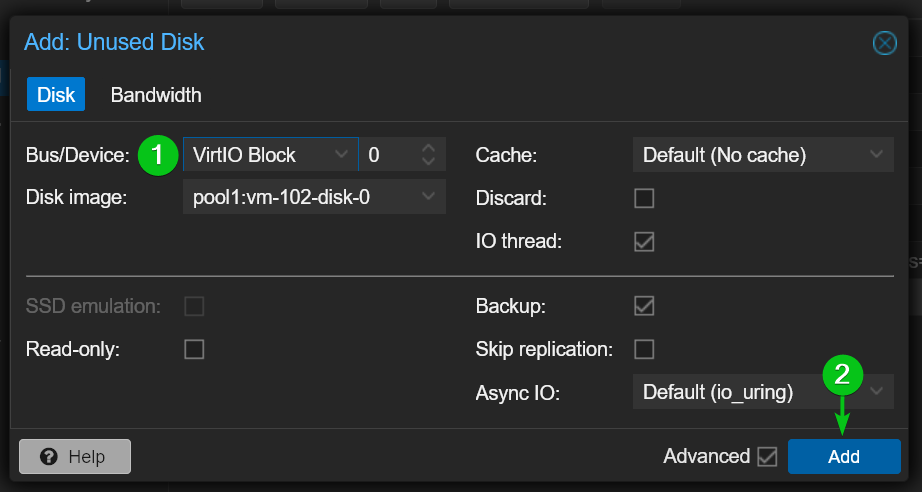
To add the virtual disk to the virtual machine again, select the Unused disk and click on Edit.
Select VirtIO Block from the Bus/Device dropdown menu[1] and click on Add[2].
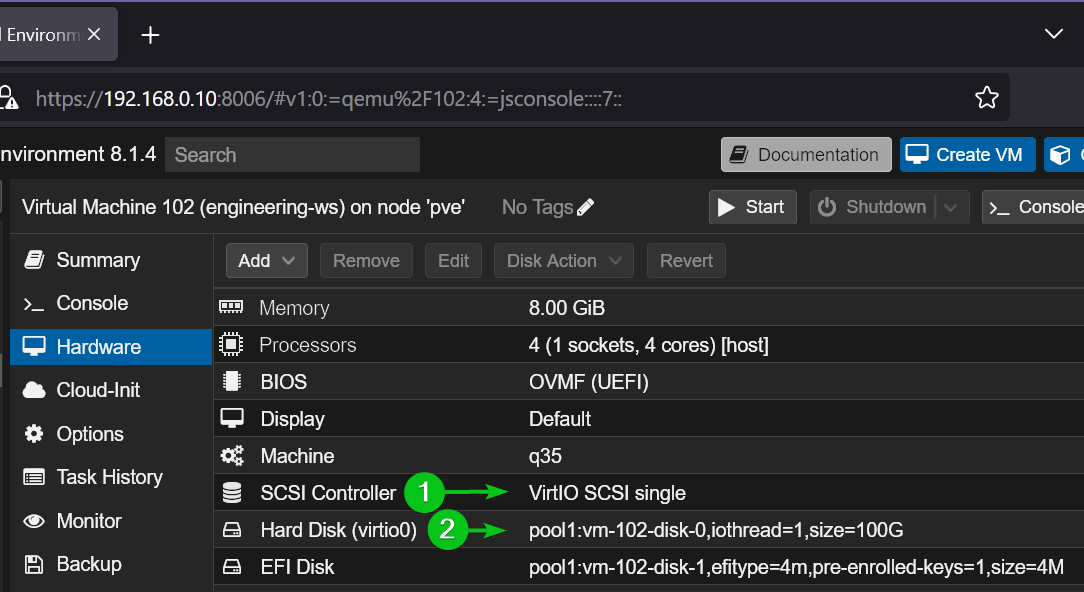
The Linux virtual machine should use the VirtIO SCSI Single controller[1] and the virtual disk should be configured as a VirtIO Block device[2].
Adding a Network Device to the Proxmox VE Virtual Machine:
Newly imported virtual machines might not have a network device added by default. So, you won’t have any internet connectivity unless you add a network device to the virtual machine.
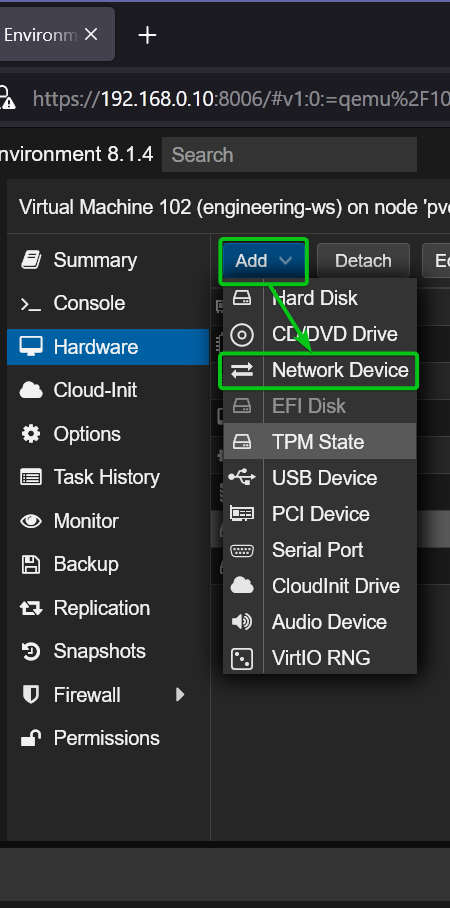
To add a network device to the virtual machine, navigate to Hardware and click on Add > Network Device.
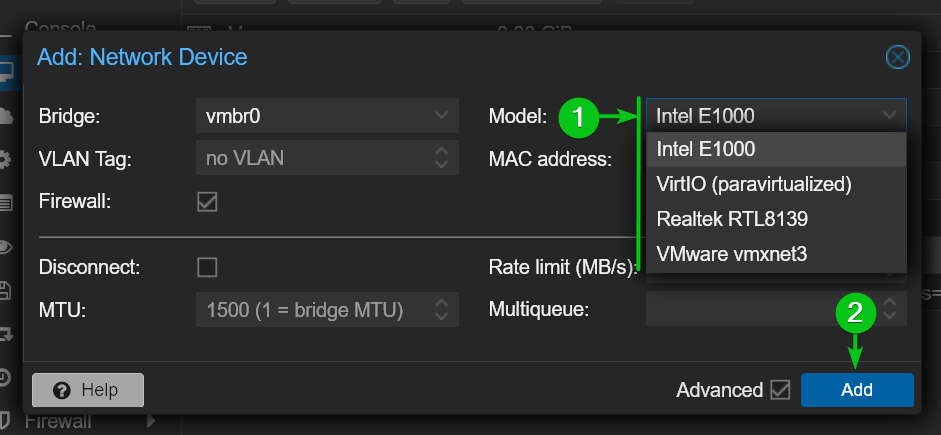
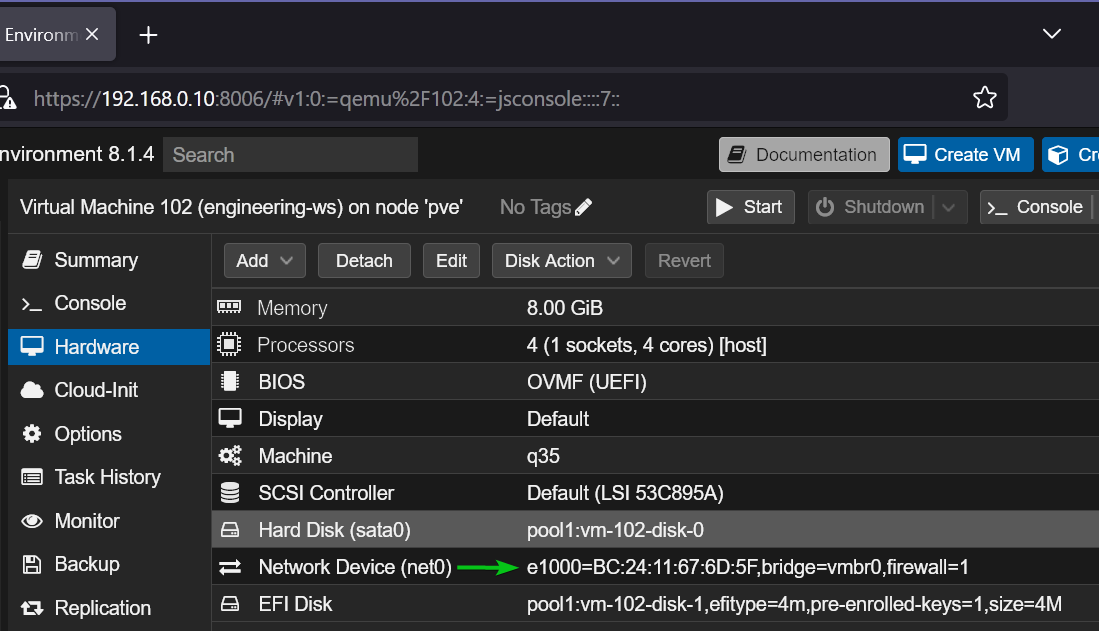
If you’ve imported a Windows 10/11 virtual machine, select Intel E100 from the Model dropdown menu[1].
If you’ve imported a Linux virtual machine, select VirtIO (paravirtualized) from the Model dropdown menu[1].
Once you’re done, click on Add[2].
A network device should be added to the imported virtual machine.
Changing the Boot Order of the Proxmox VE Virtual Machine:
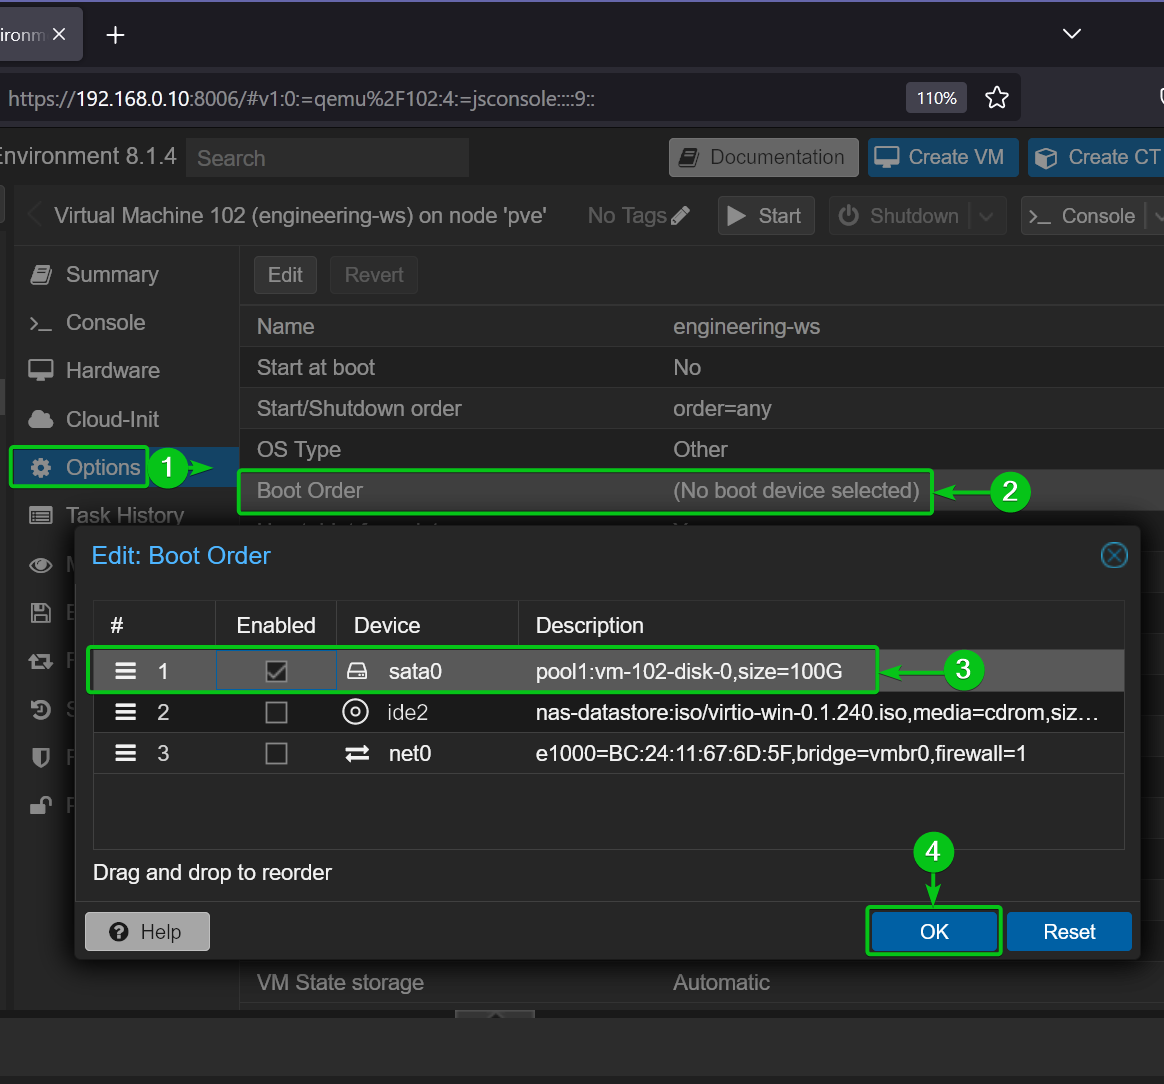
Once you’ve configured the hardware of the virtual machine, you need to configure the virtual machine to boot from the virtual disk.
To do that, navigate to Options[1] > Boot Order[2] and drag and drop the virtual disk to the top of the boot order[3].
Once you’re done, click on OK to save the changes[4].
Enabling QEMU Guest Agent for the Proxmox VE Virtual Machine:
QEMU Guest Agent is used to exchange information between the virtual machine and the Proxmox VE host and execute commands (i.e. shutdown, hibernate, restart) in the virtual machine from the Proxmox VE host.
To properly manage the power of the virtual machine from the Proxmox VE web management UI and take snapshots/backups of the virtual machine correctly from Proxmox VE, it is highly recommended to enable the QEMU Guest Agent for all the Proxmox VE virtual machines.
To enable QEMU Guest Agent for the imported virtual machine, navigate to Options[1], double-click (LMB) on QEMU Guest Agent[2], tick Use QEMU Guest Agent[3], and click on OK for the changes to take effect[4].

Starting the Imported Proxmox VE Virtual Machine:
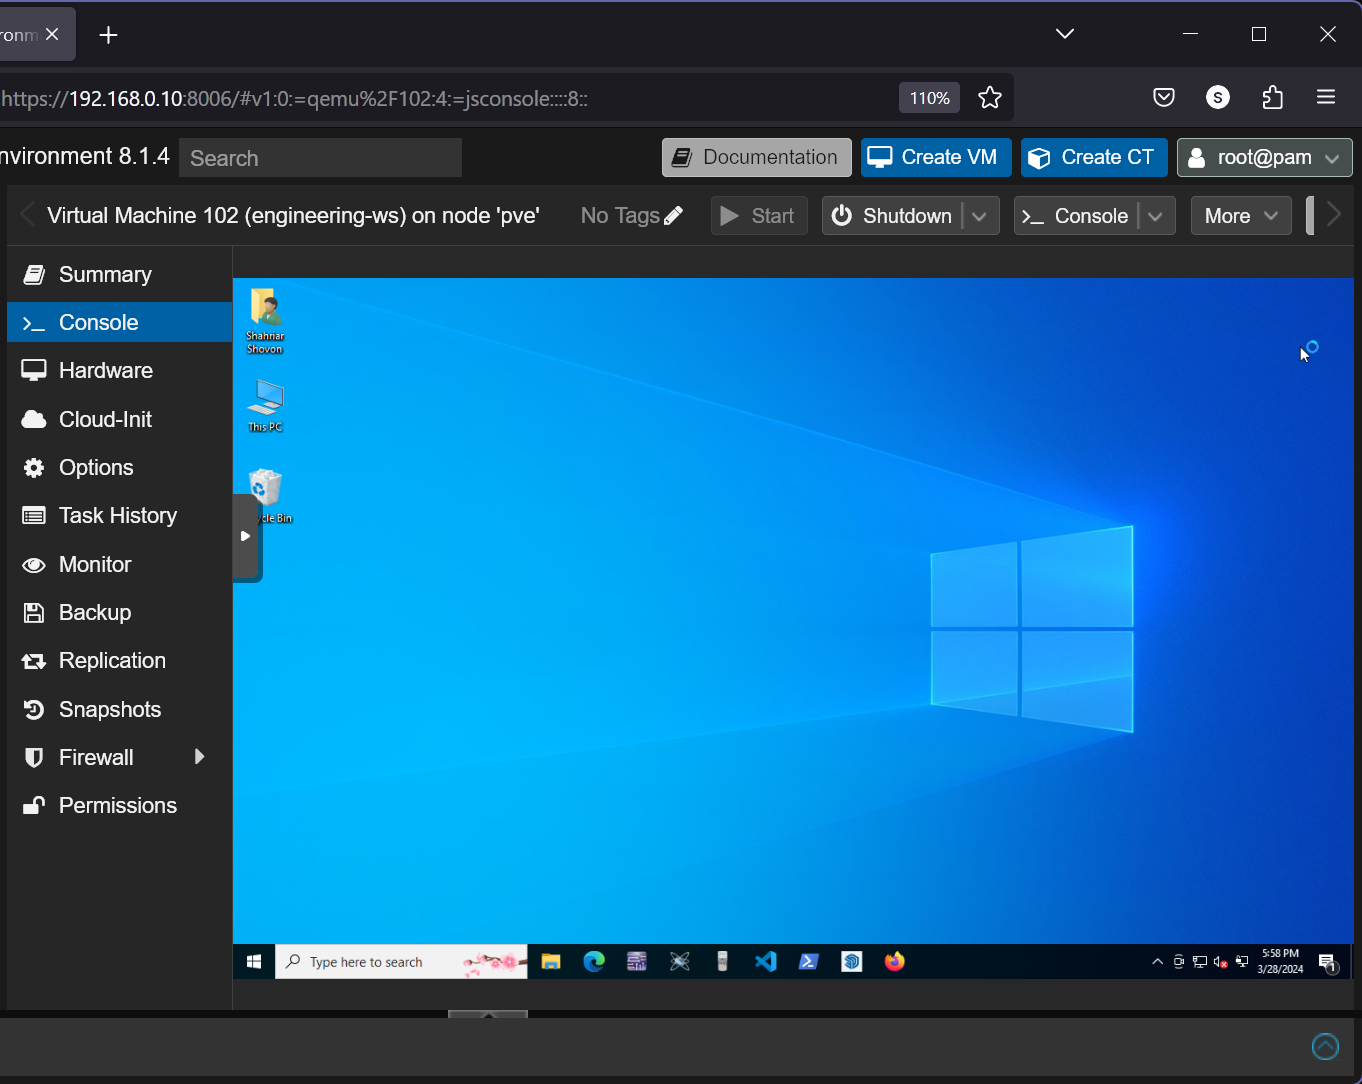
Once the imported virtual machine is configured, navigate to Console and click on Start to start the virtual machine.
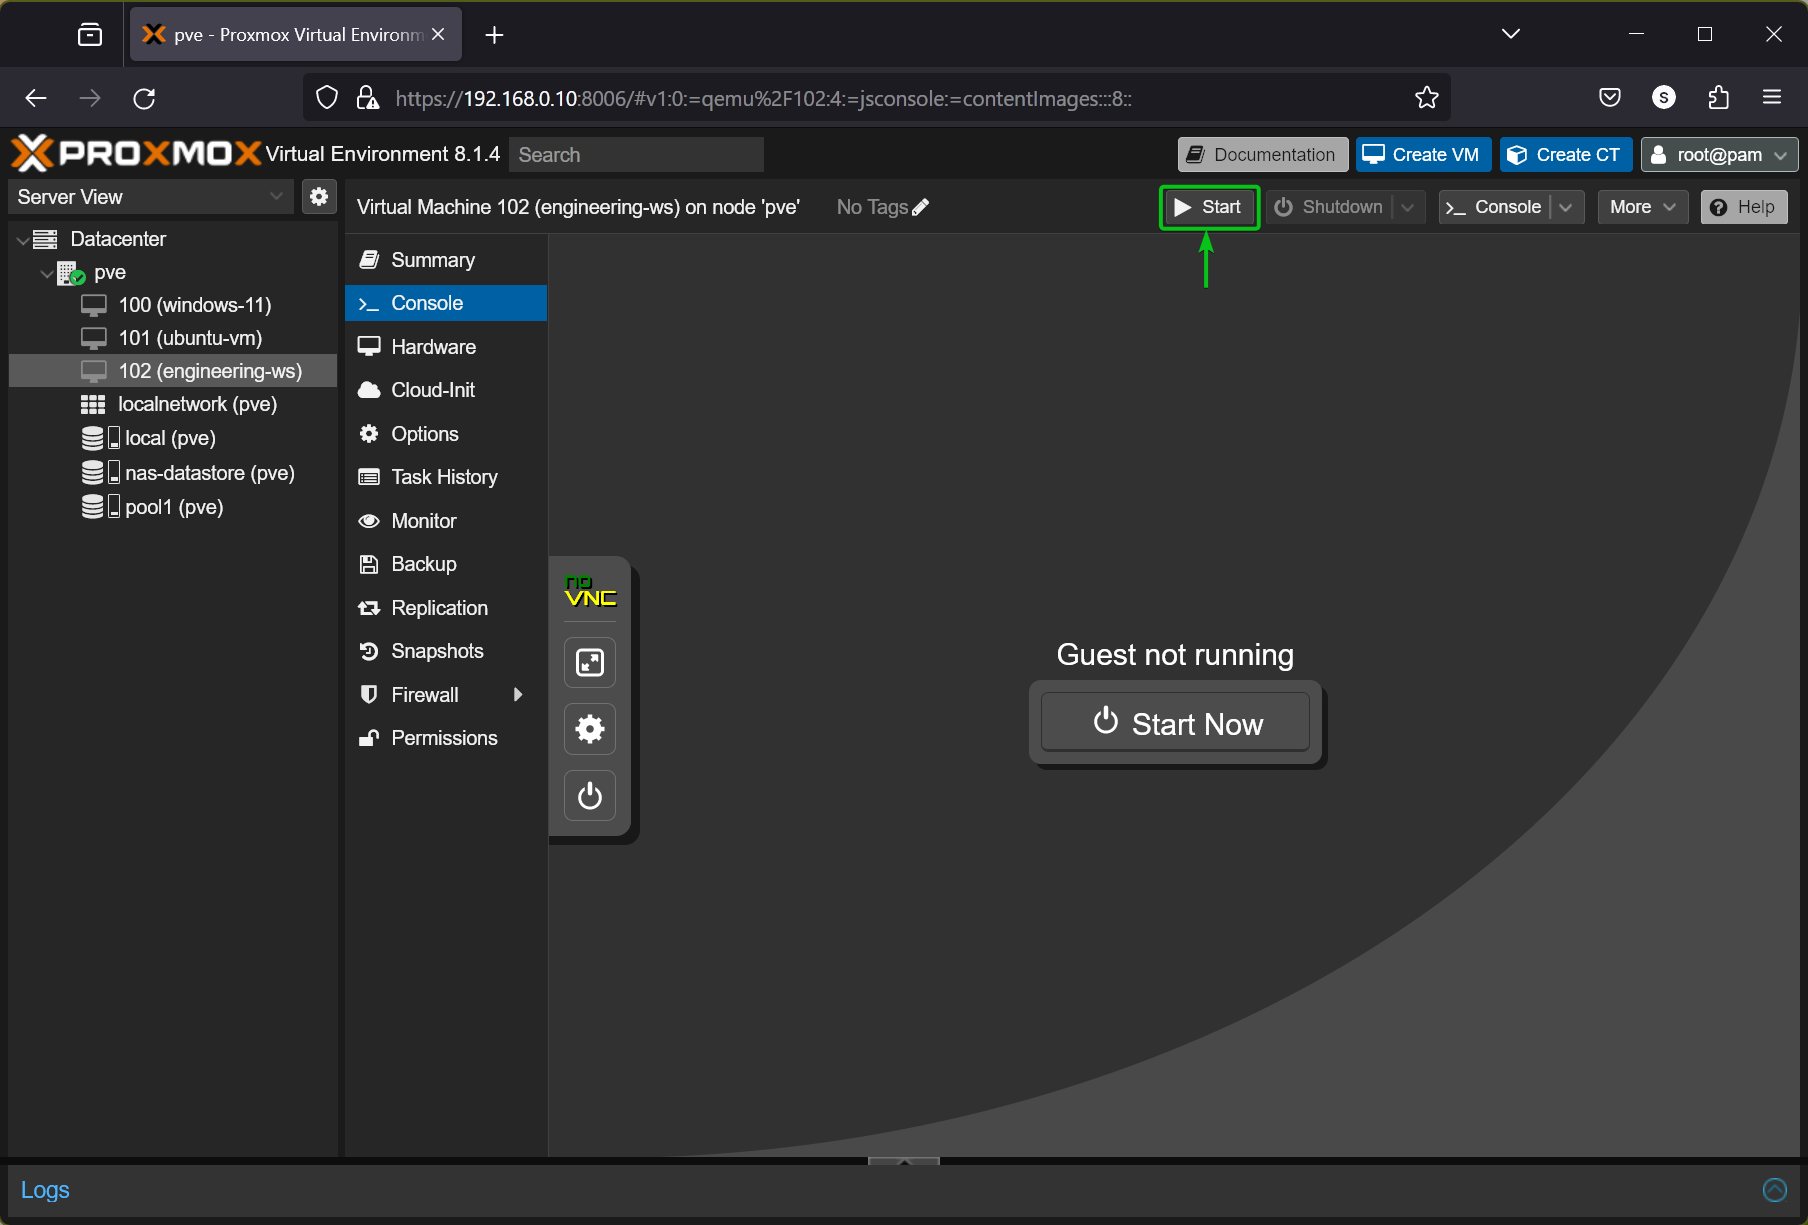
If you’ve configured the virtual machine correctly, the virtual machine should boot the installed operating system from the virtual disk.
Installing the VirtIO Drivers and QEMU Guest Agent on a Windows Proxmox VE Virtual Machine:
Windows operating systems don’t have the VirtIO drivers and QEMU guest agent installed by default. To get the best performance and Proxmox VE integration, you should install the VirtIO drivers and QEMU guest agent on your imported Windows 10/11 virtual machine.
Installing QEMU Guest Agent on a Linux Proxmox VE Virtual Machine:
Modern Linux operating systems come preinstalled with the VirtIO drivers. So, you only need to install the QEMU guest agent on your imported Linux virtual machine to get the best performance and Proxmox VE integration.
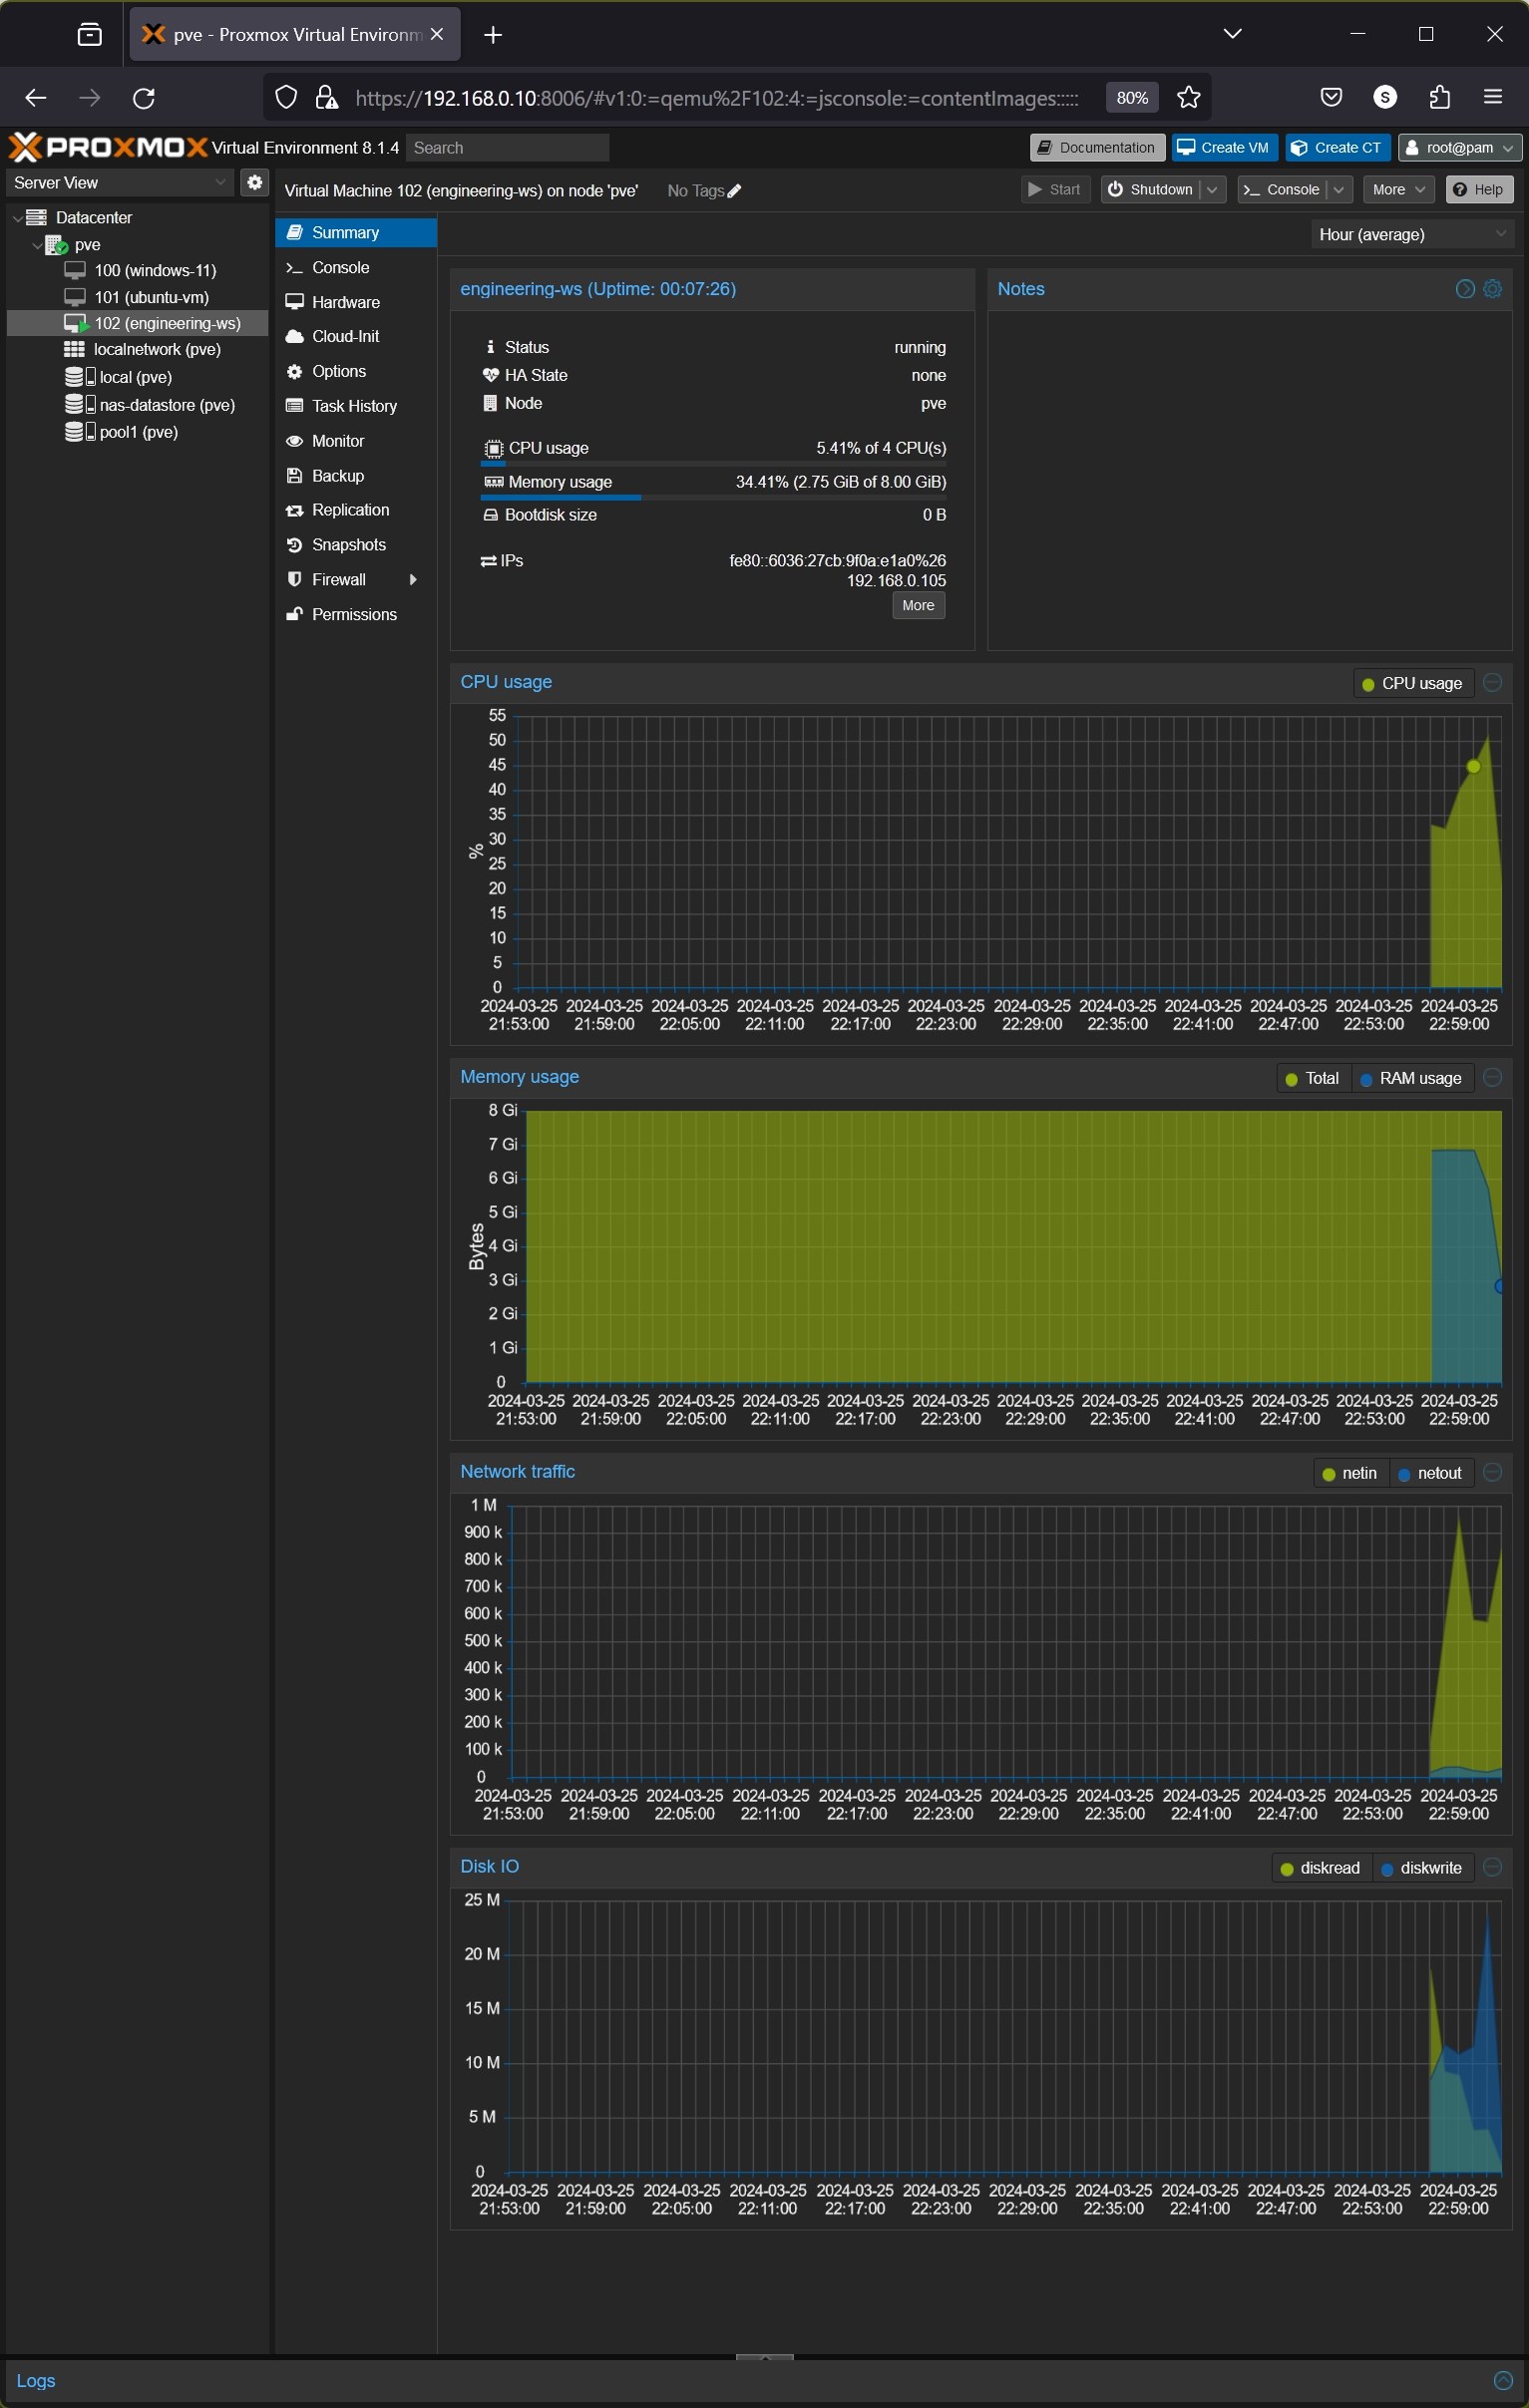
Monitoring the CPU, Memory, Network, and Disk I/O Usage of a Proxmox VE Virtual Machine:
Once you’ve installed the QEMU guest agent on your imported Proxmox VE virtual machine, you should be able to monitor the CPU, memory, disk, and network usage of the virtual machine from the Summary section. You should also be able to take seamless backups and snapshots of the virtual machine. You should be able to manage the power (i.e. start, shutdown, reboot, reset, hibernate, suspend) of the virtual machine from the Proxmox VE web management interface.
Conclusion:
In this article, I have shown you how to import a VMware Workstation Pro virtual machine exported in OVA or OVF format on Proxmox VE. Proxmox VE can’t import virtual machines exported in OVA format directly. So, I have shown you how to convert/extract an OVA virtual machine file into OVF files so that Proxmox can import it directly. After reading this article, you will be able to import virtual machines exported from VMware Workstation Pro, VMware ESXi/vSphere, VirtualBox, and other hypervisors into Proxmox VE.