- Why is my iPhone Showing SOS only
- Is SOS only on my iPhone an Issue
- What are the Reasons for SOS only Issue
- How can I Fix the SOS only Issue on the iPhone
- Additional Fixes to Fix SOS only Issue
- How SOS only and No Service are Different
- How SOS Emergency Calls Work
- Conclusion
Why is my iPhone Showing SOS only
While traveling if you leave the coverage area of your carrier then your iPhone automatically goes into SOS or SOS only mode. The SOS only appears in the place of your cellular network bar.
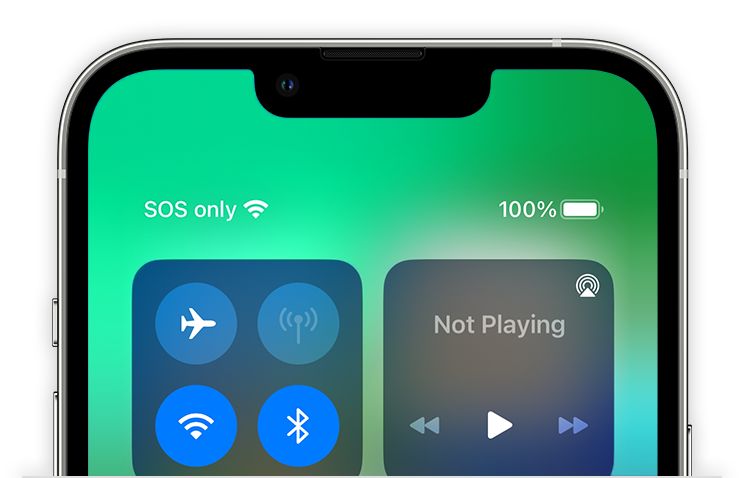
This means you can only make emergency calls to specific numbers such as 911 (USA/Canada), 999 (United Kingdom), 000 (Australia), and 112 (India). You won’t be able to make normal calls, send text messages, or use internet service.
Is SOS only on my iPhone an Issue
If your iPhone goes into SOS only state then it gets back into the normal state when you enter the carrier’s coverage area as it is a failsafe phenomenon. But it can become an issue if it does not go away automatically. So, what are the possible reasons that your iPhone carrier status is showing SOS only. Let’s find out.
What are the Reasons for SOS only Issue
If SOS only has stuck to your iPhone then there might be the following reasons:
The Carrier Service Outage
The carrier service may at times be interrupted due to maintenance or sometimes weak signals can also lead to the SOS only issue. In such a situation you need to wait for the carrier to fix the issue.
Poor Carrier Signals
The weak signal can also sometimes cause the SOS only. Normally gets corrected when you enter into an area with strong carrier signals.
Sim Card Issue
If you are using a damaged sim card then you may also get SOS only. Check your sim card and try to replace it with a different sim card.
Note: If you occasionally get SOS only warning then try to change the carrier.
How can I Fix the SOS only Issue on iPhone
SOS only is not an issue itself, but if you get it more frequently then you may need to take steps.
2. Turn On/Off the Cellular Data
4. Update the Carrier Settings
5. Turn On/Off the Airplane Mode
6. Turn On/Off the Auto Network Selection
7. Remove and Re-insert the SIM
1. Check the Coverage Area
The first and easiest solution to fix SOS only issue is to move into the carrier coverage area physically. In most situations, SOS only warning only comes when you are out of coverage area.
2. Turn On/Off the Cellular Data
To Turn on and turn off the cellular data of the iPhone see the instructions mentioned below:
Note: I am using a device with iOS 17 to perform the following steps.
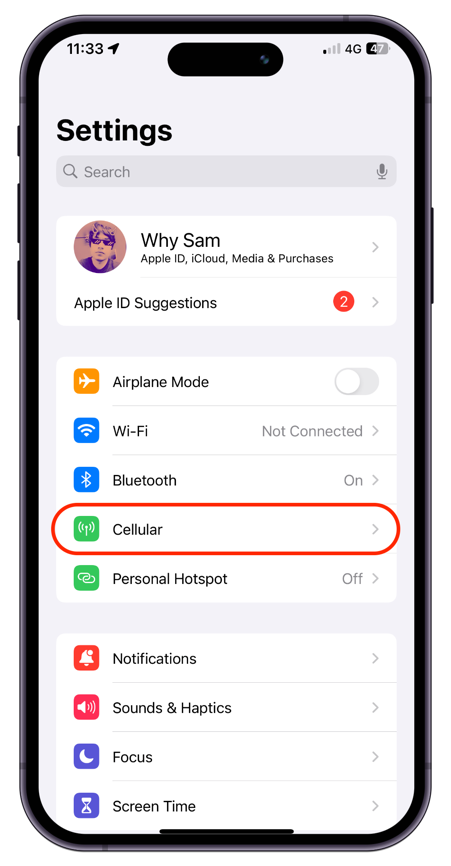
1. Open Settings and tap on the Cellular option:
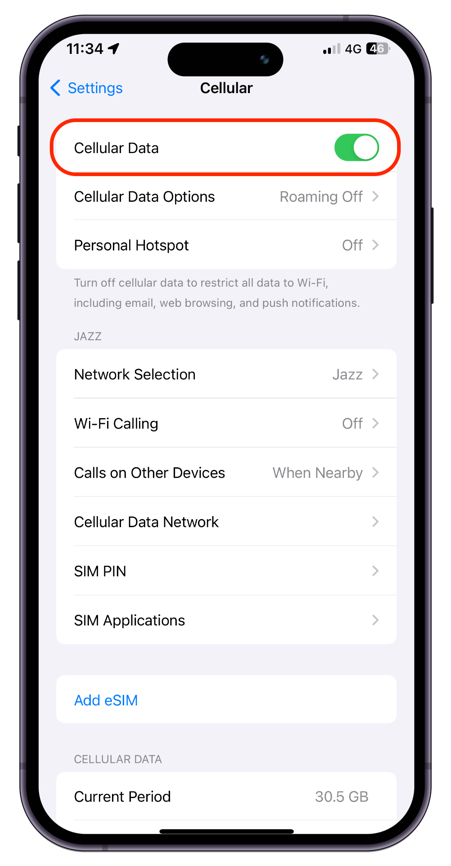
2. Disable the Cellular Data and enable it:
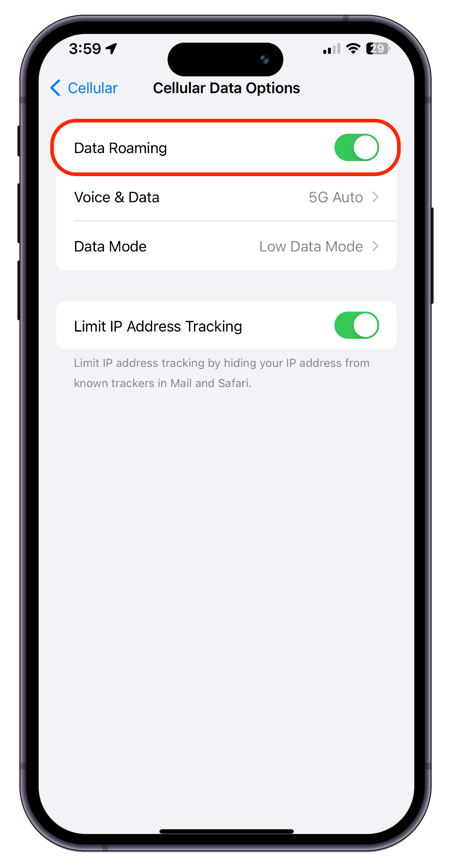
3. Enable Data Roaming
If you frequently travel abroad and leave the carrier coverage then you will also get SOS only status. But it can be avoided by enabling the Data Roaming on iPhone.
Note: Data roaming incurs charges, therefore, it is recommended to subscribe to an international data plan before enabling this option.
The steps to enable data roaming on iPhone are:
1. Open Settings, and tap on Cellular.
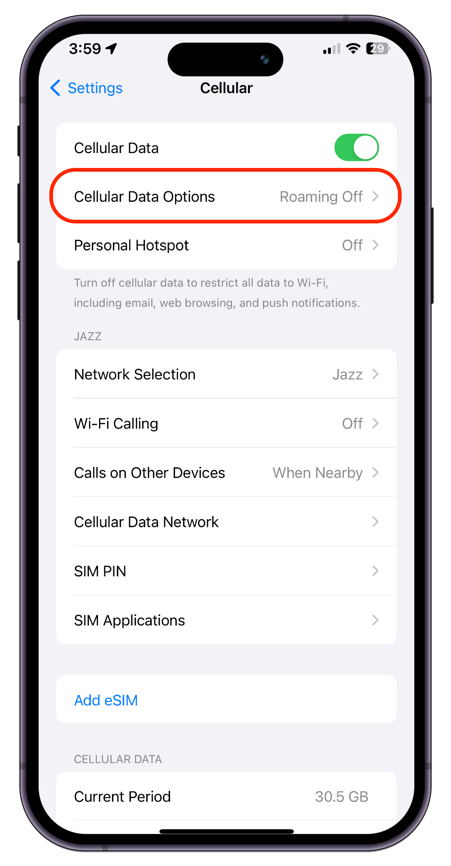
2. Tap on Cellular Data Options:
3. Enable Data Roaming:
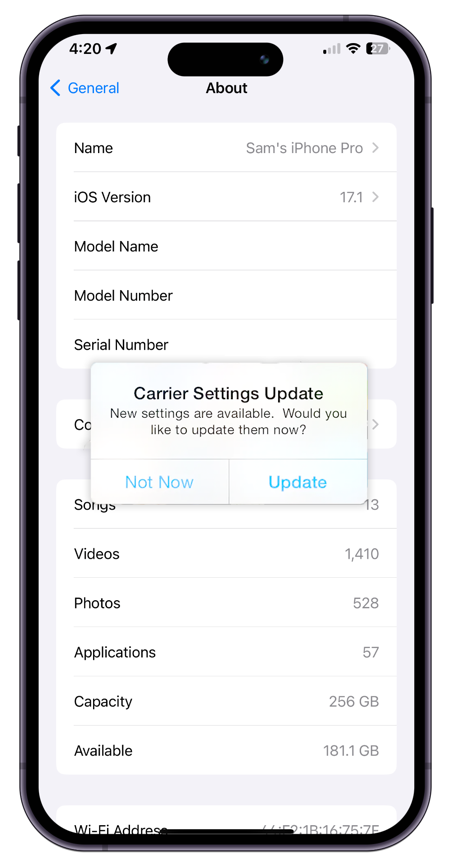
4. Update the Carrier Settings
The cellular service providers occasionally update the service to include new features. Whenever carrier settings update is available, you are prompted with Carrier Settings Updates, tap on Update to immediately update the settings.
You can also manually update the carrier setting by the following steps:
1. Go to Settings and tap on General.
2. Tap on About, you will get the prompt of carrier setting if available.
5. Turn On/Off the Airplane Mode
Turning Airplane mode on and then turning it back off will quickly reset the cellular network. It is the easiest way to reset the cellular network. This step can also solve the SOS only issue on your iPhone:
Open the Control Center, tap on the airplane icon to enable it, and then tap again to disable it.
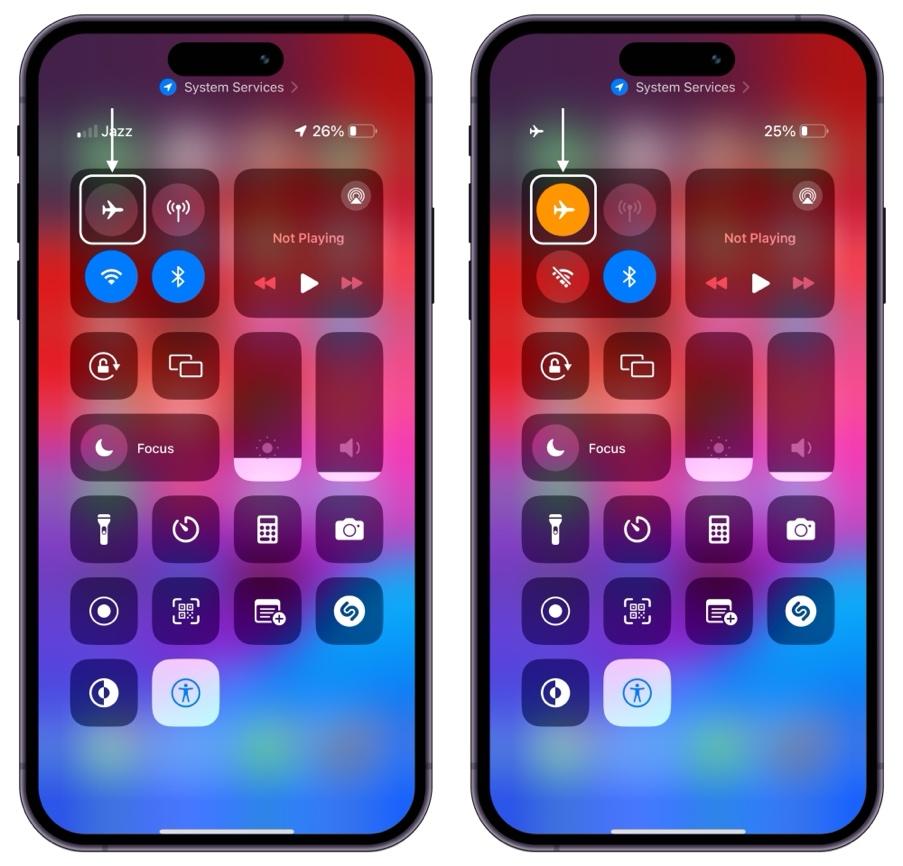
Or go to the Settings and toggle On/Off the Airplane Mode.
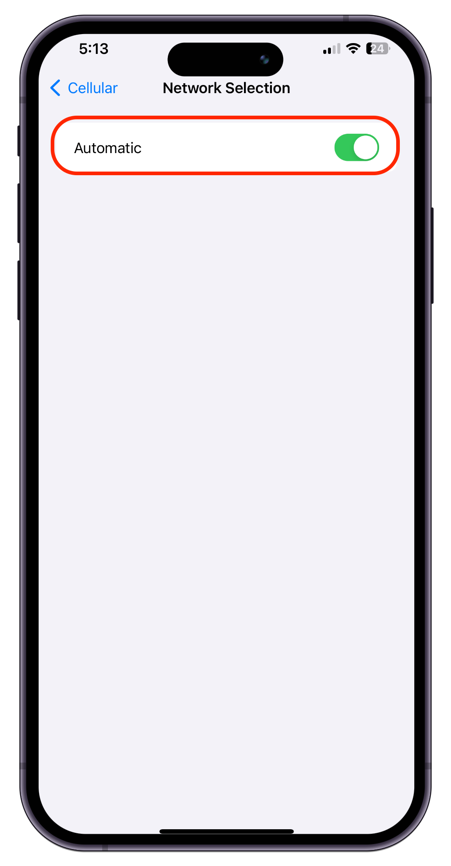
6. Turn On/Off the Auto Network Selection
The network selection on the iPhone is completely automatic but many times turning off the Airplane glitch it. It can give you the No Service or SOS only error. To fix it see the following steps:
1. Open Settings, and tap on Cellular.
2. Tap on Network Selection, and toggle Automatic off/on it.
7. Remove and Re-insert the SIM
If you are using a physical SIM card on your iPhone then try to take it. Inspect it for any damage, if you find try to replace it. Also carefully examine the SIM card tray if it is bent or not.
Note: If you are using an eSIM then avoid resetting it.
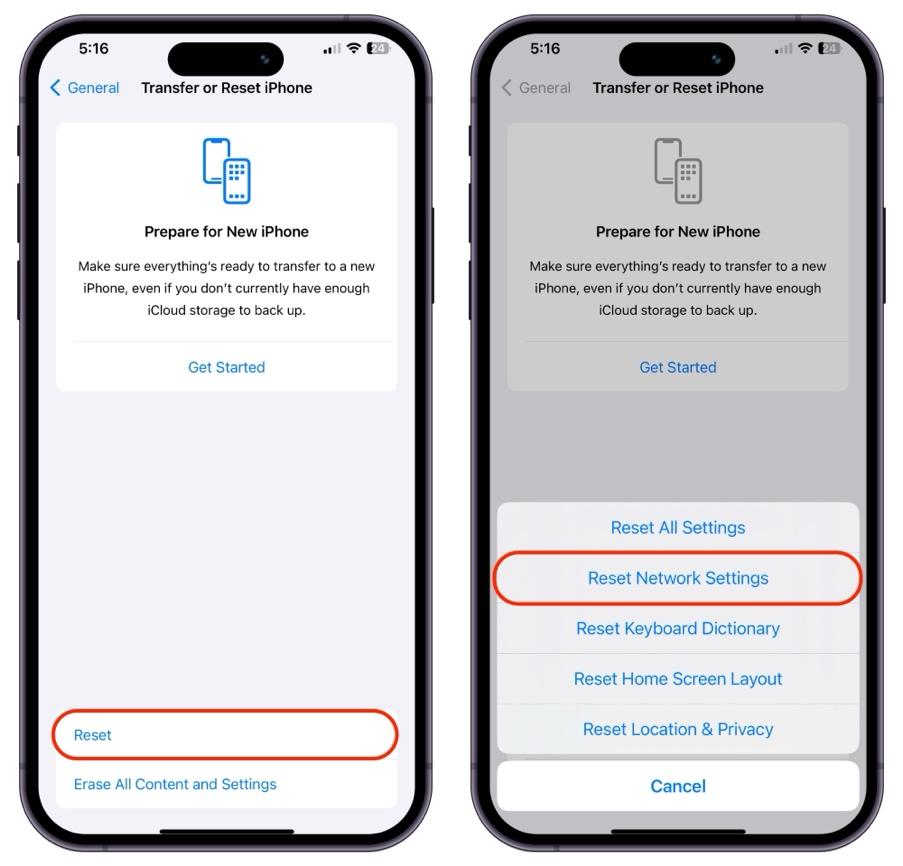
8. Reset Network Settings
Resetting the network settings can also solve this issue. See the following instructions to reset the Network Settings on your iPhone:
Note: Resetting the network setting removes all the Wi-Fi passwords, therefore, ensure have a backup of all the passwords.
1. Open Settings, and tap on General.
2. Scroll and find Transfer or Reset iPhone.

3. Tap on Reset and then on Reset Network Settings.
9. Restart iPhone
Restarting the iPhone is one of the classic fixes, try it to fix SOS only issue.
To restart the iPhone, press and hold the side button with the volume up button.

Slide to turn off the iPhone. To reboot press and hold the power key till you see the Apple logo on the screen. The restarting process of the iPhone varies from model to model, read a complete guide on how to restart the iPhone (All Models).
10. Contact Carrier
If the SOS only issue remains even after trying all the fixes then contact the carrier service provider.
Verizon [Contact]
T-Mobile [Contact]
At&T [Contact]
Dish Wireless [Contact]
US Cellular [Contact]
Additional Fixes to Fix SOS only Issue
Some other fixes to get rid of SOS only issue on iPhone.
Update iPhone
Operating system bugs can also cause this issue, ensure you keep your operating system up to date. To check for iOS updates, go to Settings > General > Software Update.
Reset iPhone
You can also go for your phone reset if SOS only issue remains. But I would not recommend going for this option, as doing this will erase your data. If you want to reset your iPhone backup your phone first. The easiest way to back up your iPhone is using the iCloud service.
Contact Apple Support
If the issue does not go away then try to contact Apple Support. The fastest way to access the Apple customer is by using the Apple Support app. Or directly visit Apple Support from here.
How SOS only and No Service are Different
If you see No Service or Searching, it signifies that the device is not connected to the carrier or searching for the carrier. But when it is SOS only, it means that you can make emergency calls but your carrier network is not available.
Note that when it is No Service then it means you do not have any network service around you cannot even make emergency calls.
How SOS Emergency Calls Work
The SOS message appears on your status bar when you are out of the coverage area of your cellular service provider but you can still make emergency calls. How do those emergency calls work?
When you go out of your carrier coverage range then you are still in the coverage range of other networks that allow you to make emergency calls. This service is only available in the United States, Canada, and Australia.
Conclusion
SOS only on iPhone means that you can only make emergency calls as you are out of your carrier network coverage area. This can be fixed by just entering into the coverage area of your network. But if you get SOS only on your status bar even if you are in the range of your carrier network then it is an issue. You can try various fixes as such turning on/off the cellular service, auto network selection, or Airplane mode. Or reset the network setting and remove and re-inserting the SIM.