As a Linux user, knowing how to work with groups is vital. You will interact with groups at every instance, so you must learn how to manage the groups. For instance, you must know how to change a group’s name or modify its ID.
Managing groups is easy, thanks to the “groupmod” command that offers different options to manage your groups quickly. In this guide, we will elaborate about the “groupmod” command in Linux and provide various examples on how to use it. Read on!
How to Use the Groupmod Command in Linux
Imagine a scenario where you want to modify the group name of your files or change the group ID of a given group to assign it with a specific ID. All these are possible, provided that you know how to work with the “groupmod” command. The command has two main options that we will focus on throughout this article.
- -g or –gid GID – This option lets you change the group ID of the mentioned group and assign it with the specified GID.
- -n or –new-name NAME – This option lets you specify the new NAME for your group to replace the mentioned group.
You can execute the “groupmod –h” option to access its help page and see the other options that you can use. However, the ones that are mentioned previously are the main ones that you will use. Let’s explore the different examples.
Example 1: Change the Group Name
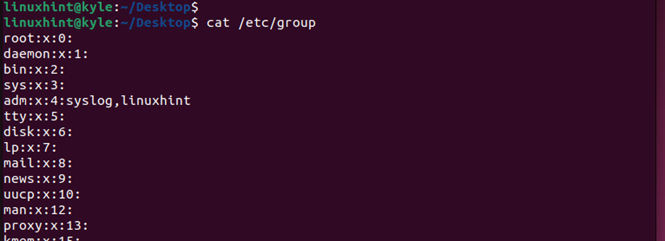
Linux uses groups to organize the files. You can access all the groups on your Linux system by accessing the “/etc/group” file. When you open it with a command such as “cat”, it lists all the available groups and their group IDs. The following is an example of such a list:
Now, let’s check the group where a directory named “new” in our current directory belongs. For that, we use the “ls” command as shown in the following:
Ensure to replace the directory name to match your case. Alternatively, you can use the long listing option with “ls” to get the details of all files and directories, including their groups.
For this case, we can see that the folder is under the “kyle” group.
Before changing the group’s name, let’s quickly verify the current group ID to use it for confirmation. To check the group ID, access the “groups” list and find the target group using the “grep” command as demonstrated in the following:
Here, our target group has an ID of 1000.
To change the group’s name, we run our “groupmod” command as follows:
In the previous command, “-n” is the option to change the group name. The “ubuntu12” is our new group name and “kyle” is the current group name. Replace the names to match your case.
After executing the command, enter your password to authenticate it. Next, rerun the earlier command to check under which group the “new” directory belongs. We can see that we successfully managed to change the group name.
To further verify, rerun the earlier command to check the group ID. You will notice that the new group name matches the earlier group ID. That confirms that the change of group name worked.
Example 2: Change the Group ID
Aside from changing the group name, you can also change the group ID. For this example, let’s work with the same group in which we changed its name. Start by checking its current group ID with the following syntax:
For our case, the current group ID is 1000. To change it and give it a new group ID which, in this case, is 2300, we run our command as follows:
Don’t forget to replace 2300 with your preferred group ID and “ubuntu12” with your target group.
Verify that the change of group ID worked successfully.
Example 3: Change the Group Name and ID Simultaneously
Changing the group name and ID simultaneously with one command is possible. For that, you must specify the new group name and the ID with the following syntax:
Once you run the command, list the groups to check the current name and the ID. For our example, we can confirm that we changed the group name and the ID. All details are reflected in the following image:
Conclusion
The “groupmod” command helps with managing the groups in Linux. You can use it to quickly change any group’s name and ID to meet your objective. We discussed the command in detail and provided examples on how to use it.


