By default, Ansible uses callback plugins to handle logging, each offering different ways to display in the output.
In this tutorial, we will explore the fundamentals of logging in Ansible. We will discuss how to enable the logging, configure the Ansible log mechanisms, and write the logs to files.
Basics of Logging in Ansible
In Ansible, logging is handled by special plugins which are known as callbacks. These callbacks respond to various events in the Ansible ecosystem which allow them to write or send the events to an external source such as a logging system.
For example, when we run an Ansible playbook, the output on the terminal is due to a callback plugin called default.
Ansible also provides other callback plugins which can be used to format the output differently or store it in a file.
Standard Output
By default, Ansible uses the default callback plugin for its standard output. This is the output that we typically see in the terminal when we run an Ansible playbook.
The default callback plugin provides an organized display of play and task executions, whether they’ve changed, failed, or succeeded.
An example is as follows:
- name: Sample Playbook
hosts: localhost
tasks:
- name: Echo a message
command:
cmd: echo "Hello from Ansible!"
register: echo_output
- name: Display the echoed message
debug:
msg: "{{ echo_output.stdout }}"
- name: Intentionally fail
command:
cmd: /nonexistent/command
ignore_errors: yes
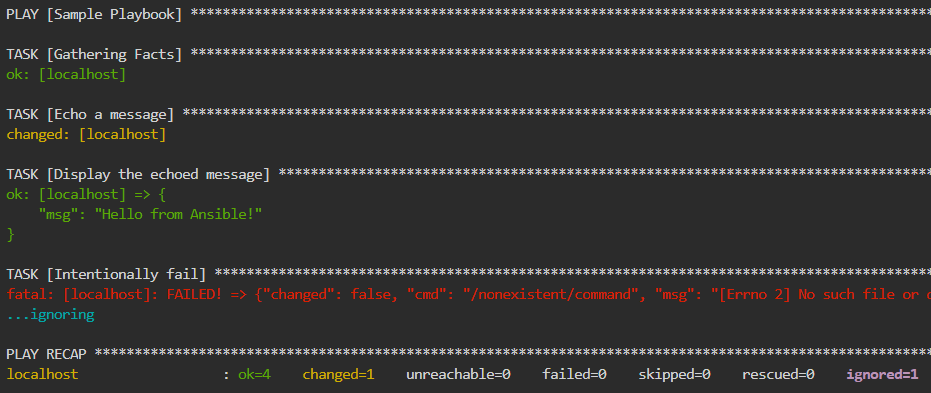
If we run the previous playbook, we should see an example output as follows:

As you can see, Ansible uses the default callback plugin to return the details about the defined tasks. It also includes the status of the various tasks and the resulting errors.
Changing the Default Callback for Standard Output
Ansible also allows us to change the default callback. We can do this by editing the “ansible.cfg” file in the controller node.
Under the [defaults] section, set the “stdout_callback” option to your desired callback plugin.
You can change your desired callback to either yaml or JSON as desired.
Enabling Additional Callbacks
To enable multiple callbacks simultaneously, you can edit the “ansible.cfg” file and add or modify the “callback_whitelist” option under the [defaults] section:
This example enables the timer and mail callback plugins.
Logging to a File
When dealing with an automated environment, saving the logs to a file is essential, as you can reference them later.
In Ansible, you can enable logging into a file by setting the path to the log file in your “ansible.cfg” file:
This creates a cumulative log with new events that are appended to the log file. Ensure that the user that is running Ansible has write access to the specified path.
Conclusion
We learned the workings of Ansible logging features, including standard callback plugins, which enables other callback plugins and writing Ansible logs to a file.


