This write-up will explain the procedure of creating a master branch in a bare Git repository.
How to Create/Make a “master” Branch in a Bare Git Repository?
To create/make a “master” branch in a bare repository, follow the given-provided instructions:
- Navigate to the local repository.
- Create a bare repository.
- Clone the bare repository into another repository.
- Switch to the cloned repository.
- Create a new file in the newly cloned repository and track it.
- Commit changes.
- Push modifications to the bare repository.
- Verify changes in the bare repository.
Step 1: Redirect to Local Repository
First, switch to the desired local directory using the following command:
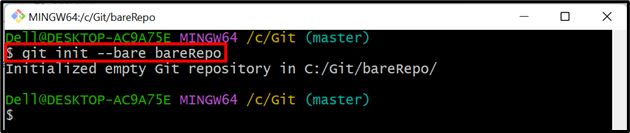
Step 2: Create Bare Repository
Then, utilize the below-provided command along with the particular bare repository name to create it:
Here, “bareRepo” is our bare repository name:
Step 3: Navigate to Bare Repository
Next, redirect to the newly created bare repository:
Step 4: View Available Branches
Now, type out the following command to view all the available branches in the bare repository:
It can be observed that the bare repository does not contain any branch:

Step 5: Create “master” Branch
To create a master branch in the bare repository, execute the given-provided command:
In the below screenshot, the error can be seen, and the master branch could not be created:
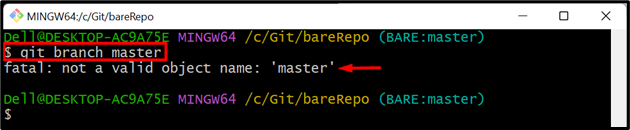
Note: You cannot create any branch in a bare repository. Many Git commands do not work in a bare repository. So, to create a master branch in a bare repository follow the next provided steps.
Step 6: Move Back to Root Directory
Now, use the following command and move back to the root repository:
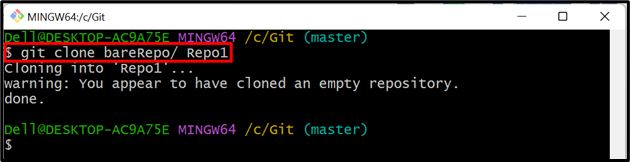
Step 7: Make a Clone of Bare Repository
Next, clone a bare repository into another repository:
Here, “Repo1” is our desired repository into which we want to clone our bare repository:
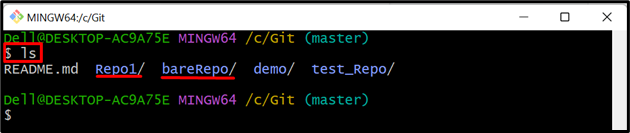
Step 8: Verify Repositories
List the content of the root repository using the below-provided command:
Here, both “Repo1” and “bareRepo” repositories can be seen:
Step 9: Redirect to Cloned Repository
Then, navigate to the cloned repository, i.e., “Repo1”:
Step 10: List Branches
Display the available branches of the current working repository:
In the below screenshot, no branch can be seen in the current cloned repository:

Step 11: Create a New File
Now, utilize the “touch” command and create a new file in the current cloned repository:

Step 12: Track File
Add the newly created file to the Git index:

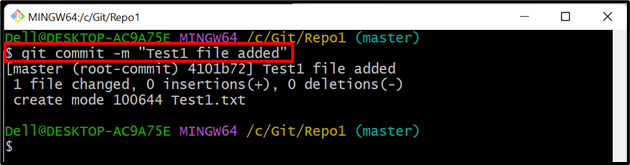
Step 13: Commit Changes
After that, commit changes with the help of the following command along with desired commit message:
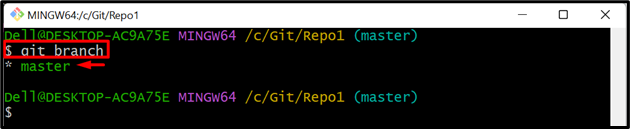
Step 14: Check Branches
Next, list all the branches again:
As you can see that the current repository now contains a “master” branch:
Step 15: View Remote
To verify whether the current repository is linked with the bare repository or not, run the below-listed command:
It can be seen that the current repository has been cloned with the “bareRepo” bare repository:

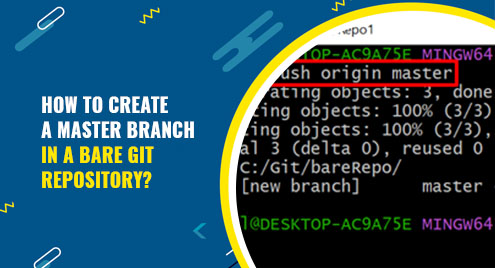
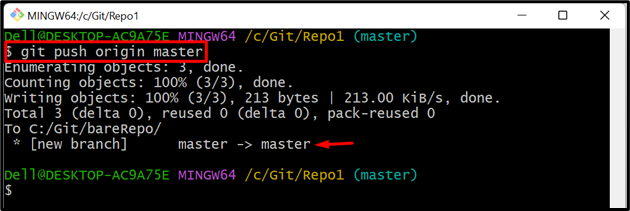
Step 16: Push Changes to Bare Repository
Now, type out the following command to push the changes of the current repository to the bare Git repository:
Step 17: Switch to Bare Repository
Navigate again to the bare Git repository to view changes there:
Step 18: Verify Changes
Execute the given-provided command to view the bare repository’s branches:
In the below-provided command, the “master” branch can be seen in the bare Git repository:

That was about creating a master branch in a bare Git repository.
Conclusion
To create a master branch in the bare Git repository, first, redirect to the root directory. Then, create a bare repository and make a clone of it. After that, navigate to the cloned repository and make changes to it. Next, commit those changes and push them to the bare repository. Lastly, verify modifications in the bare repository. This write-up explained the method of creating a branch in a bare Git repository.