This article will illustrate:
- Primary Difference Between the “git checkout” and “git branch” in Git
- How to Utilize the “git branch” Command in Git?
- How to Utilize the “git checkout” Command in Git?
Primary Difference Between the “git checkout” and “git branch” in Git
The “git branch” command is utilized to create a new branch and view the list of branches. Whereas, the “git checkout” command is commonly used to switch branches, cancel changes in specific files, and also used for creating a new branch.
In order to practically differentiate between the mentioned commands, check out their uses.
How to Utilize the “git branch” Command in Git?
The “git branch” is used for numerous purposes, such as:
- Create a New Branch
- List Local Branches
- List Remote Branches
- List All Available Branches
Check out the below-provided uses of the “git branch” command!
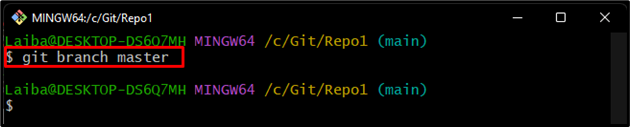
Use 1: Create a New Branch With “git branch” Command in Git
To create a new branch, type out the “git branch” command and specify the desired branch name:
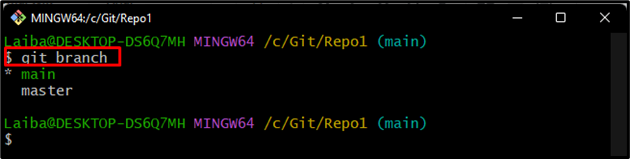
Use 2: View List of Local Branches With “git branch” Command in Git
Execute the following command to view the list of available local branches:
According to the below output, the repository contains “main” and “master” two local branches and the “main” branch is the current working branch:
Use 3: View Remote Branches With “git branch” Command in Git
To display the remote branches, utilize the following command:
Here, the “-r” option is used to display the remote branches:

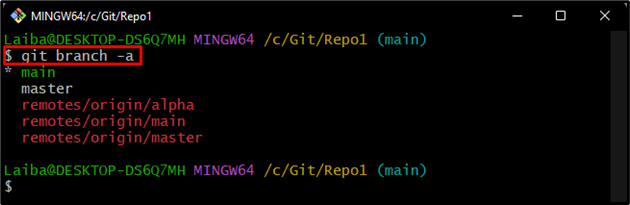
Use 4: View All Available Branches With “git branch” Command in Git
Show the list of all branches including remote and local branches with the help of the given-provided command:
In the above command, the “-a” option is used to display all available branches in the repository:
How to Utilize the “git checkout” Command in Git?
The “git checkout” is used for different purposes, such as:
- Switch to another branch
- Create and switch to another branch at once
Use 1: Switch to Another Branch With “git checkout” Command
Type out the “git checkout” command along with the existing target branch name and switch to it:

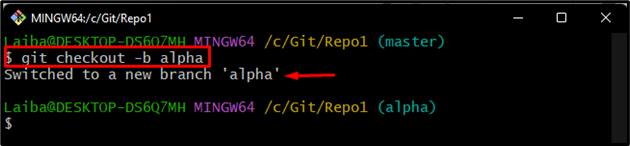
Use 2: Create and Switch to Another Branch At Once With “git checkout” Command
To create a new branch and switch to it immediately, execute the below-stated command along with the new branch name:
Here, the “-b” option is used for creating a new branch.
It can be observed that the new branch “alpha” has been created and we have switched to it:
That was all about the difference between “git branch” and “git checkout” and how these commands work.
Conclusion
The “git branch” is used for various purposes, such as creating a new branch and displaying a list of local, remote, and all branches in Git. While the “git checkout” command is used to cancel changes in a file, create a new branch, and switch branches. This article differentiates between “git branch” and “git checkout” commands.