Notably, this connection comes after negotiations on the network layer. The negotiation involves a series of activities, including querying and exchanging packets with the correct information, such as identification credentials and authentication port numbers. The result is that the RADIUS protocol provides account information, authentication, and authorization from authentication servers to the respective devices requesting access.
FreeRADIUS stands out as this protocol’s most popular free and open-source implementation. It refers to the radius server. However, it is vital to note that other open-source implementations of the RADIUS protocol exist—and dolaRADIUS is another practical example.
This tutorial details how you can install and use FreeRADIUS on Ubuntu 22.04. It will also illustrate how to configure FreeRADIUS with MySQL. Let us go!
How To Install FreeRADIUS on Ubuntu 22.04 and Configure It With MySQL
Ideally, FreeRADIUS supports all three principal functions of the RADIUS protocol. Besides, it can do this by supporting the various databases often used for various accounts. The databases include but are not limited to PostgreSQL, Oracle Database, MariaDB/MySQL, and Microsoft SQL Server.
This step-by-step guide focuses on configuring FreeRADIUS with MariaDB/MySQL. You will need to follow these steps:
Step 1: Confirm If Your System Meets All the Prerequisites
Confirm that your system meets the following prerequisites;
1. A Linux server is running Ubuntu 22.04. It is important to note that this process is possible with a server running on an up-to-date Ubuntu 20.04. Apart from the OS, the process will be more efficient if your device has a minimum of 300 MB of free storage space and a RAM of 512.
If your device runs on the latest Ubuntu 22.04 or 20.04, you can update your system using the following command:
You can upgrade your Ubuntu OS to have the necessary packages using the following command. Note that you can also run these two commands concurrently.
2. Again, you can only accomplish this process if you are a user with sudo privileges. Thus, you must log in as a non-root sudo user. Logging in as a root user could harm your system since the system will not question any of your operations.
Step 2: Install the Relevant Components
Some components are integral to this process. And among the components are a group of open-source software used to create websites and web applications. Collectively, they are referred to as LAMP (Linux, Apache, MySQL, PHP) Stack. And since we already have a Linux server, we will install Apache, MariaDB/MySQL, and PHP as illustrated below:
1. Install the Apache Web Server
You can install Apache using the following command:
Once the installation is successful, proceed to enable the service by starting it and enabling it simultaneously using the following commands:
Finally, include the Apache service in your firewall’s rules. The firewall can block the Apache service if you do not have it. The following command will help:
2. Install MySQL/MariaDB
Another component that you will need to install before you proceed is MariaDB. It is a drop-in alternative for MySQL. While a few differences exist between the two databases, they serve the same function. For this illustration, we will go with the MySQL database and install it using the following command:
Once installed, proceed to set your password. If you are looking to set your password, the following command should help to gain a more secure installation:
The previous command will prompt you to enter your current MySQL password for root. Follow the prompts by pressing ENTER and setting your new root MySQL password. A plugin will ask you to validate your password and confirm whether you want to continue with the password or use a different one. Notably, there are up to three levels of character strength based on length, characters, and cases used.
3. Install PHP and Related Modules
Proceed to confirm the PHP version that you have downloaded using the following command:
The installation process should provide PHP8 since PHP-7 is available in most Ubuntu versions.
Step 3: Install FreeRADIUS
FreeRADIUS needs two modules for a successful installation. Thus, you should install the protocol together with the modules. The modules are the freeradius-mysql and the freeradius-utils. The former makes RADIUS capable of carrying out the accounting and authentication aspects of MySQL, while the latter adds more useful utilities to the protocol.
This command will help install both modules:
Step 4: Test Your FreeRADIUS Server
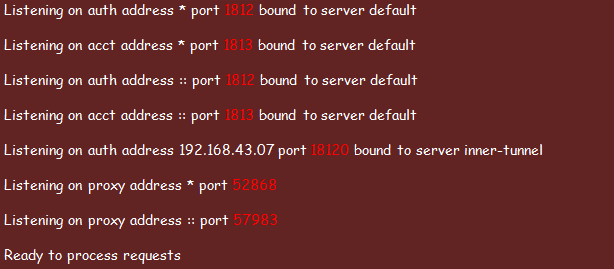
Notably, FreeRADIUS will run automatically upon installation. However, you can check if the FreeRADIUS Server runs flawlessly by running it in debug mode. The first thing that you will need to do is to stop the FreeRADIUS server using the following command:
It is now time to run it in the debug mode using the following command:
The result of the previous command should be as illustrated below:
Once you have tested the functionality of the FreeRADIUS server, stop the debug mode. You can achieve this step by pressing Ctrl + C. Enable the FreeRADIUS Protocol using the following command and continue:
Step 5: Allow FreeRADIUS on UFW Firewall
The UFW firewall may restrict the ports that FreeRADIUS uses. Ensure you set your firewall to allow the FreeRADIUS using the following utilities:
Step 6: Configure FreeRADIUS for MySQL
Finally, configure FreeRADIUS to use the MySQL database. You can achieve this by accessing the MySQL console as a root user before following the prompts to change your credentials accordingly. This utility will help you access the MySQL console.
Conclusion
Through this article, I hope that you have installed the FreeRADIUS protocol and configured it to use MySQL on Ubuntu 22.04 or 20.04 machines. Reach out to us in case you have any issues during the installation process.


