“Working with distributed systems, you might come across RPC calls. The RPC call -as the name defines- Remote Procedural Calls is a procedure to call the procedures present on the remote system. It is commonly known as a subroutine call or function call. In this article, we will examine the two commands of RPC call, rpcinfo, and rpcbind, in the Linux operating system.”
This article will revolve around these two commands while providing some simple examples to help you understand the functions of rpcinfo and rpcbind functions.
What is RPC, and How Does it Work?
An RPC (Remote Procedural Call) is a software communication protocol used to call a program located on another network. The computer is available on the network to request a service without understanding the details of the network. The RPC calls the process on the remote system and requests a required service based on the client-server model. The system that makes an RPC request is the client, and the system that provides or fulfills the service is the server on the network.
The RPC call is a synchronous operation meaning that the client system needs to be suspended until the server system fulfills the request. It uses the API (Application Programming Interface) specified by the IDL (Interface Definition Language) to perform the remote procedures. The IDL provides a bridge between the client and the server machine, which may be using different operating systems and programming languages.
What are rpcinfo and rpcbind Commands in Linux?
The following sections will discuss the rpcinfo and rpcbind commands in detail.
rpcinfo Command in Linux
The rpcinfo is a command provided in the Linux operating system to get the information of the RPC. It makes a direct call to the RPC server and returns back whatever it finds. It usually reports back the status of the RPC server, whether it is in a ready, waiting, or inactive state. The rpcinfo command returns the specific info that you ask for as it provides several options to choose from. For example, if you need to call a specific version, you will specify the target version, and the rpcinfo will call that version of the specified program. On the other hand, if you do not specify the version, then the rpcinfo function will find all the registered versions of the program.
Syntax of rpcinfo Command
The syntax of the rpcinfo command is shown below:
The options for the rpcinfo command are -a, -b, -d, -l, -m, -n portnum, -p, etc. The host’s IP address and port are provided via the -a option. The -b option is used to make an RPC broadcast to procedure 0 and return all the hosts that respond. The -d option is used to delete the RPC service registration specified by the versum and prognum. The -l option is used to list the versum and prognum entries against a specified host.
The -m option prints the portmap operations table. The -n option makes use of the portnum as the port number. The -p option probes the portmap service on the host. All options of the rpcinfo command can be presented by using the –help command. The following command will be used to display the list of options available for the rpcinfo command:
This will give you a complete list of options with its description. See the list below:
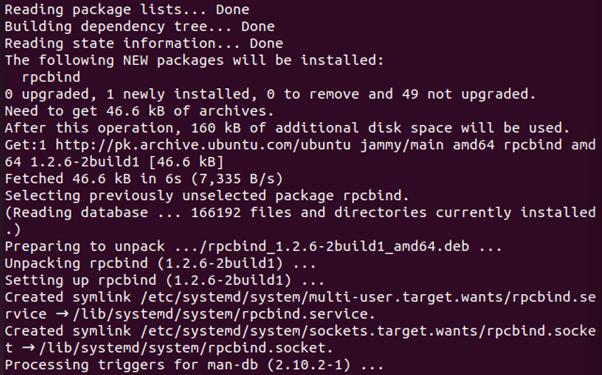
But before you execute any RPC command, you need to make sure that it has been preinstalled in your system. If your system does not have it preinstalled, you can do that with the “sudo apt install” command. Use the following command and install the RPC toolbox in your system:
This will install the rpcinfo, rpcbind, as well, as all other RPC commands in your system. See the result below:
Now your system is ready to run the rpcinfo command. Let us see what the rpcinfo command will return us:
If you do not use any option or specify anything with the rpcinfo command, then it will simply return all the RPC services of the local host. Let us confirm this with the output given below:
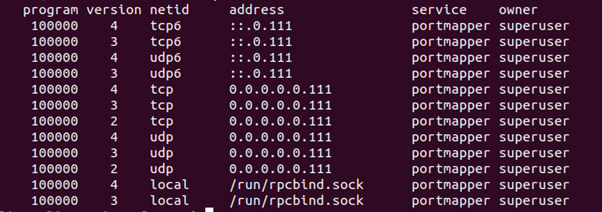
Let us display all the RPC services registered with the rpcbind protocol on the local machine. Here is how you can do that:
The -p option will give you the following result:
rpcbind Command in Linux
The rpcbind is a command provided in the Linux operating system to bind the RPC program with universal addresses. It is an RPC utility that is used to convert the RPC program number to specific universal addresses. The rpcbind utility should be running on the host so that it can make RPC calls to the server machines. The RPC service provides the rpcbind utility with two pieces of information when it starts up: the program number that is ready to serve and the address where it is listening. When a client needs to make an RPC call, it contacts the rpcbind to get the address of where the RPC call should be made. The point to remember here is that the rpcbind utility should be in an active state before you try to use any other RPC service.
Syntax of rpcbind Command
The syntax of the rpcbind command in the Linux operating system is as follows:
The available options for rpcbind command are -a, -d, -f, -h, -i, etc. The -a option is used to make the service abort on errors while debugging. When you run the rpcbind command with the -a option, the system will abort in case any error occurs. The -d option of the rpcbind command allows you to run the utility in debug mode. The -f option will make the process run in the background and not fork. The -h option is used to define the IP addresses to bind. To use any of the options with rpcbind, you need to make sure that the rpcbind service is active. You can do that by checking the status of the rpcbind utility with the following command:
This will tell you the status of the rpcbind utility so you can restart it if it is not active. And if it is in an active state, then you will get the following result:
Conclusion
This article gave a walkthrough of the rpcbind and rpcinfo functions of the RPC utility. The RPC is a software communication protocol and provides rpcbind, rpcinfo, and various other utilities. The rpcinfo utility is used to get the complete information of the RPC from the RPC server. The rpcbind utility is used to map the RPC program number on the universal addresses. This article briefly explains both utilities and uses them as examples to understand their functionalities.


