Uuencode Definition
The uuencode is a Linux command used to encode a binary file to share through the internet via email. It converts a binary file to ASCII code and sends the encoded file to a remote system using electronic email. It takes an input file which is a source file of data, encodes the data in the file, and returns the standard encoded output. The encoding format used by the uuencode command only includes printable ASCII characters. It includes the remote file name and also the mode of the file so that the binary image of the encoded data can be recreated on the receiving side of the remote system. To decode or recreate the original binary image of the data, uudecode command is used in Linux.
Syntax of uuencode Command in Linux
The syntax of the uuencode command in Linux is given below for your understanding:
![]()
The uuencode flag in the syntax is the main command that will perform the function in the Linux operating system. The source file represents the input file that contains the data that needs to be encoded and shared via electronic mail. The output file represents the name of the file that the decoded file will have after decoding the date on the remote server. However, the uuencode also takes input from the standard terminal and gives output at the standard terminal. This can simply be achieved with the /dev/stdout instruction with the uuencode command. We will guide you on how you can do this in the coming sections with the help of examples.
How to Install the uuencode Command in the Linux Operating System?
The uuencode is not preinstalled in ubuntu, so you manually have to install it using the apt install command. You can ensure whether you have already installed the uuencode package installed in your ubuntu system or not by executing the following command:
![]()
If you do not have \ uuencode installed already, you will get the following output:
![]()
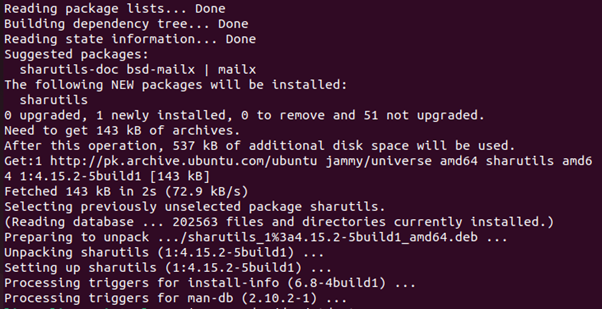
This indicates that you need to install the uuencode command by using the install shrutils. The uuencode command is provided in the sharutils package, so installing sharutils means all of its dependencies, libraries, and commands will be installed automatically. Let us install the sharutils so that we can explicitly use the uuencode command in Linux. Use the command given below to install the sharutils:
![]()
After the successful installation of sharutils, you will get the following result:
As we have installed the sharutils, the system will now allow us to use the uuencode command. But before that, let us locate the uuencode command again and where it is by executing the locate command again:
![]()
As we have installed the sharutils, we should get the exact path where the uuencode command is located in the package. Let us confirm this in the output result given below:

Now let us explore some examples to understand how to uuencode works in the Ubuntu or Linux operating system.
Example 1
In the first example, we will perform a simple encoding on the standard terminal. We will give the input on the command line terminal and get the encoded output in the same command line terminal. As we know that the uuencode takes two parameters, one is the input file, and the other one is the output file. So, if we do not provide the input file, then it will take the input from the user at run time on the given command line terminal. And to print the encoded data on the terminal, we need to indicate the uuencode command. This can be done by using the /dev/stdout command. See the example code below:
![]()
When you press enter after typing this command, the system will prompt you to enter the input data:
![]()
Now type the data or information that you want to encode using the uuencode command. We type the following line:
![]()
After giving the input data, you need to press the ctrl+d so that the uuencode performs its function and encodes the given output. When you press the ctrl+d, the encoded output will be displayed on the terminal as we used /dev/stdout with the uuencode command. See the encoded data below:
![]()
This is the ASCII conversion of the input we provided above.
Example 2
In this example, we will take the input from a binary file and convert it into ASCII text using the uuencode command. We will create an input.tar.gz file and store the data in it. The tar is a compressed binary file that is used in encoding and decoding conversions. After using the uuencode command to convert the input data, we will print it on the terminal using the dev/stdout flag with the uuencode command. First, create a binary file using the following command:
![]()
This will create a binary file named “input.tar.gz” in the “downloads” folder:

Now, provide the input file name to the uuencode command and encode the binary file into ASCII code and print the encoded data on the terminal. Here is the command that will perform this function:
![]()
This will convert the data of the binary file “input.tar.gz” into ASCII and give the result back in encoded format. See the ASCII code of the input file below:

This is the encoded ASCII data on the standard output.
Conclusion
In this article, we explored the uuencode command in Linux. The uuencode command is used in the Linux operating system to convert the binary file into an ASCII code. It only uses valid printable ASCII characters for encoding the input data. You can give the input on the standard terminal and get the standard output, or you can use a binary file to give the input and print the encoded ASCII on the terminal. The examples will help you perform these functions easily.