ADC is an acronym of Analog to Digital Converter. ADC is used to convert real time analog data from sensors, analog devices, and actuators to a digital signal for processing. ADCs are everywhere from cell phones to video recording cameras and even in multiple controllers. Arduino boards are one of them. Arduino has a built-in ADC that allows users to interface Arduino with the real world. Arduino without ADC is limited to the digital world only. Here we will look at how we can use ADC in Arduino to build our next project.
ADC in Arduino
ADC in Arduino is used to convert analog data such as voltage, analog sensor values into digital form. Microcontroller inside an Arduino board can read this digital signal. Arduino and other electronics work on binary data also known as machine language. ADC converts analog data into binary form (digital signal). Most Arduino boards have an ADC inside a microcontroller but an external ADC can also be added to process more data.
- When we interface analog sensors with Arduino most of them has output in analog form ADC convert them into digital
- ADC is used between analog sensor and Arduino microcontroller
- Arduino ADC has multiple applications like weather monitoring system, fire alarm, biometric and voice recognition etc.
How to Use ADC in Arduino Uno
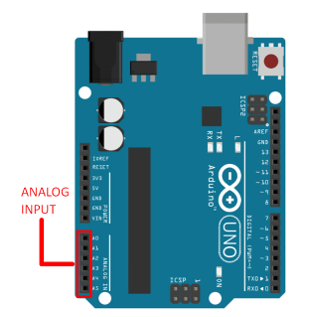
Arduino Uno has 6 analog pins to read analog data. These analog pins read data in between 0-5V. ADC used in Arduino boards is 10bit. It can divide analog values into digital data with a range of 0-1023. This range can also be described as Resolution which shows Arduino ability to map analog data into discrete values.
To make it more clear let’s take an example:
For 5V Vref value:
- If Analog input is 0V then digital output will be 0
- If Analog input is 2.5V then digital output will be 512 (10-Bits)
- If Analog input is 5V then digital output will be 1023 (10-Bits)
AnalogRead() function is used to read analog data using a specified pin from A0 to A5. In Arduino Uno it takes 100 microseconds to read data using analog input pins which means it can take a maximum of 10,000 analog reading per sec.
AnalogRead(pin) uses a parameter “pin” which indicates the name of the analog pin where data is being read. Number of analog pins varies according to board types:
- A0-A5 on majority of boards like Uno
- A0-A15 on Mega board
- A0-A7 on Mini and Nano
- A0-A6 on MKR family boards
Example: Reading Analog Value Using Arduino
To make things clearer let’s start an example using a potentiometer that sends analog data to Arduino analog pin A0. To see our digital output, we will use a serial monitor which is available inside Arduino IDE.
Material required:
- Arduino
- IDE
- Potentiometer
- Breadboard
- Jumper wires
Circuit Diagram
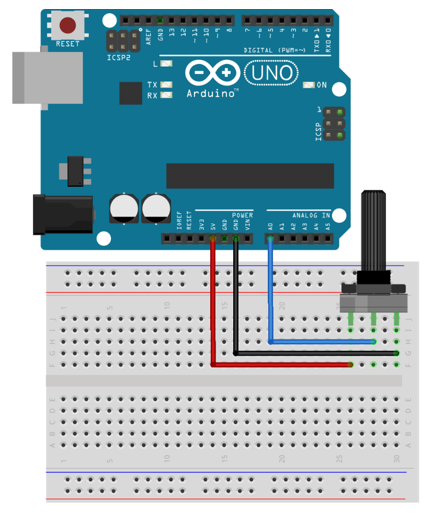
Connect Arduino board to Pc using USB B cable. A potentiometer will provide us with analog data. Connect potentiometer three terminal legs as follows:
- 5V and GND pins of Arduino to outer legs of potentiometer respectively
- A0 analog input Arduino pin with central input terminal of potentiometer
Code
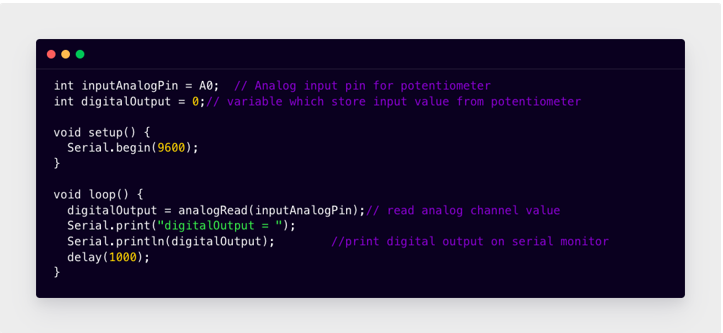
int digitalOutput = 0;// variable which store input value from potentiometer
void setup() {
Serial.begin(9600);
}
void loop() {
digitalOutput = analogRead(inputAnalogPin);// read analog channel value
Serial.print("digitalOutput = ");
Serial.println(digitalOutput); //print digital output on serial monitor
delay(1000);
}
In this code we have initialized two variables: inputAnalogPin will read input sensor data and digitalOutput will store output digital data, which can be printed on serial monitor using Serial.println() function.
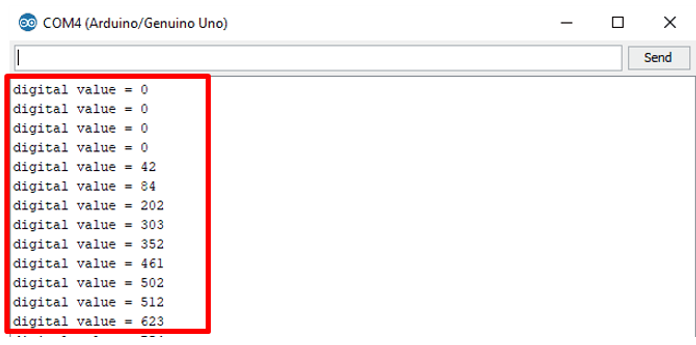
Output digital data can be seen on the serial monitor.
Using Arduino ADC, we have completed our program that converts analog data coming from potentiometer into digital data.
Conclusion
ADC is a kind of tool that links the analog world with digital. Arduino boards are designed for students, teachers, and beginners so they can easily operate hardware using real time data. To link Arduino with sensors ADC will do the work. Here using an example, we have demonstrated working of an Arduino ADC.


