SMTP servers or Postfix, in general, come in handy in securing your servers. They use the mynetworks parameter to determine trusted senders within the network. This was pretty easy a couple of decades ago since institutions and organizations leveraged LAN to specify network users.
But things are no longer the same, and this article will explain the difference. This article will explain how Postfix SMTP works with SASL authentication. But more importantly, this article contains a detailed guide on setting up SASL authentication for Postfix SMTP and enabling authentication.
How Postfix SMTP Works With SASL Authentication
We are in the 21st century, and today’s average office personnel wants maximum mobility. They want to be able to send and receive emails on smartphones, laptops, tablets, or home computers. Jobs are no longer institutionalized like they used to be.
Postfix SMTP aims to bridge the mobility gaps. It uses Simple Authentication and Security Layer (SASL) to validate users. SASL is a framework currently used by many connection-oriented internet programs and applications to secure data, servers, and validate users.
Thus, enabling SASL in your systems ensures that Postfix will only accept STMP connections with credible authentications. SMTP servers will reliably decide whether the SMTP client has the authorization to send emails to remote gadgets or only to destinations around the server.
Of course, SMTP servers often allow emails to remote destinations as long as the client and the server are within the same IP address. But clients away from the server’s IP address will need other ways to access “same network” privileges. This is where SASL authentication comes in.
Postfix SMTP supports SASL implementations because they have a plugin architecture necessary for that. A remote SMTP user with the combination will authenticate to your Postfix SMTP server. Similarly, a Postfix SMTP client will be able to authenticate to your remote SMTP server. And with successful authentication, in either case, the server will provide the client with the same network privileges.
However, it is worth noting that Postfix does not independently implement SASL. Instead, it uses available implementations within SASL as its building blocks. This implies that several SASL configuration files belong to Postfix.
And this brings us to the final part of this project!
Configuring SASL Authentication To Work With Postfix SMTP Server
A functional SASL framework is necessary to authenticate with SMTP servers successfully. Besides, you will need TLS/SSL support for the mail server.
The following steps are necessary;
Step 1: Set Up the SASL Libraries
First, you must choose which SASL version you want to use. The following command should help you install the SASL libraries if you do not have SASL running in your system.
Once done, use the following command to confirm the SASL implementations that your Postfix installation will support. The following commands will help:
In the previous illustration, -a is the SMTP server-side, while –A is the SMTP client-side command. The result is that the server-side support both the Dovecot and Cyrus SASL, while the client-side only supports the implementation of Cyrus SASL. Your results with the commands could be different.
Step 2: Configure Dovecot SASL and Cyrus SASL
For this illustration, we will demonstrate how to configure Dovecot SASL and Cyrus SASL. However, you will choose what best works for your systems based on your interests and available support options.
Configure Dovecot and Establish Communication Between SMTP Postfix and Dovecot SASL
Dovecot is an IMAP server. It features an array of configurations that allow it to authenticate IMAP clients. In cases where you configure Postfix SMTP servers to use Dovecot SASL, the servers will use part of the SASL configuration.
So, ensure that you correctly configure Dovecot SASL into your systems using the following command:
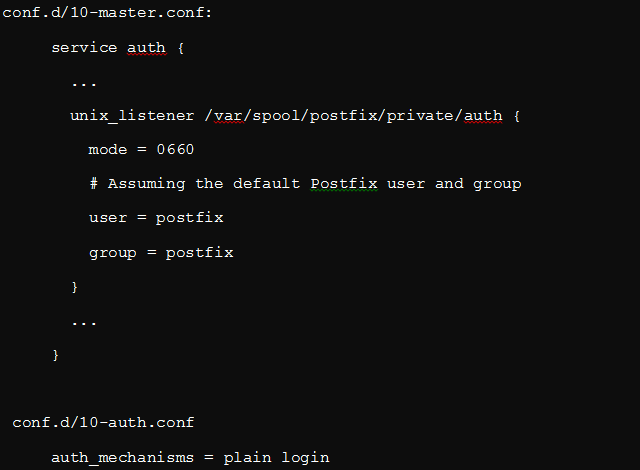
Proceed to establish a connection between SMTP Postfix and Dovecot SASL. We will do this over a UNIX domain for enhanced privacy. In the following figure, we will assume that we have our Postfix queue under /var/spool/postfix/, as shown in line 4:
From lines 5–8, you will notice that the illustration only limits read and write permissions to postfix users and groups. On the other hand, line 14 indicates that the SASL will only use plaintext mechanisms of PLAIN and LOGIN.
Configure Cyrus SASL and Establish Postfix to Cyrus SASL Communication
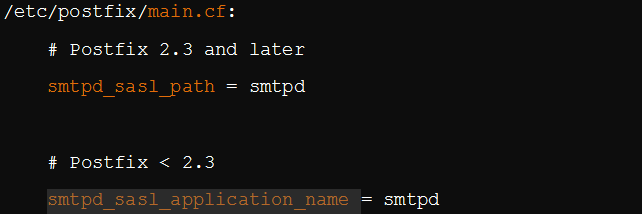
The Cyrus SASL framework is versatile and supports many programs and applications, including IMAP, POP, and SMTP. Configuring Cyrus SASL begins with determining the name and location of the configuration file. This describes how the SMTP will use the Cyrus SASL framework. It always defaults to SMTP and should successfully configure using these variables.
Step 3: Configure Postfix
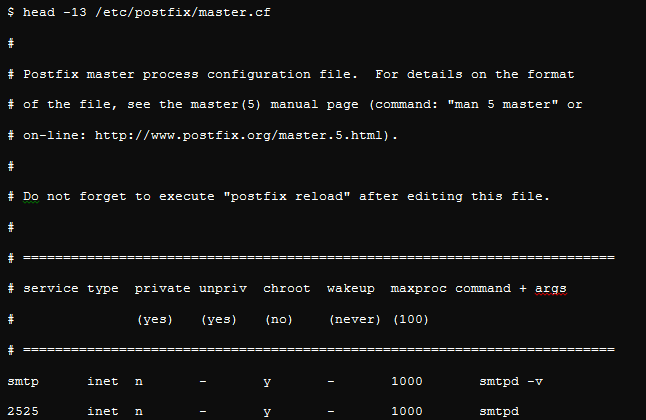
The two configuration files you may use to drive the Postfix server are the main.cf and the master.cf. The master.cf file will successfully configure all Postfix subsystems you may need, including relay, queue, cleaned, and SMTP, among others. Besides, this is also where you will clarify if the Postfix subsystems will run within a jailed environment or if you want to choose verbose logging. This step will also choose the ports you would want to be restricted.
The following screenshot shows Postfix STMP on verbose logging and running within a chroot jail. It also indicates that Postfix is listening on ports 2525 and 25.
The previous image illustrates what the master.cf file will show. However, the main.cf file will be more elaborate. It will show all the small subsets of the configuration options, and whatever is not indicated will remain at its default settings.
Step 4: Generate a Plaintext sasl_passwd File
The plaintext file should look like this:
The first row indicates the destination to which Postfix will relay emails, while the remaining rows are user credentials in the list.
You can also generate a hashed version of the same file as shown below:
Step 5: Configure Cyrus SASL on Server Side
We have already dealt with configuring SASL on the client-side. Let us now configure it on the server-side. We will use the Cyrus SASL alongside the sasldb auxiliary and a property plugin (auxprop).
The following figure shows what the plugin configuration should look like:
Step 6: Create the Client Credentials
Create client credentials at the server-side. Only clients whose credentials appear correctly on the server will have a connection to the Postfix server.
Lines 5 and 6 enable you to copy the password database since the packaged Postfix on Ubuntu exists in a chroot environment. Once copied, Postfix will read the database and adjust the permissions. You can then restart Postfix, and you are good to go.
Conclusion
Postfix SMTP is undoubtedly one of the most established open-source mail transfer agents. It reliably routes and delivers emails. Its most significant advantage over other MTAs like Sendmail is that it is pretty easy to configure and use. The previous configuration will only route emails from clients already authenticated with SASL. So, we configured Postfix to act as an SMTP queue and relay.


