Example 01
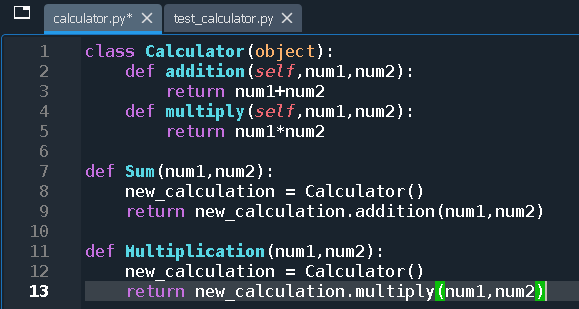
Let’s begin with the first illustration. The calculator.py module includes the subsequent lines of code. In the first line, we defined the addition of the function and multiplied for the class Calculator. Two numbers are multiplied together using the second function named “multiply”; similarly, the first function is used to get the sum of the two numbers. Both functions only return the addition and some of the supplied numbers; they do not print any output.
We have built two module functions outside of the class in which class objects of the Calculator type are created, and the addition and multiplication methods of the Calculator class are called. Verify the code in the affixed picture.
The Sum and Multiplication functions from the calculator.py module will be used in the straightforward module we are constructing, test calculator.py. The code is incredibly simple; we are just importing the Multiplication and Sum methods from the Calculator module. Following that, we ran the Sum function and supplied the 2 and 5 as parameters.
Similar to how we called the Multiplication function, we passed the parameters 5 and 3 into this module function. Using the print statement, we display the output that these functions return. Verify the code in the affixed picture.
Run the test_calculator.py module at this point to see the results. Although you can use any other tool, we are writing and running the code using the Spyder 3 tool. The output in the Spyder tool terminal is visible, as you can see. Using the calculator.py class, the function’s Multiplication output is 15, and its Sum output is 7, which is the intended result.
Example 02
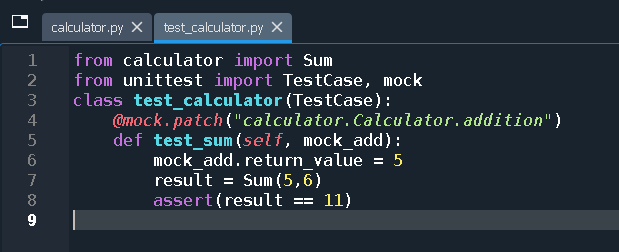
Now we are going to a test for Sum and Multiplication but let’s assume that we have to mock the addition and multiply functions. Mocking and mocks are very useful when we are writing tests for our modules because they allow us to isolate the test targets from their dependencies that cause less fragile tests. If we employ mocks in our unit tests, any tests that fail will do so due to a modification made to the target’s implementation.
However, we can build up the mockup in a way that might prevent tests from failing when they ought to! Let’s upgrade our test_calculator.py module to add mockup code to it. The code snapshot is shown below:
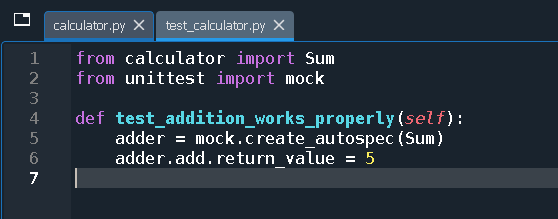
When executed, this easy test is successful. Specifying entails building a mock object with the same API/structure as the mocked object, one that will fail if it is used in a manner that deviates from the spec. The create_autospec function in the mock module is the first of two methods for accomplishing this. Let’s construct a mock object using the given function’s specification. Verify the code in the affixed picture.
Using another object as a specification, a mock object is created using the create autospec function. The signature of all functions which are called on the mock is verified first. This is advantageous because the mock function now relies on the real implementation, and we will encounter a problem if the version changes and the calculator doesn’t respect the dependents’ signatures.
When we run the above piece of code for the unit test, then, we do not find any error during execution. It means that we have passed the test. Now we have updated the code and added just a few lines. We have passed the Multiplication function to the create_autospace function and saved the output from multiplying. Verify the code in the affixed picture.
When we call the function to multiply with a single parameter and execute the code then, it raises an error on the output screen as given below:
If we don’t pass any parameter to this function, then it asks the user to enter num1 and num2 values. Verify the code in the affixed picture.
Here is the screenshot of the execution of the code:
When we pass both arguments num1 and num2, then the above test is executed successfully; the changes in the codes can be seen in the below screen:
As we previously discussed, create_autospec is one method for doing this, but another is to set autospec=True when using the patch decorator to simulate an object. We’ll return to the test_calculator module and update the code as given below screenshot. The first two lines have already been utilized in several cases. The module function name and the value true for the autspec were passed to the @mock.path method in the third code line.
In the right below, we have defined a function that is called the test_multiply where we have passed the mock object variable; later, we have to use the same variable to call the multiply function. There is a line in this code that contains an error which is the 6th line because we have to use the mockup function to operate instead of directly using the multiplication function. Verify the code in the affixed picture.
Here is the updated code. When we run this unit test, we don’t receive any error, which means that this test is passed. Verify the code in the affixed picture.
Conclusion
This is about the use of python autospec mocking in some of our python examples executed in the Spyder 3 python tool. All the examples used in this article are easy to do and learn. So, try out not to miss any one of these to get a better understanding.


