In order to operate with Linux, we must first create an account because we can no longer use the root account. Our system’s user accounts and groups are managed by a system administrator account which is one of our administrative accounts. The addition or deletion of users is one of the easiest tasks for a manufacturer Linux server. A fresh Linux server only gives us access to the root user account. It is a beneficial but unsafe feature of the Linux server. It is a good idea to add a non-privileged user to perform routine chores. The sudo command-line tool, however, allows us to access the administrative privilege.
How to Add a User in Linux in Ubuntu 20.04
On a Linux server, there are primarily two methods for adding users:
To assist you to manage the associated users and user sets on your system to the best of your ability, we’ll go through some of the common uses for the GUI and useradd command in this article.
Examples of Using the Linux Adduser Command
You must follow the command “useradd” or “adduser” with the user’s name in order to add or create a new user. The term “username” refers to the user login name that a user enters while logging into a system. The username must be distinctive and there may only be one user added (existing in the system and distinct from the other usernames).
We need to log in with the root or sudo privileges to execute the useradd command. Let’s define a few terminologies used frequently in the Linux command prompt before using the useradd command.
Username: The name used to log into a Linux system is known as a username. It is displayed when we switch in our machine. The username should have a character count of 1 to 32.
Password: An encrypted code known as a password is used to secure your system from malware. It is kept in an encrypted fashion in the etc/shadow file.
User ID: Linux assigns a special ID to each user known as a user identification number (UID) or UID. The root user’s UID is often set to zero by default, and the remaining UIDs from 1 to 99 are set aside for other preconfigured accounts. Additionally, UIDs 100 through 999 are set aside for system accounts and groups.
Group ID: An identification number for groups is given by the Linux system and is called the GID or Group ID.
User Info: It enables us to specify some more user data like the user’s full name. It is not required.
Home directory: It is a precise position for the user.
Shell: A user’s shell can be found in its exact place.
You must configure the user password before you could login in as the newly formed user. Use the passwd command after entering the username to accomplish that:
The password must be entered twice, once for verification. Make sure to select a secure password.
Sometimes, the newly formed user may or may not set a home directory. Use the following command to form a user and compel the allocation of a home directory. Take a look at the following terminal snapshot:
For the Linux user, the aforementioned command creates the home/linux directory and prompts for the system administrator password.
The initialization files can be found by listing the files in the /home/linux directory as follows:
Linux enables us to replace the default folder with a home directory that we can construct in a different location. To create an alternative home directory, use the useradd commands -d flag. Run the following command:
To designate a user with an expiration date that results in automatic deletion after a specific date.
The aforementioned command generates a user with the chosen expiration date. A user named “u_linux” is created and automatically deactivated on August 08, 2022.
Examples of Using the Linux GUI for Creating Users
We can build a user from the functions of the Linux GUI. It is an easy process. To add a user on the Linux server, follow the instructions outlined in the following:
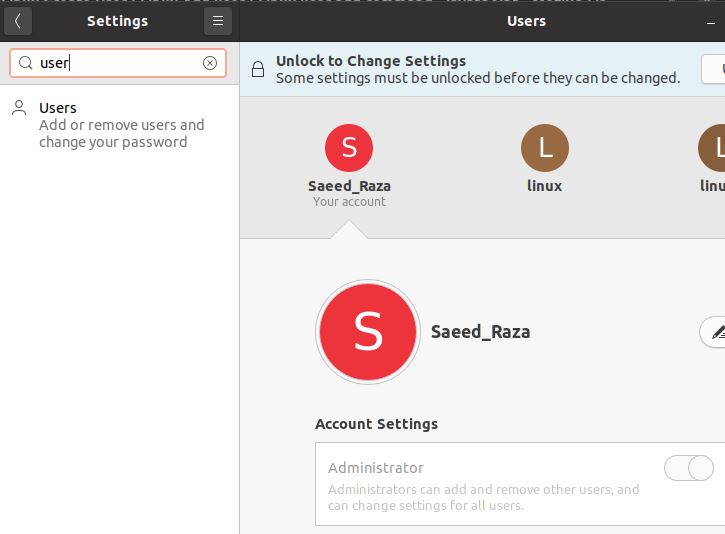
Step 1: Open the system search in your Ubuntu application. Enter the setting’s name and then select the Detail-> about or you can search the user option from the search bar.
Step 2: Select the Unlock option from the header after selecting the Users. You will be prompted for the system authorization password; input it and press OK to continue. Take a look at the following illustration:
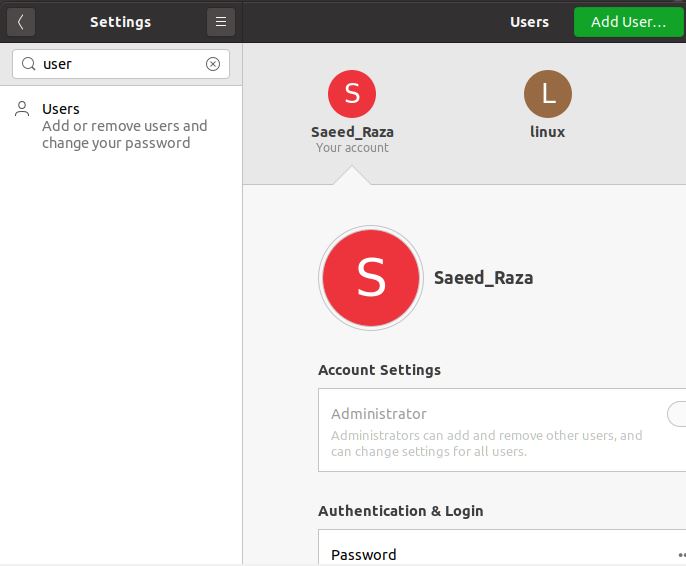
Step3: To add a new user, select the Add User option shown in the right corner.
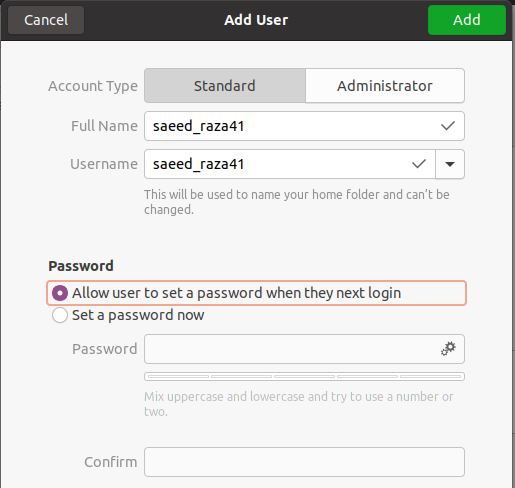
Step 4: The user information, including username, password, and account type, should be entered. Two account types, Standard and Administrator, are available for creation. Sudo privileges are not available to standard accounts as we have given a user name “saeed_raza41”.
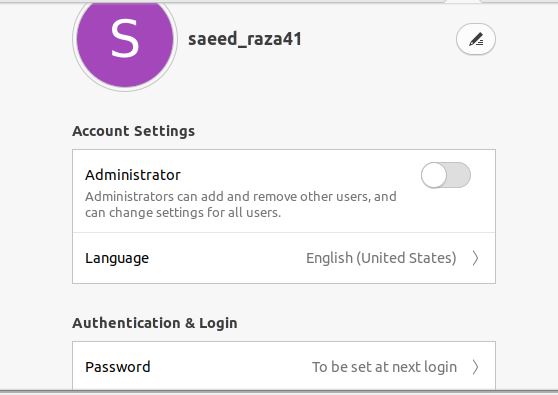
Step 5: Now, saeed_raza41 is a new user that we successfully created. You can change the account setting if you want. Consider the given figure:
Conclusion
This manual explains how to create a user in Linux. Here, we have gone through the process of creating a user in Linux in two different forms: a shell/terminal user and a GUI user. Users and administrators who frequently handle the users and user sets in the Linux terminal must become proficient with the useradd command. One of the many benefits of adopting Linux is the multi-user access, and you have already mastered the first step in it.


