The SCP Command in Linux in Ubuntu 20.04
To copy files between servers securely, use the Linux system’s SCP (secure copy) command. File transfers can be made securely using the SCP command, or secure copy, between a local server and a remote server or between two distant servers. The Secure Shell (SSH) protocol utilizes verification and security mechanisms. The advantages of SCP are its availability, simplicity, and security. The following syntax is generated when you run the SCP command on your Ubuntu terminal.

This is particularly helpful as an alternative for FTP, which is by nature insecure. The encrypted copy protocol also simulates standard command-line and SSH functions to establish a smooth command set for handling files between Linux workstations.
How To Give the SCP Command on Linux in Ubuntu 20.04
Using examples, you will discover how to utilize the SCP command in Linux in this manual. Learn about the different options you can apply with this command by following the instructions below.
Example 1
In this example, we are creating a directory on the remote server where we can easily copy the files.

We have called the SSH command and provided the remote server name “linux_user” along with the IP address. Then, we have the mkdir method, which helps us to create the directory. Also, we have the “-p” flag after the mkdir. The functionality of the “-p” flag is that if the parent directory is not present, the -p option creates it. Then, we specified the path to the directory where the files are copied. The password is required to access the remote server. After then, the path directory is created.
Example 2
We have defined the directory of the remote server. Now, transfer the single file from a local server to a distant server.

The previous SCP command is deployed to copy the specified file to the remote server. The command includes the file name “index.php” placed on the local server side, the remote server name, and the directory where the file will be copied. When the command runs, it asks for the password of the remote server side. Hence, the file is copied successfully, as shown on the prompt.
Example 3
SCP enables you to copy multiple files with a single command. For instance, the following command copies “.txt” files from a local server to a remote server:

Here, we have provided two “.txt” files with the path of the folder in which these files are kept. These files copy to the remote server side upon executing the command.
Example 4
SCP can securely copy directories and files to and from other servers. A sample directory can be recursively copied to a distant server using the following command:

We have provided the SCP keyword. After that, the -r flag is used for files to be copied recursively. Then, we have defined the directory name “Data_Folder” and the remote server name with the specified path name where the file will be placed. After we provide the password, all the files in the folder are successfully copied to the remote host.
Example 5
When using SCP in quiet mode, no progress bar or non-error messages are displayed in the output. You must include the -q option to accomplish this as shown in the following image:

We have deployed the “-q” flag after the SCP. Notice that when we provide the password for the remote server, no progress bar for copying files is displayed. This way, the “-q” flag works with the SCP.
Example 6
When you add the -v option to SCP, the debug level is set to 2, enabling verbose mode. Using this, debugging data is printed in the output, which might be helpful for troubleshooting. To activate the verbose mode, follow the instructions below and add the -v flag after SCP:
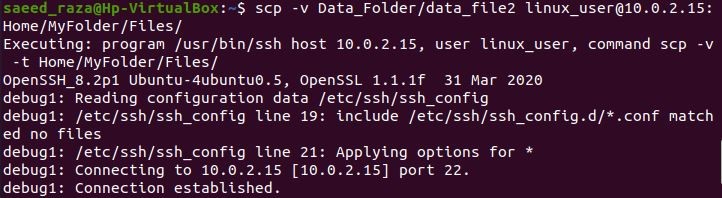
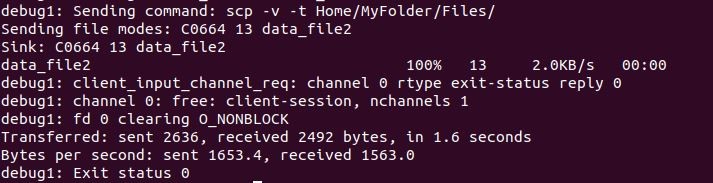
As we have defined the “-v” flag just after the SCP. So, this generated the details of the SCP process upon the execution of the command. Also, it shows the progress bar of the file copied to the remote server.
Example 7
Another practical option is to use the -l parameter to restrict the amount of bandwidth the SCP command uses. To stop SCP from consuming all available bandwidth while copying large files is extremely helpful. You must indicate the quantity in Kilobits/s when limiting bandwidth.

We have set the bandwidth to 800 after the “-l” flag in the above command. The bandwidth 800 is equal to the 1 kbps as 1 byte is equal to 8 bits and 8 into 100 equal 800.
Example 8
Add the -C flag, which compresses the file as it is being transferred, to accelerate file transfers between servers. The file recovers to its original size once it arrives at its destination.

With the SCP keyword, we have deployed the “-C” option to faster transfer files to the remote server. Then, we assigned the path and file name to be copied to the remote server specified path. The destination files’ progress is indicated by a progress bar.
Example 9
Using the -4 or -6 characteristic, you can have SCP use only IPv4 or IPv6, depending on your requirements. Running the following command would copy an example file using IPv4 exclusively from a local machine to a remote host as shown in the following image:

Conclusion
The SCP command has been covered in this guide. You have gained knowledge about the SCP command and how to use it to send files securely. It’s an excellent tool to be aware of when an SSH connection exists between your local machine and a distant server. It is most likely among the most straightforward and painless approaches to swiftly copying files to or from a distant server. You can always establish RSA key authentication to make things even more practical. This will completely get rid of the password prompt and boost security.