How to Create a Table in MariaDB?
To demonstrate the method of creating a table in MariaDB, we will be using an example in which we will create a table of students with the attributes “name” and “age”. The exact steps are:
Step # 1: Access the MariaDB Console:
To access the MariaDB console, you need to run the following command:
![]()
Step # 2: Display all the Databases:
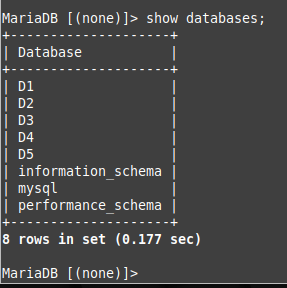
Now, you need to choose the MariaDB database in which you want to create the table. For that, you can take a look at all the existing databases by executing the query shown below:
The following image shows all the databases of our MariaDB server:
Step # 3: Switch to the Desired Database:
We want to create a table within the database titled “D1”. Therefore, we need to switch to that database first by executing the query shown below:
The following output implies that we have successfully switched to the target database.
Step # 4: Create a Table within the Desired Database:
Now, for creating a table within this database, we have executed the query shown below:
This query will create a table named “student” within the database “D1” having two attributes: name and age. Moreover, it will set the “name” attribute as the primary key for our table.
The following output shows that our table has been created successfully.
Step # 5: Confirm the Creation of the Table:
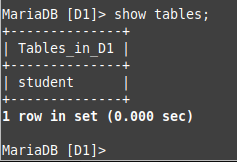
We can confirm the table creation by running the command shown below:
This command is used for listing down all the tables of the current database.
Since we only had one table within our target database, therefore, the name of that table appeared in the output of this query as shown in the following image:
Step # 6: Check the Table Description:
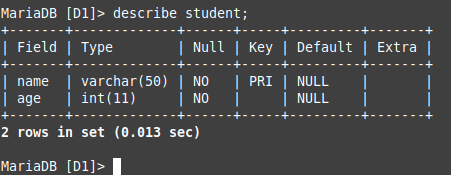
Additionally, you can also check out the structure of the newly created table by running the query shown below:
The structure of our table is shown in the following image:
Step # 7: Insert Some Records in the Table:
Now, we will try to insert some records in this table with the help of the query shown below:
The following output shows the confirmation of this insertion:
In the same manner, we will add another record to this table with the help of the query shown below:
The following output confirms the insertion of the above-mentioned record:
Step # 8: Display all the Records of the Table:
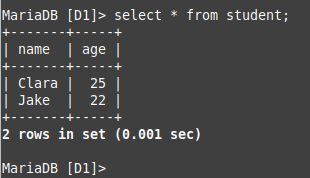
Finally, we will use the query shown below to display all the records of the table to confirm if all the records have been inserted successfully in our table or not.
All the records of our table are shown in the following image:
Pro-Tip:
As a pro-tip, we would like to share with you how you can remove a particular table from a MariaDB database. All you need to do is to execute the query shown below:
This query will simply drop the “student” table from our “D1” database as shown in the following image:
You can re-confirm the deletion of this table by executing the “show tables” query again. The output shown below implies that our specified table has been dropped successfully:
Conclusion
This article provided a thorough explanation of creating a table in MariaDB. Following the same lines, you can create as many tables as you wish. Moreover, you can also remove any desired table by following the pro-tip that we have shared in this tutorial.


