Before taking a look at the use of the “chsh” command of Linux, we will have to make our system fully updated and upgraded with the new features and make it error-free. For that, you need to open the Linux shell on your screen after the successful login. You can use the Ctrl+Alt+T for that. After the launch of the Linux shell, we will be using the apt package to use the “update” and “upgrade” commands combined in the query area. Use the “&&” operator to merge both commands. Also, don’t forget to use the “sudo” keyword to run this query with administrator privileges. After the execution of this combined query, it will be asking for your root password and you need to add the passcode to continue it. The process will be started and may take up to 5 minutes if you haven’t already updated your system.
![]()
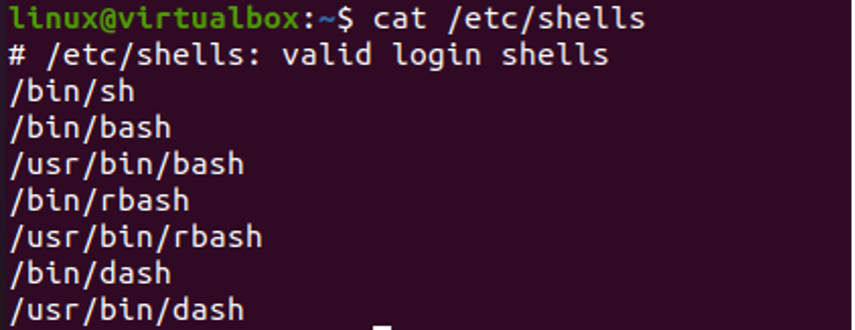
After the full-fledged update and upgrade of our system, it is ready to deliver bug-free outputs. Before using the chsh command to switch between the shells, we need to take a look at all the available shells for our Ubuntu 20.04 Linux operating system for the particular user. For this, you need to use the “Cat” instruction to display all the login shells available in our system followed by the path to the shells folder (i.e., “/etc/shells”.) You will be demonstrated with all the available login shells. For instance, we have found the shown-below 7 shells available in our Linux system and we can switch between them.
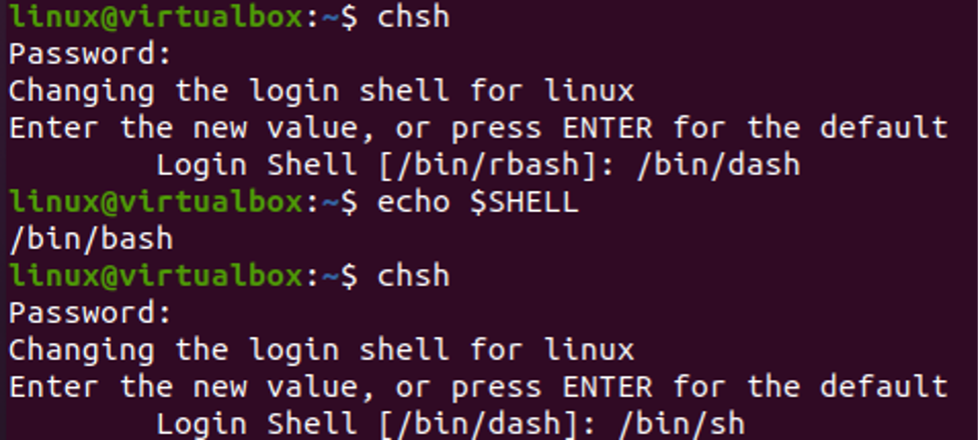
As we wanted to use the “chsh” command to switch between different shells of Linux, it is required to take a good look at the currently running shell. For this, you need to use the “echo” instruction to display the currently logged-in shell via the environment variable “SHELL” using the “$” sign. The execution of this SHELL instruction is displaying that the currently logged-in user has been using the “/bin/bash” shell at our end.
Let’s try out the “chsh” command to discuss its usage. So, we have tried it solely and it has been asking us for the password of the current login shell “/etc/bash” for the currently logged-in user “Linux”. We have added the password and pressed the Enter key to move ahead. You will see that it will be displaying “Changing the login shell for Linux” at our “chsh” shell output. After that, it also demonstrated that, if you want to switch to another bash, just add its value or press Enter to continue using the default login shell. So, we tapped the Enter key to continue using the default “/bin/bash” shell. So, after trying the environment variable “$SHELL” echo command within the query area again, we have the same default value for the login shell.
You can also try out the chsh command with the logged-in username to only change the particular user’s login shell. So, we have tried the “chsh” command with the “Linux” username and pressed the Enter key to continue using the default “/bin/bash” shell.
Using the “echo” statement with the environment variable again, we have to know that the Linux user is at the same “/bin/bash” login shell.
You can try out different options with the chsh command to change one login shell to another for the currently logged-in Linux user. For instance, the “-s” option is widely known as the option to switch one login shell to another for a particular Linux user. You need to provide the login shell pathname in this instruction after the “-s” option to switch the already logged-in shell (i.e., “/bin/bash” to the new one “/bin/rbash”.) It may imply your current user password to continue this update. After this, we have tried the environment variable “$SHELL” instruction once again with the “echo” keyword to display the changes. But it will be displaying the old login shell pathname on our output screen.
We need to use the “chsh” command again to see if the shell got updated or not. After adding the password, it displayed the new login pathname “/bin/rbash” at the last line after the title “Login Shell”. This means that the login shell has been successfully switched from “/bin/bash” to “/bin/rbash”. Now, we have been switching the “/bin/rbash” shell to the new login shell (i.e. “/bin/dash”) within the same output after it asked for the new value for the login shell. So, we have provided the value “/bin/dash” and pressed the Enter key. The use of the “$SHELL” variable within the “echo” command is again displaying the old pathname “/bin/bash” for our Linux user. But after using the “chsh” command in the next query line, we have got the “/bin/dash” login shell pathname after the title “Login Shell”. You can now switch it again if required.
While, when you try to switch to the unavailable shell, the chsh command will display a warning.
Conclusion
This article is about the use of shells and switching between different shells of Linux via the chsh instruction. We have discussed some of the instructions at our shell with the “-s” option and the “echo” environment variable commands to see the usage of the “chsh” query.


