This article will explain to you how to use the dig command in Linux with the help of some examples.
How to Use the Dig Command in Linux?
Dig command is included by default in all modern Linux distributions. So, verify the installation of the dig command by using this command:
The following output should display on the terminal window:
If you receive an error “dig command not found,” then install it by running the following command:
Dig Command for DNS Lookup
Dig command can use with different options. When you use the dig command to query a single domain name without any additional options, the dig command displays the simple verbose the following form:
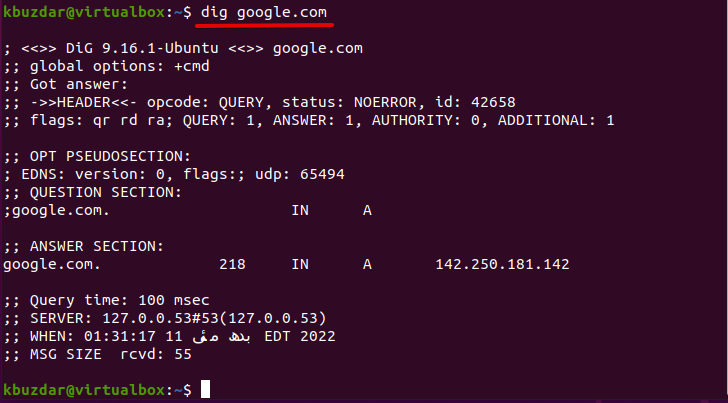
For example, we want to search for a domain name ‘google.com’. In this case, the above command will use in the following order:
If we analyze the output, it contains different kinds of information.
- The first line of your output displays the dig command version and queried domain name. The next or second line shows that the global option by default is +cmd.
- The header section displays the answer details received from the requested DNS server.
- The OPT PSEUDOSECTION section displays the EDNS (Extension system for DNS), Flags, and UDP packet size.
- The answer section shows the details about the requested domain name in the first column. The second column shows you the query type (IN=internet), and the third column displays the record (A = Address) type.
Dig Return All Records
Dig command allow us to return all records of the query. Use the ‘Any’ option to return all records for a specific domain by running this command:
Query Record Types
By default, dig returns all ‘A’ type records on querying a specific domain name. Using the dig command, you can also display the specific type of records on the terminal by using the following options:
Options Purpose
CNAME To retrieve alias domain names
MX To display a list of all mail servers for a requested domain name
NS To search for the authoritative name servers for the requested domain
TXT To retrieve all the TXT records for a requested domain
Display Short Answer
Use the ‘+short’ option with the dig command to get the short answers for a query domain.
Display Detailed Answer
When you use the options ‘+noall’ and ‘+answer’ with the dig command, it returns the detailed answers. The ‘+noall’ option turns off all results, and ‘+answer’ turns on the answer section.
Dig Query for Specific Name Server
Dig uses the local configurations to decide which name server is to search if no name server is mentioned. You can also specify the name server IP address or hostname with @ symbol against which you want to execute your query. For example, here, we want to query the Google’s name server using the following command:
Search for Batch Domain Names
You can query for a large number of domains using the dig command. Add all domain names (one domain name per line) and use the -f option with the file name query_domain.txt.
linux.org
linuxhint.com
linuxways.net
[/c]c
For example, we want to query the multiple domain names listed in a query_domain.txt file.
[cc lang="dart" width="100%" height="100%" escaped="true" theme="blackboard" nowrap="0"]
$ dig -f query_domain.txt +short
Manage Dig Configuration
The dig command behavior can be controlled using the ~/.digrc file. For example, if you want to display the dig command’s answer section, make the following changes in the ~/.digrc file.
+noall +answer +nocmd
Save changes and again run the dig command for the specific domain name.
Conclusion
In this article, we demonstrated the uses of the dig command with the help of different examples. Dig command (DNS Lookup) is helpful for Linux administrators to find the domain name servers. We have a basic understanding of returning all records using the Dig command. I hope the above examples and information will be helpful for you. Thanks!


