System Update and Upgrade
So, let’s make a start by opening the Ubuntu 20.04 shell application using the shortcut “Ctrl+Alt+T”. We will be starting with the system update first. To make your system up to date, we need to use the “apt” package within the update instruction on the shell and execute it with the sudo rights. It will make your system updated in a few seconds as per the command shown.
![]()
After an update, the upgrade is required using the shown below “apt” package in the upgrade command. You can utilize the upgrade command along with the update command to perform both processes at the same time. The instruction is written in the below attached image.
While installation, it requires your confirmation again by showing you’re the actual space it takes to process this command. You have to press “Y” followed by the Enter key as shown.
Checking Log4j Vulnerability
Before going further, we need to make sure that Log4j is installed on our system and also its vulnerability. You can try out different commands to do so. We have been using the keyword “apache-log4j2” within the apt list instruction to show the installed versions of Log4j. This time, we have to add our sudo password. We have been specifying the “log4j2” in the command, which is the standard library package for apache. On execution of this command and adding the sudo password, it only shows “Listing… Done”. This means, the Log4j is not installed on our Ubuntu 20.04 system yet and our system is not vulnerable right now. The instruction is written in the below attached image.
Install Log4j
After checking its vulnerability, we need to install the Java Log4j library on our system. There are many different ways to do so by command. The very first method is the use of the “liblog4j2-java” keyword within the “apt” installation command. It will install the Log4j any edition from its version 2. It’s all up to you whatever version you want to install. So, after running the below-shown instruction, the Log4j library for java has been started to process. The instruction is written in the below attached image.
It will pause the processing and let you know about the space it contains after the installation. Thus, it requires your confirmation to proceed. Tap “y” to continue it.
It will take up to 2 or 3 minutes to complete the installation process in Ubuntu 20.04 system according to your system and internet speed. After completion, you are good to go.
You can also install version 1 of Log4j using the below instruction. The instruction is written in the below attached image.
Check Log4j Version
Now after the installation is completed, we need to check out the installed version of Log4j on our system and its vulnerability as well. For that, we need to make use of the “apt list” instruction on the shell along with the name of a library as “liblog4j2-java” as shown in the image below. The output is showing “Listing… Done”, and after that, it is showing the installed version of Log4j2 in our system i.e., version “2.17.1-0.20.04.1”. Within the square brackets “[]”, we have got the message “installed”. This means the installation of the Log4j library has made our system vulnerable and we should avoid installing it. It is also showing the additional version “2.1.2-1” installed on our system and does not show any message in the square brackets. This means the second version is not vulnerable to the system. The instruction is written in the below attached image.
The installed version 1 of Log4j can be found using the apt list command again. The instruction is written in the below attached image.
There comes another bash script that can be used to find out all the installed versions of Log4j and its vulnerability as well. You can use the below-shown script on your bash file as well.
Run this file with the “bash” instruction to check the vulnerability of Log4j. The output will show you all the installed versions of the library and its related packages as below.
Remove Log4j
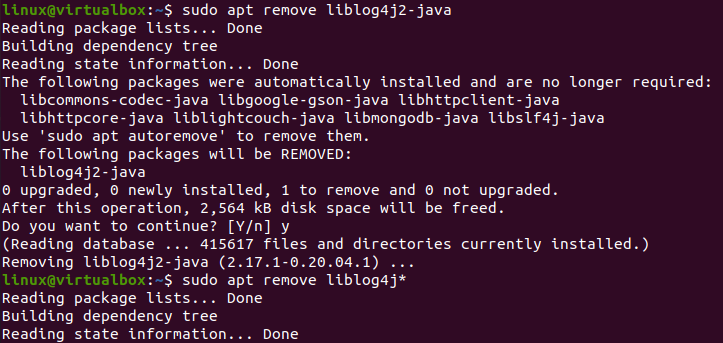
If your system is vulnerable due to the installation of the Log4j library, you must remove it from the system as quickly as possible. To do that, you have to make use of “apt” remove instruction along with the library name as shown below.
It will show you the package to be removed and ask you to affirm the removal process. Tap “y” to continue and it will be deleted in a few seconds.
To remove every version of the Log4j library and its related packages installed on your system, make use of the “liblog4j” with the “*” sign in the remove instruction shown below.
Conclusion
This was all about finding out the version of the installed Log4j library of Java on the Ubuntu 20.04 system. For this, we have to install it on our system first and check the vulnerability of our system. In last, we have to remove it if our system got vulnerable.


