![]()
Using “Shift+dot”:
The file “new.txt” has been opened in the Normal mode of Vim. Press “I” to open the insert mode. We have added 5 lines of text in the file using the insert mode as shown in the image. After adding the text in the file, we have placed the cursor at the initial character of the first line.

Now, open the Visual block mode of Vim using the “ctrl+v” shortcut from your keyboard. Your vim editor will be converted into the Visual block mode, as revealed below. Now, press the “j” key from the keyboard to select in the downward direction or press the “k” key to select in the upward direction of text lines. As you can see, we have selected the lines in the downward direction using the “j” key in the Visual Mode highlighting the selected area.
To tab or add the indentation at multiple lines, try “shift+dot” i.e., “.” Shortcut once. You will see it will add an indentation of one character at each selected line from the start.
If you want to add indentation without stopping, then you have to try the “.” Key from the keyword after using “shift+.”. It will add the indentation from the starting point until it stops it.
Using Command “>”:
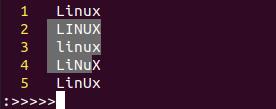
Another method to add the indentation or tab multiple lines at a time is using the command line mode of Vim. Within the insert mode, place the cursor at any line you want to tab lines, i.e., the 2nd line as shown. You need to open the visual block mode first for indentation, using the “ctrl+v” shortcut. After that, press the “next” button to select the number of characters to be indented and press “j” to cover the lines to tab along, i.e., 2 to 4.
Now, press the “:” character to add the command in the Visual mode. We have added 5 greater than characters “>” consecutively within the command line and pressed the enter button.
This time, our text at lines 2 to 4 has been tabbed 5 characters forward, as shown in the image.
Using Range Command:
Another simple and easy way to tab multiple lines in a Vim text file is using the range command in the command line. So, open the Visual block mode using the “Ctrl+V” shortcut.
Press the “:” to open the command line and add the range command. The range command contains the line number and the character “>”. So, after the “:” character uses the line number, i.e., 4, and add two characters “>>” to add indentation of two characters. Press Enter to apply the change. You can see the output is showing the indentation of two characters in line 5.
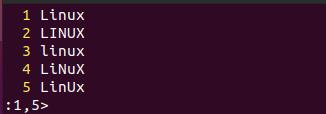
This was all about adding the indentation at a single line. Let’s tab multiple lines using the range command. So, update the file to its last appearance, as shown below. Now within the command line, add the line range to tab multiple lines. The number 1 states the starting line, and the number 5 states the end line to be tabbed separated by “,” comma. Now add the “>” character to specify the number of characters to indentation, i.e., 1. Press Enter and see the changes.
The output below shows the indentation of 1 character for all 5 lines at the same time.
Let’s tab the multiple lines at once with the indentation of 10 characters. So, we have added the range command starting from 1 to 5 and added 10 “>” characters for indentation. Press the Enter key to apply the range command on the text within the Visual block mode.
The lines from 1 to 5 have been shifted 10 characters forward at once using the above range query in the command line. The output is shown below.
Undo the last action you had performed using the “u” key from the keyboard. You can comprehend that the text has been placed in its older position. Now, we want to tab multiple lines at once while adding the indentation of numerous characters in the command line. So, we have added the range 1 to 5 and added multiple “>” characters followed by tapping the Enter key.
The output shows that all the lines from 1 to 5 have been tabbed 27 characters forward at once.
This was all about forward indentation or tabbing. Let’s do the backward indentation of multiple lines at once. It would be done with a minor change. Add the line range, i.e., 1, 5, in the range command. With that, replace the “>” characters with the “<” character in it and tap Enter key.
You can see that the text block will be indented in the opposite direction, and we have got the last text file appearance again in our Vim editor.
Come back to the Visual block mode and place the arrow at the initial character.
Press “:” and add “>” characters to simple indent a single line
Conclusion:
This article contains the explanation of tab multiple lines in Vim at once. We have discussed three different ways to tab multiple lines, i.e., using shift+dot, using “>”, and range command in forward and backward direction. So, this article is a bundle of all methods to perform multiple lines tabbing in the Vim editor of Ubuntu 20.04. We hope it will be helpful to every user.


