Once a table has initialized in a specific user session, only that user can view, edit, or delete the table. Other logged-in users have no access to it. Once a session dies, MySQL automatically drops the table and the data stored in it.
In this tutorial, we will quickly discuss how you can create and use the MySQL temporary table.
NOTE: Support for MySQL temporary tables starts from MySQL server version 3.2 and above. If you are using an older version, you might not have access to specific features.
How to Create a Temporary Table?
The process, and syntax, for creating a temporary table are very similar to what you’ll use to create a normal table.
However, you need to specify the TEMPORARY keyword in the statement. We can express the query as:
Columns,
table_constraints
);
You can specify any table name as long as it does not conflict with the main table.
Although you can create a temporary table with the same name as the main table, that is not a good practice as it may lead to confusion and possibly data loss.
Example 1
The following query illustrates how to create a MySQL temporary table and store data in it.
Start by logging in to a MySQL session:
Once logged in, create a sample database:
In the next step, change the database and create a temporary table using the query:
CREATE TEMPORARY TABLE temp_tb (id INT AUTO_INCREMENT PRIMARY KEY, username VARCHAR(100) NOT NULL, email VARCHAR(255));
Once you create a temporary table, you can insert and update the data stored on it using the same process used to populate and update a normal MySQL table.
For example, use the queries below to insert sample data to the temp_tb created above:
VALUES ('t00r', '[email protected]'),
('db_user', '[email protected]'),
('z3ro', '[email protected]');
Once you have data, you can select values from it using a normal SQL SELECT statement:
+----+----------+----------------+
| id | username | email |
+----+----------+----------------+
| 1 | t00r | [email protected] |
| 2 | db_user | [email protected] |
| 3 | z3ro | [email protected] |
+----+----------+----------------+
3 rows in set (0.00 sec)
Example 2
A more common use case of the MySQL temporary tables is to store values from another table, which can be useful, especially when you have a long script accessing the database; preventing other queries from occurring.
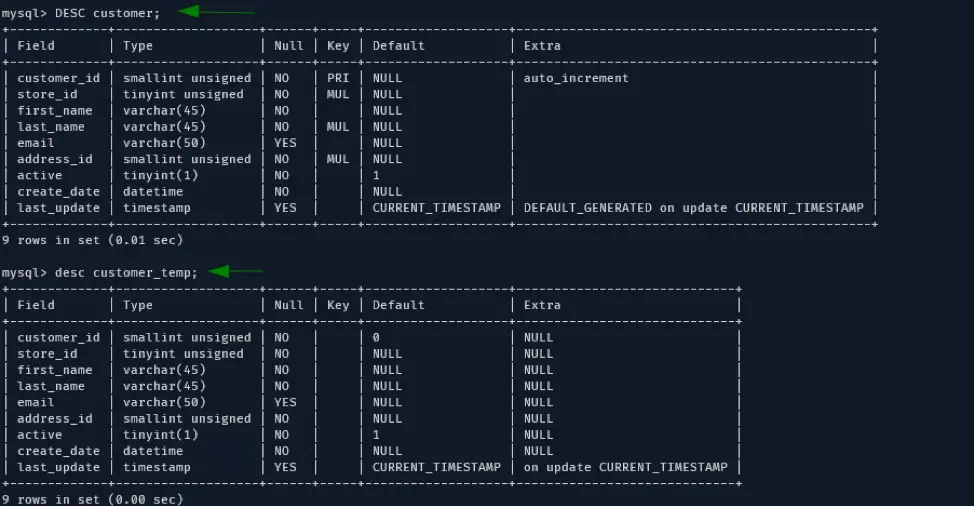
Let us consider the sakila sample database. We can create a temporary table based on the customer table using the query:
Once in the database, use the query below:
Once the query has been executed successfully, you can verify that the tables contain similar information using a DESC statement as:
How to Rename a Temporary Table?
Unlike a normal MySQL table, you cannot use the RENAME statement directory to rename a temporary table.
To achieve this, you can use the ALTER TABLE query.
For example, to rename the temporary table from customer_temp to cust_temp; we can use the query:
How to Drop a Temporary Table?
To drop a temporary table, use the DROP TEMPORARY TABLE statement. Using the TEMPORARY keywords ensures that you don’t accidentally drop a normal table.
To Recap
A MySQL temporary table allows you to store information temporarily for a single user session. The following are properties of MySQL temporary tables:
- We create them by specifying the TEMPORARY keywords.
- They do not exist outside a single user session.
- They are volatile and dropped after a user session dies.
- They function similarly to a normal MySQL table.
- They can have similar names to the main table (not recommended).
- Two tables within a single user session cannot contain a similar name.
That is it for this one!

