Prerequisite:
The Linux environment is necessary to run these commands on it. This will be done by having a virtual box and running an Ubuntu in it.
Linux provides the user information about the head command that will guide the new users.
Similarly, there is a head manual as well.
Example 1:
To learn the concept of the head command, consider the file name data2.txt. The contents of this file will be displayed using the cat command.
Now, apply the head command to get the output. You will see that the first 10 lines of the file’s content are displayed while others are deducted.
Example 2:
The head command displays the first ten lines of the file. But if you want to get more or less than 10 lines, you can customize it by providing a number in the command. This example will explain it further.
Consider a file data1.txt.
Now follow the under-mentioned command to apply on the file:
From the output, it is clear that the first 3 lines will be displayed in the output as we provide that number. The “-n” is mandatory in the command, otherwise,90l;…. it will show an error message.
Example 3:
Unlike the earlier examples, where whole words or lines are displayed in the output, the data is displayed corresponding to the bytes covered on the data. The first number of bytes is displayed from the specific line. In the case of a new line, it is considered as a character. So it will also be considered as a byte and will be counted so that the accurate output regarding bytes can be displayed.
Consider the same file data1.txt, and follow the below-mentioned command:
The output is describing the byte concept. As the number given is 5, the first 5 words of the first line are displayed.
Example 4:
In this example, we will discuss the method of displaying the content of more than one file by using a single command. We will show the usage of the “-q” keyword in the head command. This keyword implies the function of joining two or more files. N and the command “-“ is necessary to use. If we don’t use –q in the command and only mention two file names, then the result will be different.
Before Using –q
Now, consider two files data1.txt and data2.txt. We want to display the content present in both of them. As the head is used, the first 10 lines from each file will be displayed. If we don’t use “-q” in the head command, then you will see that the file names are also displayed with the file content.
By Using -q
If we add the keyword “-q” in the same command discussed earlier in this example, then you will see that the file names of both files are removed.
The first 10 lines of each file are displayed in such a way that there is no line spacing between the content of both files. The first 10 lines are of data1.txt, and the next 10 lines are of data3.txt.
Example 5:
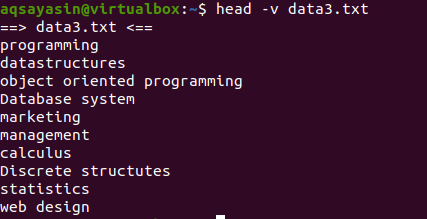
If you want to show the contents of a single file with the name of the file, we will use “-V” in our head command. This will show the filename and the first 10 lines of the file. Consider the data3.txt file shown in the above examples.
Now use the head command to display the file name:
Example 6:
This example is the use of both the head and the tail in a single command. Head deals with displaying the initial 10 lines of the file. Whereas, tail deals with the last 10 lines. This can be done by using a pipe in the command.
Consider the file data3.txt as presented in the screenshot below, and use the command of head and the tail:
The first half head portion will select the first 7 lines from the file because we have provided the number 7 in the command. Whereas, the second half portion of the pipe, that is a tail command, will select the 4 lines from the 7 lines selected by the head command. Here it will not select the last 4 lines from the file, instead, selection will be from the ones that are already selected by the head command. As it is said that the output of the first half of the pipe acts as an input for the command written next to the pipe.
Example 7:
We will combine the two keywords we have explained above in a single command. We want to remove the filename from the output and display the first 3 lines of each file.
Let’s see how this concept will work. Write the following appended command:
From the output, you can see that the first 3 lines are displayed without the filenames of both files.
Example 8:
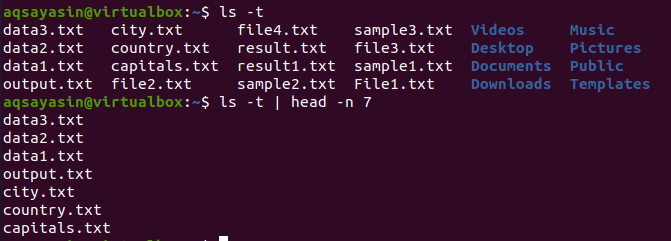
Now, we will obtain the most recently used files of our system, Ubuntu.
Firstly, we will get all the recently used files of the system. This will also be done by using a pipe. The output of the below-written command is piped to the head command.
After getting the output, we will use this piece of command to get the result:
Head will show the first 7 lines as a result.
Example 9:
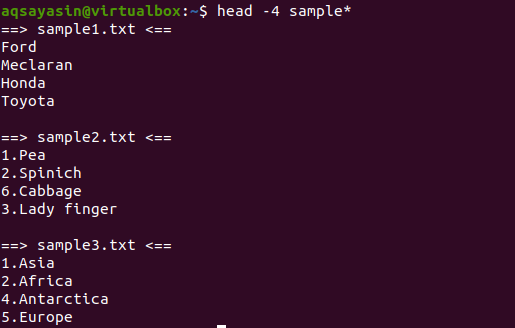
In this example, we will display all the files having names starting with a sample. This command will be used under the head that is provided with -4, which means the first 4 lines will be displayed from each file.
From the output, we can see that 3 files are having the name starting from the sample word. As more than one file is displayed in the output, so each file will have its filename with it.
Example 10:
Now if we apply a sort command on the same command used in the last example, then the whole output will be sorted.
From the output, you can notice that in the sorting process, space is also counted and is displayed before any other character. The numeric values are also displayed before the words having no number at the start.
This command will work in such a way that the data will be fetched by the head, and then the pipe will transfer it for sorting. Filenames are also sorted and are placed where they are to be placed alphabetically.
Conclusion
In this aforementioned article, we have discussed the basic to complex concept and functionality of the head command. Linux system provides the usage of the head in various ways.


