Prerequisites:
Before starting the steps of this tutorial, the following steps will be required to complete.
Enable the SSH service on Ubuntu if it is not enabled before.
Generate the SSH Key pairs to execute the commands in the remote server. Run the following command to create the public key and the private key. The private key will be stored in the remote server, and the public keys will be stored in the client securely.
Run the following command to open the sshd_config file using nano editor to add some necessary configurations.
Add the following lines in the file to enable the root login and password-based authentication.
PermitRootLogin yes
Run the following command to restart the SSH service.
Syntax:
The syntax of the ssh-copy-id command is given below. It supports multiple options, which are explained later.
Different options of ssh-copy-id command:
The purposes of using different options of ssh-copy-id commands have been described in this part of the tutorial.
| Option | Purpose |
| -i keyfile | It is used to copy the public key that is stored in a file. It can be used multiple times. |
| -l | It is used to copy the keys currently held by the ssh-agent. It uses as the default if the -i option is not specified. |
| -o ssh-option | It is used to pass the option directly to ssh. It can be used multiple times. |
| -p port | It is used to connect with the specified port on the remote host instead of the default port that is 22. |
| -v | It is used to pass the value of -v to ssh. |
Copy key to the server:
You have to authorize the public key in the server machine for establishing the SSH connection without using any password. After creating the public key, the ssh-copy-id command can add the key as an authorized key on the server machine.
Run the following command from the server machine to add any newly created public key as an authorized key of the server.
The following output will appear if the public key already exists in the remote server; otherwise, the key will be added.
It is mentioned before that the -i option is used with the ssh-copy-id command to add the public key from the file. If you stored the newly created public key in the default file, the file name would be id_rsa.pub. But you have set any file name when creating the key pairs, then use that filename with the -i option. I have stored the public key in the default file.
Run the following command from the server machine to add the public key to the server machine. The command will copy the key to the server and configure it to add the key to the authorized_keys file to access the server.
The following output will appear if the public key didn’t add before into the server machine.
Check the connection:
After adding the key to the server, you have to check whether the client machine can connect with the server. The username of the server machine is ‘fahmida,’ and the client machine is ‘yesmin’ here. So, log in to the client machine first to test the connection.
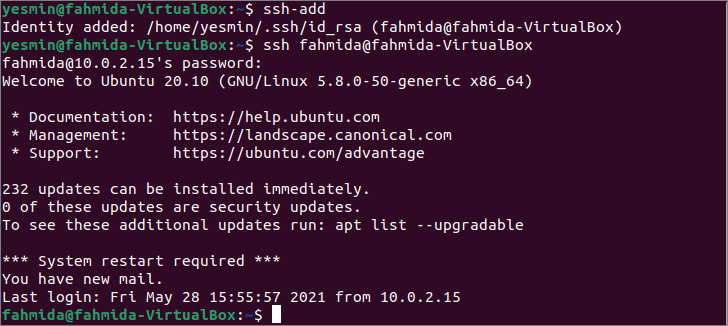
Run the following command to add the identity of the server to the client machine.
Run the following ssh command without any option to establish a connection with the server machine. If password-based authentication is enabled in the server machine, the user must provide a valid password to establish a connection with the server.
The following output shows that the identity of the server has been added to the client machine. Next, the password of the server’s user has asked for the connection because the password-based authentication has been enabled in the server machine here. The username is changed to ‘fahmida’ from the ‘yesmin’ in the command prompt that indicates the connection has been established properly after giving the valid password.
If you want to mention the public key’s filename with the location for establishing the connection with the server, then run the following ssh command with the -i option. It will require if you store the public key in the user-defined filename. I have used the default file name at the time of key generation that is id_rsa.
It will ask for the password like before to establish the connection with the server. The output shows that the connection has been established properly, and the username of the command prompt has changed. You can change the server’s configuration file to disable the password-based authentication if you don’t want to provide a password whenever you want to connect with the server.
Conclusion:
The uses of the ssh-copy-id command to connect with the remote host have been described in this tutorial by using two user accounts of the local host to help the readers to know the function of this command properly.


