Prerequisites
SSH server is not installed on Ubuntu by default. You have to install the OpenSSH package that will work as an SSH server before starting this tutorial. Run the following command to install the OpenSSH server if it is not installed in the system before.
Generate an SSH Key
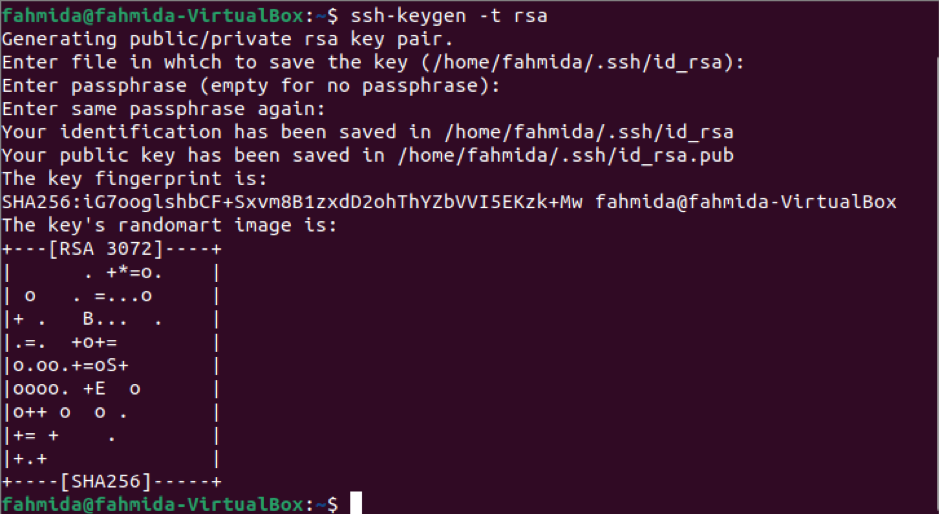
Generate the SSH Key pairs to execute the commands in the remote server. Run the following command to create the public key and the private key. The private key will be stored in the remote server, and the public keys will be stored in the client securely.
After executing the above command, it will ask the file name where the key will be stored. Press the Enter key to keep the default file name of the public key that is id_rsa.pub. Next, it will ask for the password to log in. Again, press the Enter key two times if you want to keep the empty password. The following similar output will appear after generating the keys.

Create the authorized_keys file
id_rsa.pub file contains the public key of the SSH connection stored in the ~/.ssh/ folder of the remote host. The client machine will also require the public key to connect with the remote host copied in the next part of the tutorial. You have to create the file named authorized_keys inside the ~/.ssh folder of the remote host that will contain the public key. Run the following command to move the id_rsa.pub file to the ~/.ssh/authorized_keys file.
No error will appear if the file is moved properly, like the following image.
Modify the configuration file
You have to set some configuration parameters in the server machine to make the SSH connection without any password. Run the following command to open the sshd_config file using nano editor to set the necessary parameter values.
Set the value of PasswordAuthentication to no to disable the text password option for the SSH connection.
PasswordAuthentication no
Save and close the file. Run the following command to restart the SSH service.
Run the following command to set the permission bits for the authorized_keys file to prevent unauthorized access of this file.
Copy the Public key in the client machine
Now, log in to the client machine from where you will execute ssh command to make an SSH connection with the remote host. Here, two user accounts of Ubuntu have been used to check the SSH connection in the local server. One user account has been used as a client, and another user account has been used as a server in this tutorial.
Run the following command to create a folder named ~/.ssh in the client machine if it does not exist.
Run the following command to copy the public key from the remote host to the ~/.ssh folder of the client.
You have to provide the password of the username of the remote host for copying the public key to the client machine. You will get the following output if the file is copied properly. The client machine is now ready to make the connection with the server machine using ssh service.
Logon to server machine using SSH without Password
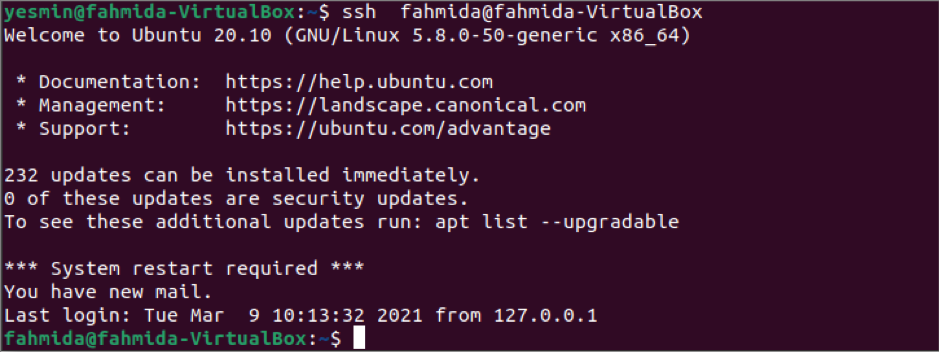
Now, the public key exists in both client and server machines. When the client machine sends the connection request to the server machine using the ssh command, the server will match the client’s public key with the server’s public key. If the matches are found, then the connection will be established from the client to the server. You can connect to the server or the remote host by using the hostname or IP address. The local server has used this tutorial to show the use of the authorized_keys to establish the SSH connection from the client machine to the server machine. One account has been used as a server machine where the OpenSSH server is installed, and another account has been used as a client machine here. Run the following command from the client machine to establish a connection with the server machine.
The following output will appear after executing the above command. The output shows that the username of the client machine is ‘yesmin.’ The username of the server machine is ‘fahmida.’ The SSH connection has been established properly because the username has changed to ‘fahmida’ from the ‘yesmin.’ Now, the content of the server machine can be accessed easily. If the user executes any command now, the output will be generated based on the server machine.
Conclusion
The use of the authorized_keys to establish the SSH connection has been explained in this tutorial by using the localhost. You can follow the same process to make the SSH connection for the remote host. You can also use the ssh-copy-id command to make an SSH connection with the server shown in another tutorial.


