7-Zip is a file compression and management program that has command line variants which are tailored to both Windows and Linux/Mac.
Since 7-Zip is an open-source program, anyone can use it at no cost. The majority of the code is released under the GNU LGPL. It supports many formats such as 7z LZMA2, XZ, ZIP and many others. However, it only supports the unpacking operations for some formats like APFS, AR, EXT, FAt etc.
What Will We Cover?
In this guide, we will see some practical example of using 7-Zip on Linux command line.
Variants of 7-Zip
Two variations of 7-Zip for Linux and macOS are released:
1) The p7zip which is a Linux version of 7-Zip that is created by a third party.
The most recent version of p7zip is 16.02. That version is now obsolete.
2) The 7-Zip for Linux/macOS is a new package that has all the modifications from the most recent 7-Zip for Windows.
Remember that p7zip may be a better choice to implement the Linux-specific features than the latest version of 7-Zip for Linux.
In spite of its fairly simple user interface, 7-Zip’s command-line versions provide extensive configuration options through the command line arguments and flags which are detailed in the following discussions.
Installing 7-Zip on Ubuntu 20.04
There are multiple download files available on the official website to install 7zip for different systems. For example, one can see the files of different formats and for different architectures.
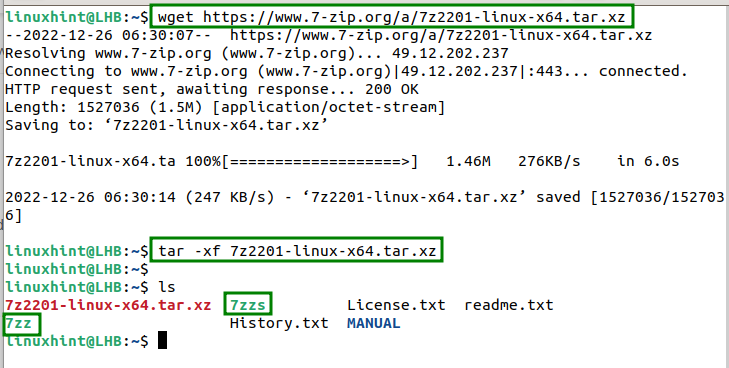
Let’s download a Linux specific file of the 7-zip console version. Also, you should check the description column, if available, for more information about a file.
Let’s proceed with the “.tar.xz” file for an x86-64-bit Linux (Ubuntu in my case). Let’s use the wget tool to retrieve this file:
We now extract the file using the tar command:
After extracting, you will see two files: 7zz and 7zzs. These two files differ in terms of system library linking.
Alternatively, we can also use the default 7-Zip application which is provided with Ubuntu’s official repository:
This way, we can use 7-Zip from anywhere on the system. However, the version of 7-Zip may not be the latest one.
Working with 7-Zip
Now that we downloaded and extracted 7-Zip on our Ubuntu machine, it’s time to look at how it works with the command line options. Let’s first understand its basic syntax.
The standard command line syntax to use to invoke the 7-Zip is “7z”. However, “7zz”, “7zr”, and “7za” can also be used. We then add the commands and parameters as follows:
Note: By default, when using the 7-Zip binary file from the command-line, 7-Zip searches for the files that you’re working with in the same folder as the program’s executable. For this reason, before starting a session, you must either copy your files into a 7-Zip’s directory or provide their complete paths in the file names.
Let’s take a simple example to see how it works. Suppose we want to create an archive file named “my_archive”. The “my_archive” should contain a “demo.txt” file and should be a password protected file.
The command in this case is as follows:
This results in a “my_archive.7z” file which is protected with a password. This contains a file called “demo.txt”.
The “-a” flag adds the file to the archive, and “-p” makes it password protected:

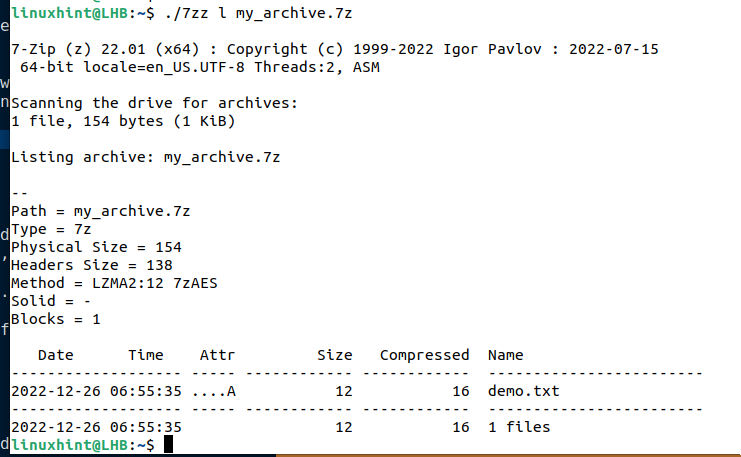
1. Listing the Files Inside the 7z Archive
Although this command should come later when you create some archives, you can, however, use it to list the entries of existing archive files:
The “-l” flag provides us with the content of an archive. Let’s take an example an archive file named “mytest.7z”. To list its contents, simply use the following command:
2. Compressing Multiple Files
Let’s now see how we can compress several files in one shot. Let’s take a test directory named “Project” that currently has four files: file1, file2, file3 and file4.
Now, to create the “test.7z” archive from these files inside the same folder, we need to execute the following command:
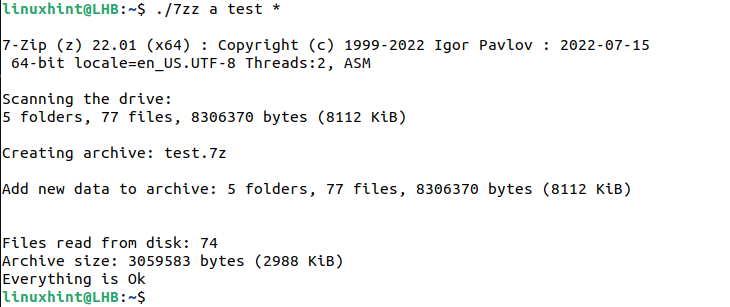
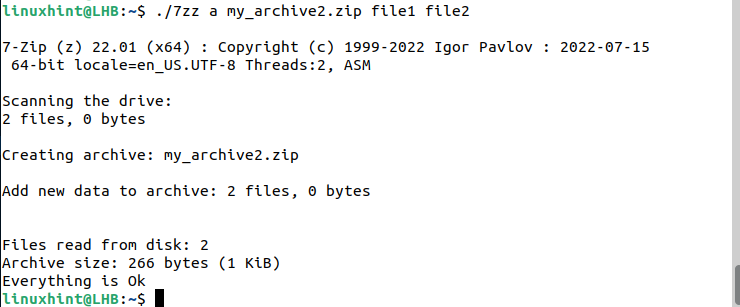
The wildcard makes it sure that all the files are compressed. Similarly, we can also select the files to compress instead of compressing all of them. For instance, we can compress only file1 and file2 as follows:
3. Extracting the Files from the Archive
Let’s now see how to extract our archive and retrieve the files. First, delete the already existing uncompressed files to avoid confusion.
The “x” flag comes in handy here. We just need to pass the target archive file as shown in the following:
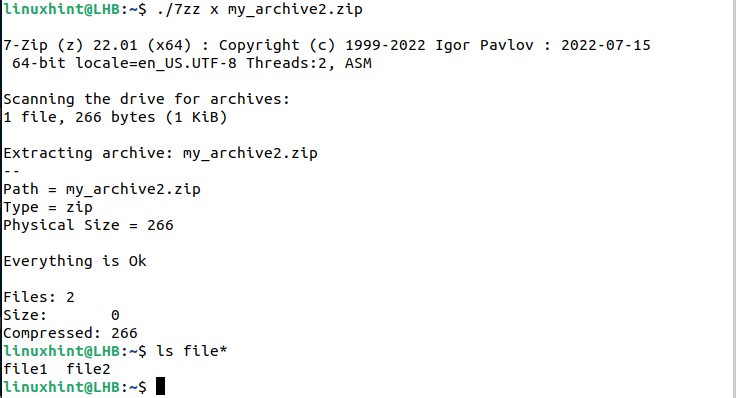
Here, we can also use the ”e” flag for the same purpose.
4. Creating a Custom Archive Format File
So far, we are mostly working with the .7z formatted files. Equivalently, we can use the 7-Zip tool to create a .zip, gzip, bzip2, and tar file. Let’s create a “.bz2” archive of file1.
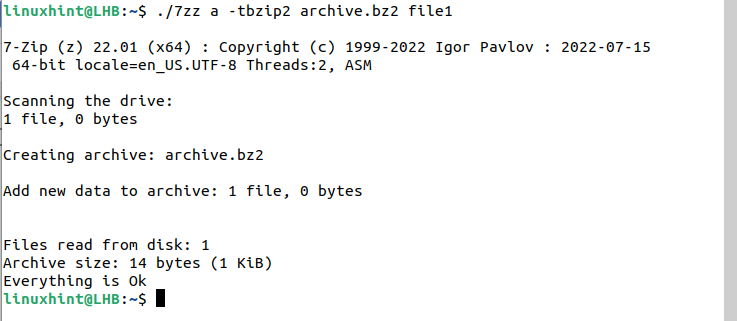
Note: Please keep in mind that some archive formats such as .xz and.bz2 only support a single-file compression at a time. However, to compress multiple files, we can first make a tar archive. Then, we can use the .bz2 or .xz compression.
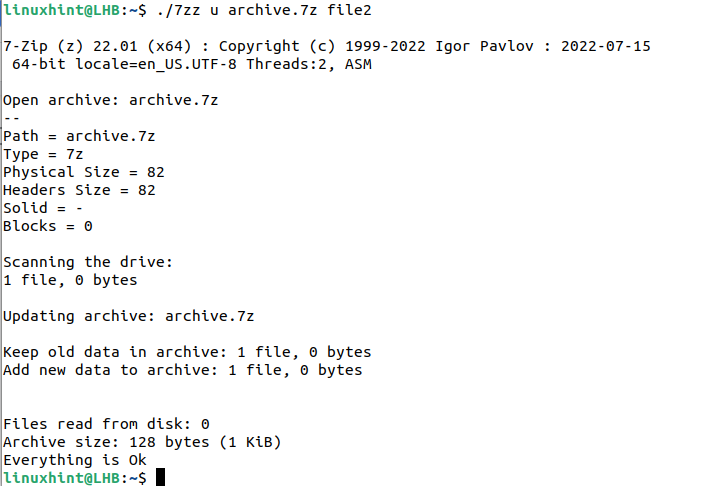
5. Adding Files to an Existing Archive
We now see how to add the files to an existing archive. Suppose we already created an archive but later discover that more files need to be added to it. For this, we may update the existing archive with the “-u” flag rather than making a new one from scratch.
Let’s add the “file2” to the “archive.7z” archive:
6. Deleting the Files from an Archive
Moving on, we can also delete some nasty files from an archive. The “-d” flag provides us with this facility, as illustrated here:
Conclusion
We covered how to use the 7-Zip tool on the command line. As you probably observed, it is fairly simple to install and use this on Linux.
However, because it does not save the file owner and group information, you SHOULD NOT USE 7-Zip for Linux/Unix backups. If you want to use 7-Zip for long-term storage or backup, you should first compress your files with tar and then compress them even more with 7-Zip.
You can always refer to the official website for frequently asked questions (FAQ), help pages, and man pages. Additionally, the tool also has a Sourceforge listing.